Backpacking on a budget doesn’t mean sacrificing quality—especially when it comes to photography. Let’s explore how to capture stunning travel moments without breaking the bank.
Understanding the Basics of Backpacking with a Budget
Why Choose Budget Backpacking?
When I first started my backpacking journey, I quickly realized that keeping my expenses low allowed me to travel more often and explore new places. Budget backpacking is not just about saving money; it’s about experiencing the world authentically. I believe that there’s something truly special about traveling on a budget. It forces us to find creative solutions and discover hidden gems that many tourists overlook. I remember stumbling upon a small local café in a quiet alley, all because I was looking for a cheaper meal instead of a tourist hotspot. Those moments are priceless.
Benefits of Traveling Light
Traveling light is one of the best decisions I made as a backpacker. It didn’t just save me money on baggage fees; it also made my journey more enjoyable. Carrying less gear means I could move freely, navigate crowded markets, and hop on and off public transport without feeling weighed down. I learned to prioritize what I really needed, which often resulted in a richer experience. For example, instead of bringing every piece of clothing I owned, I packed versatile items that could be mixed and matched. This not only lightened my load but also made packing and unpacking a breeze.
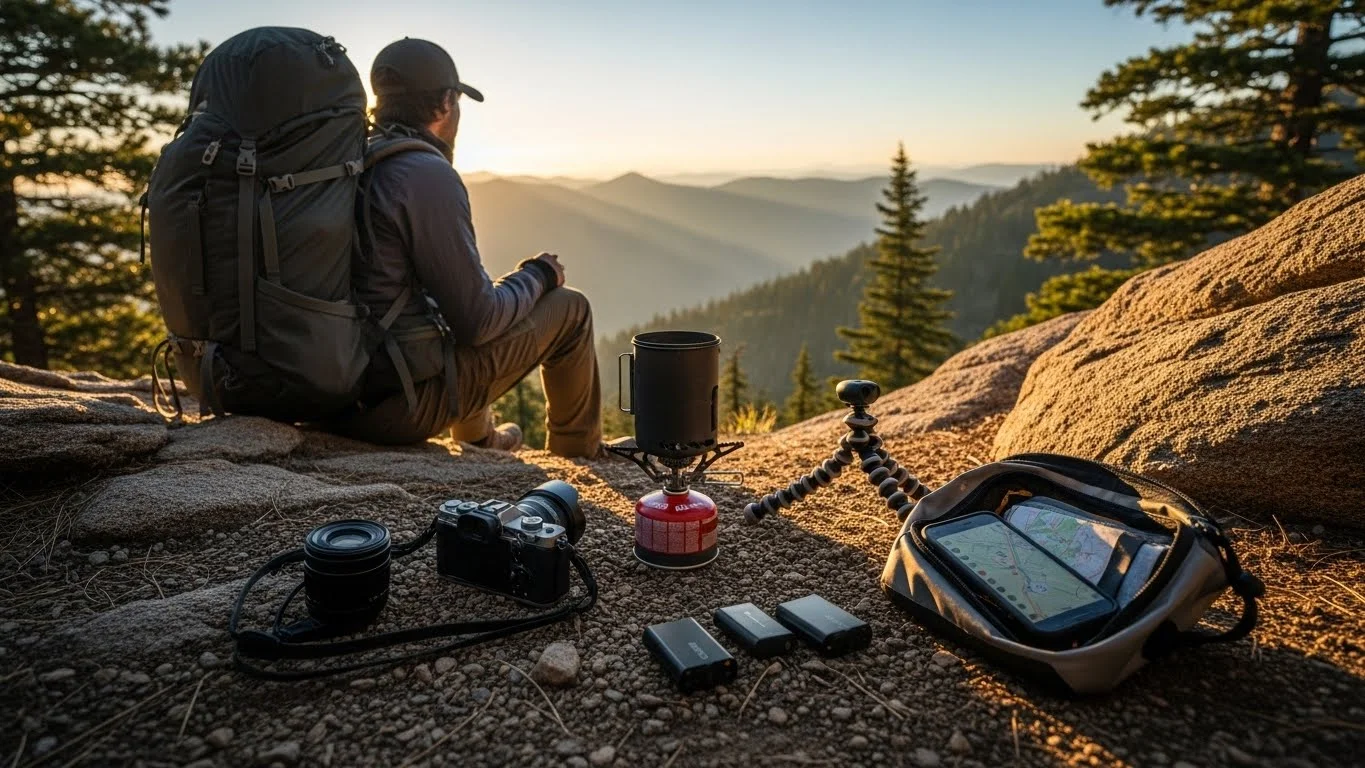
Essential Camera Gear for Backpackers
Camera Types: DSLR vs. Mirrorless vs. Point-and-Shoot
When it comes to choosing a camera for backpacking, I’ve tried them all—DSLRs, mirrorless cameras, and point-and-shoots. Each has its pros and cons. DSLRs are fantastic for high-quality images and offer great manual control, but they can be bulky and heavy. I used to lug around my DSLR, and while I got some stunning shots, I often regretted the extra weight on long hikes.
On the other hand, mirrorless cameras strike a balance between quality and portability. They are lighter than DSLRs and still provide excellent image quality. I eventually switched to a mirrorless camera, and it has been a game-changer for my backpacking trips. Point-and-shoot cameras, while not as versatile, can fit in your pocket and are incredibly user-friendly. For casual photography, I think they are a solid choice. I’ve seen friends capture amazing travel photos with their compact cameras, proving that great photography doesn’t always require professional gear. If you’re interested in learning more, check out my article on How to Choose the Right Camera for Backpacking Trips.
Best Budget-Friendly Cameras for Backpacking
Finding a budget-friendly camera can be daunting, but there are plenty of great options out there. I’ve had great success with models like the Canon EOS M50 and the Fujifilm X-T200. These cameras offer excellent image quality and are lightweight, making them perfect for backpackers. They also have a range of lenses available, allowing you to expand your photography as you grow. If you’re more into point-and-shoots, the Sony RX100 series is worth considering. They’re compact, reliable, and produce impressive images without the need for extensive setup. For more recommendations, you can refer to my post on Best Budget-Friendly Cameras for Travel Photography.
Smartphone Photography: Pros and Cons
Let’s not forget about smartphone photography! In my experience, smartphones have come a long way and are often underrated. I’ve captured some of my best travel moments using just my phone. They’re always at hand, easy to use, and often include editing features right in the gallery. However, the downside is that they may not perform as well in low light and can lack the versatility of a dedicated camera.
That said, I believe smartphones are a fantastic option for budget backpackers. They allow for spontaneous captures that you might miss with a bulky camera. Plus, you can easily share your adventures on social media or with friends and family in real time. For me, the key is finding the right balance—sometimes I carry both my smartphone and my mirrorless camera, depending on the trip’s demands.
As I prepared for my last backpacking adventure, I reflected on the importance of choosing the right camera gear. It’s not just about the equipment; it’s about how we use it to tell our story. Each piece of gear should enhance our experience and help us create memories that last a lifetime. By understanding the different camera options and what works best for my style, I felt ready to capture the beauty of the world around me. If you’re looking for a comprehensive guide, be sure to check my article on Essential Camera Gear for Backpacking Adventures.
Accessories to Enhance Your Photography
Tripods: Lightweight Options for Stability
One of the best investments I made for my photography was a lightweight tripod. I used to think tripods were just for professional photographers, but I quickly learned their value during my travels. A sturdy tripod allows for longer exposure shots, especially in low light or for capturing stunning sunrises and sunsets. I remember being in a remote location in the mountains, and I wanted to shoot the stars. Without a tripod, that shot would have been impossible.
There are many portable tripods available that won’t weigh you down. I found that compact travel tripods, like the Joby GorillaPod, are perfect for backpackers. They’re flexible, lightweight, and can be wrapped around objects for unique angles. I often set mine up on uneven surfaces, and it held my camera steady while I captured breathtaking views. If you’re planning to take nighttime shots or long exposures, I highly recommend investing in a reliable tripod.
Lenses: Versatile Choices for Different Scenarios
When I first started exploring photography, I didn’t think much about lenses. However, I quickly learned that having the right lens can drastically change the outcome of my photos. A versatile lens is essential, especially for backpackers who want to capture a range of images without carrying a bag full of gear. I often use a zoom lens, like a 24-70mm, which allows me to capture both wide landscapes and close-up details without needing to switch lenses constantly.
Another fantastic option is a prime lens, like a 50mm. They’re typically lighter and offer better low-light performance, which I found invaluable during my evening explorations. I’ve taken incredible portraits and street shots with my 50mm lens, and it has helped me improve my composition skills. For anyone just starting out, I recommend investing in a couple of good-quality lenses that suit your photography style, as they can open up a world of creative possibilities.
Camera Bags: Protecting Your Gear on the Move
When I first began backpacking, I made the mistake of using a regular backpack for my camera gear, and it was a disaster. My equipment was unprotected, and I worried constantly about damaging my camera while hiking. After a few close calls, I decided to invest in a dedicated camera bag. It’s one of the best purchases I’ve made.
I found that a backpack-style camera bag was perfect for me. It offered comfort and ample space for my gear while being easy to carry. Look for one with padded compartments, so everything stays safe during your travels. I also love that many camera bags come with weather-resistant materials, which is crucial when you’re out in nature. I’ve trekked through rain and dust, and my gear emerged unscathed. Choosing the right camera bag is essential, as it can make a huge difference in protecting your investment while on the go.
Memory Cards: Storage Solutions for Travelers
With the incredible experiences we capture, having enough storage is vital. I’ve learned this the hard way when I ran out of memory on my card while exploring a beautiful market in Marrakech. It was a panic-inducing moment, and I vowed to never let it happen again. I now carry multiple memory cards to ensure I never miss a moment.
When selecting memory cards, I recommend looking for those with a high write speed, especially if you’re shooting in burst mode or capturing video. I typically carry 32GB or 64GB cards, as they provide ample storage for thousands of photos. Plus, I’ve learned to keep a backup card in a safe place, just in case. It’s a small investment that can save you from heartache during your travels.
Portable Chargers and Power Banks
In our tech-driven world, keeping our devices charged is crucial. I can’t tell you how many times I’ve been out exploring when my camera’s battery level dropped low, leaving me anxious and frustrated. That’s when I discovered the importance of portable chargers. They have become a staple in my backpack.
There are many compact power banks available that can charge multiple devices at once. I’ve found that a power bank with at least 10,000 mAh capacity is ideal for backpacking. This way, I can recharge my camera and phone without worrying about finding an outlet. I remember one evening in Barcelona when I was out late capturing the city lights, and my phone battery was draining fast. Thanks to my portable charger, I could keep snapping shots without having to cut my adventure short. Having reliable power on the go keeps my creativity flowing, and I know I can capture those spontaneous moments without fear.
Budgeting for Camera Gear
Cost-Effective Gear Buying Tips
As a backpacker, I know how important it is to stick to a budget, especially when it comes to camera gear. I’ve learned a few tricks along the way that help me save money while still getting quality equipment. One of my favorite strategies is to buy used or refurbished gear. Many websites and stores offer pre-owned equipment at significantly lower prices. I once found a gently used lens that was still in mint condition for nearly half the retail price. It felt like a win-win; I got great gear and saved money!
Another tip is to invest in versatile equipment. Instead of buying multiple lenses, I focused on getting a high-quality zoom lens that covered various focal lengths. This decision not only saved me money but also lightened my load while traveling. I recommend doing thorough research before making any purchases—reading reviews and watching comparison videos helped me find the best options that fit my budget and needs.
Renting vs. Buying Camera Equipment
Renting camera gear can be a fantastic alternative to buying, especially if you’re heading to a specific destination where you want to capture high-quality images. I remember preparing for a trip where I wanted to try out a new lens that I wasn’t ready to purchase yet. Renting allowed me to test it on my travels without the long-term commitment. Plus, it saved me the hassle of carrying extra weight on my backpacking journey.
There are many companies that provide rental services for camera gear, either locally or online, and you’ll often find a wide variety of options. If you’re planning on a short trip or just want to experiment, I think renting is a smart way to go. It’s cost-effective and gives you the chance to use high-end equipment without breaking the bank.
Where to Find Discounts and Deals
Finding discounts on camera gear can feel like a treasure hunt, but it’s worth the effort! I’ve had great success by signing up for newsletters from photography websites and local camera shops. They often send out promotions, and I’ve snagged some amazing deals this way. Online retailers like B&H, Adorama, and Amazon frequently have sales, especially during holiday seasons. I keep an eye on their websites and social media for flash sales or exclusive discounts.
Another method I’ve found useful is checking out local photography clubs or forums. Members often sell their gear at lower prices because they’re upgrading or no longer need certain items. I even joined a Facebook group devoted to photography gear swaps, which has led to some fantastic finds. Don’t hesitate to reach out and ask for advice—photography enthusiasts are usually more than willing to share their tips on where to snag the best deals!
Photography Tips for Backpackers
Capturing Landscapes and Nature
When it comes to capturing breathtaking landscapes, I’ve learned that timing is everything. Early mornings and late afternoons, known as the golden hours, provide the best natural light for photography. I still remember waking up before dawn to catch the sunrise over a stunning mountain range. The way the light transformed the landscape into vibrant colors was something I’ll never forget. It took some effort to wake up early, but the results were worth it!
Another tip is to experiment with different angles and perspectives. I often try to find a foreground element to add depth to my landscape shots. Whether it’s a rock, a flower, or even another traveler, it helps make the photo more interesting. I’ve found that getting down low or climbing up for a higher viewpoint can dramatically change the composition of my images. The more angles I explored, the more unique my photos became.
Street Photography on a Budget
Street photography is one of my favorite ways to capture the essence of a place. I’ve realized that it’s best to blend in with the environment to capture authentic moments. I often use a smaller camera or my smartphone to avoid drawing too much attention. This way, I can capture genuine interactions and emotions without being intrusive. I remember wandering through the bustling streets of Tokyo, capturing candid moments of locals going about their daily lives. The more discreet I was, the better the shots turned out.
Additionally, I think it helps to build a rapport with the locals. A simple smile or a friendly nod can open up opportunities for candid shots. I’ve even asked people if I could take their photo, and I was surprised at how often they said yes! This approach not only resulted in stunning portraits but also connected me with the culture on a personal level, enriching my travel experience.
Using Natural Light Effectively
Natural light is a backpacker’s best friend when it comes to photography. I’ve learned to be mindful of how it changes throughout the day. For example, shooting during overcast days can result in soft, diffused light that’s perfect for portraits. Conversely, harsh sunlight can create strong shadows and contrasts. I remember one time in Greece, I took some stunning seaside shots during the golden hour, and the warm tones transformed the entire scene.
When shooting in direct sunlight, I often look for shaded areas or use backlighting to create a dramatic effect. Experimenting with light has opened up a new world of creativity for me, allowing me to capture stunning images that evoke the mood of the moment. Learning how to harness natural light has truly enhanced my photography skills, and I believe it’s a vital part of capturing compelling travel memories.
Editing and Sharing Your Travel Photos
Best Free Editing Software for Travelers
Once I began capturing incredible moments during my travels, I quickly realized that editing plays a massive role in showcasing those experiences. There are several free editing tools available that I’ve found to be super helpful. One of my favorites is Adobe Lightroom Mobile. It’s user-friendly and offers a range of features that allow you to enhance your photos beautifully. The ability to adjust exposure, contrast, and colors right from my phone has made a huge difference in the final results.
Another great option is Snapseed, which provides powerful editing capabilities and a variety of filters. I remember using it after a long day of exploring a vibrant market in India, where the colors were just begging to be enhanced. The selective editing feature allowed me to highlight specific areas of my photo, bringing the whole scene to life. I believe that editing can be just as important as taking the photo itself, as it helps to convey the emotions and stories behind our travel experiences.
How to Share Your Photos on Social Media
Sharing our travel photos has become a significant part of the journey itself. I love using platforms like Instagram and Facebook to showcase my adventures. When I post, I try to include engaging captions that tell a story about the moment captured. I remember posting a photo of a breathtaking sunset in Santorini, and I shared the story behind it—how I had stumbled upon the perfect spot after a long day of exploring.
Using hashtags is another strategy I’ve found effective. They help my photos reach a wider audience and connect with fellow travelers. I often use a mix of popular travel hashtags along with more specific ones related to the location. Engaging with other travelers by liking and commenting on their posts has also created a wonderful sense of community and inspiration. It’s incredible how sharing our experiences can inspire others to embark on their own adventures!
Creating a Travel Photography Blog
If you’re passionate about photography, I genuinely recommend starting a travel photography blog. It’s a great way to document your experiences and share them with a larger audience. I decided to create my own blog after a particularly memorable trip to South America, where I had captured so many stunning photos and stories that I wanted to share. Building a blog allowed me to combine my love for writing and photography in one space.
Platforms like WordPress and Wix made it easy for me to set up my blog without needing advanced technical skills. I focus on writing about my travels, photography tips, and gear reviews, and I’ve loved connecting with readers who share my interests. Blogging has not only enhanced my writing and photography skills, but it has also opened up opportunities for collaborations and partnerships with brands. If you have a passion for travel and photography, I think starting a blog could be a rewarding experience!
Final Thoughts
Backpacking on a budget while capturing beautiful photographs is not only possible but also incredibly fulfilling. Throughout my journey, I’ve learned that the right mindset, gear, and techniques can elevate our experiences and the memories we create. Whether it’s choosing the right camera, finding the perfect lighting, or connecting with locals to capture authentic moments, every part of the journey adds to the story we tell through our images.
Remember, it’s not just about the gear we use; it’s how we engage with the world around us that truly matters. I encourage you to embrace the challenges and joys that come with budget backpacking and photography. With a little creativity and resourcefulness, you can create stunning visuals that bring your travel stories to life. I can’t wait to see the adventures you embark on and the beautiful moments you capture along the way!
Frequently Asked Questions
What is the main benefit of budget backpacking?
The main benefit of budget backpacking is that it allows travelers to explore more often and experience the world authentically. It encourages creative solutions and helps discover hidden gems that tourists might overlook.
Which type of camera is recommended for backpackers?
Mirrorless cameras are recommended for backpackers as they strike a balance between quality and portability. While DSLRs are great for high-quality images, they can be bulky and heavy. Point-and-shoot cameras are also a good option for casual photography.
Can smartphones be used effectively for travel photography?
Yes, smartphones can be very effective for travel photography. They are always accessible, easy to use, and often include editing features. However, they may not perform as well in low light compared to dedicated cameras.
What are some essential accessories for enhancing photography while backpacking?
Essential accessories include lightweight tripods for stability, versatile lenses for different scenarios, a protective camera bag, and multiple memory cards for storage. Portable chargers and power banks are also important for keeping devices charged.
How can I save money when buying camera gear?
To save money on camera gear, consider buying used or refurbished equipment, investing in versatile items like zoom lenses, and doing thorough research before making any purchases.
Is renting camera equipment a good option for travelers?
Yes, renting camera equipment can be a cost-effective alternative to buying, especially if you want to try out high-quality gear for a specific trip without the long-term commitment or added weight.
What are some good editing software options for travelers?
Some good free editing software options for travelers include Adobe Lightroom Mobile and Snapseed. These tools offer user-friendly features to enhance photos effectively.
What strategies can be used to share travel photos on social media?
When sharing travel photos on social media, include engaging captions that tell a story, use relevant hashtags to reach a wider audience, and engage with other travelers by liking and commenting on their posts.
Why is natural light important in photography?
Natural light is crucial in photography as it affects the quality and mood of the images. Learning to use natural light effectively can greatly enhance the overall results of the photographs taken during travels.
How can starting a travel photography blog be beneficial?
Starting a travel photography blog can be beneficial as it allows you to document experiences and share them with a larger audience. It also enhances writing and photography skills and opens opportunities for collaborations and partnerships with brands.