Urban night photography is a magical experience, capturing the beauty of cities in a whole new light. With a few simple tips and the right mindset, you can transform your travel memories into stunning visuals that tell a captivating story. For more insights, check out 10 Tips for Stunning Urban Cityscape Photography.
Understanding Urban Night Photography
The Appeal of Night Photography in Urban Settings
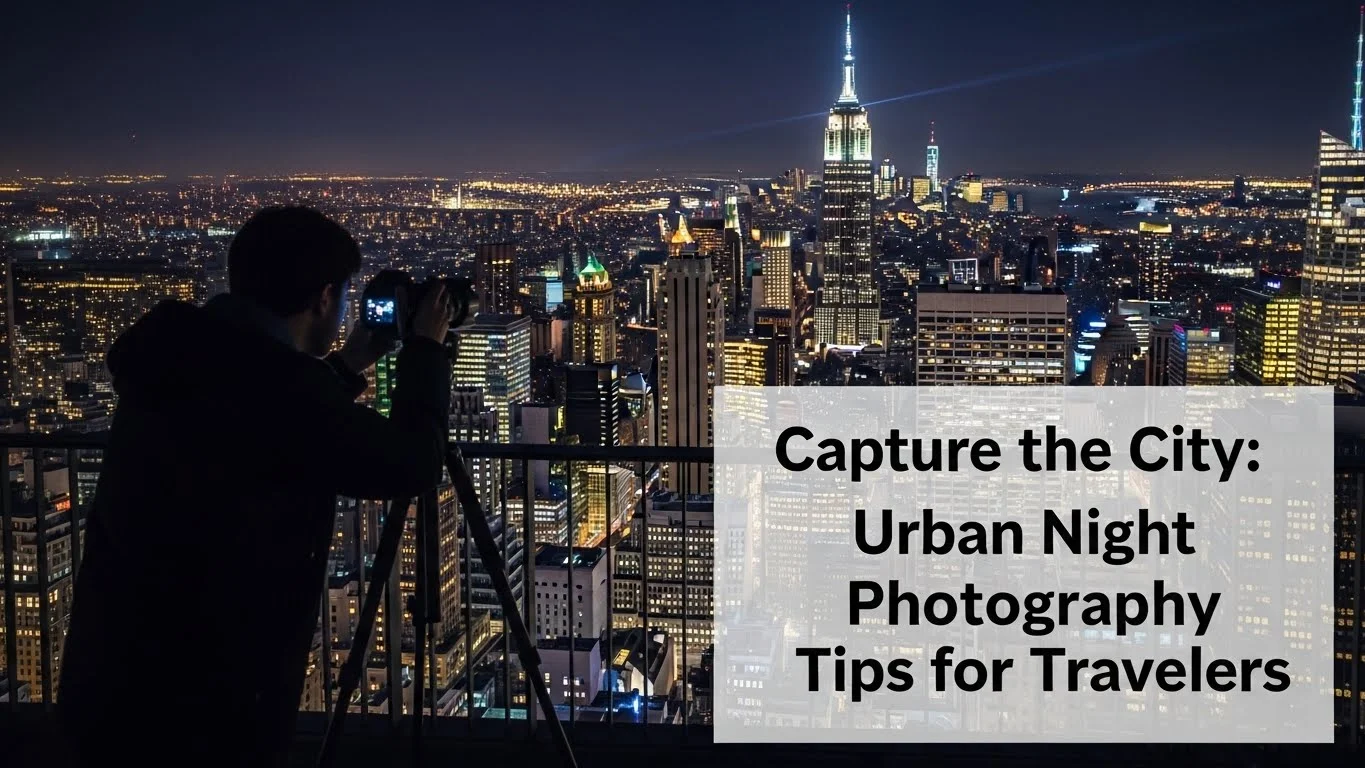
When I first ventured into night photography, I was mesmerized by how cities transform after the sun sets. The hustle and bustle of the day fades, and a different kind of energy emerges. I found that urban landscapes come alive with neon lights, illuminated buildings, and the striking contrast of shadows. There’s a certain intimacy that night photography offers—like being let in on a secret world that many people miss. I love how each city has its unique vibe at night; whether it’s the lively streets of New York or the romantic ambiance of Paris, there’s always something special waiting to be captured.
Essential Equipment for Night Photography
Having the right gear can make a significant difference in your night photography experience. I remember my first night out with just my smartphone, and while I got some decent shots, it was nothing compared to what I could achieve with a dedicated camera. Here are some essentials I recommend:
- Camera: A DSLR or mirrorless camera is ideal for low-light conditions. They tend to perform better with larger sensors.
- Lens: A fast lens with a wide aperture (like f/1.8 or f/2.8) helps gather more light. I often use a prime lens for its sharpness and low-light capability.
- Tripod: Stability is crucial for longer exposures. I can’t emphasize enough how much clearer my photos became once I started using a sturdy tripod.
- Remote Shutter Release: This can help eliminate camera shake when pressing the shutter button, especially for longer exposures.
- Extra Batteries and Memory Cards: Night photography can drain your camera’s battery quicker than you think, so I always pack extras.
Camera Settings for Low Light Conditions
Getting the settings right is key to capturing stunning night shots. I learned through trial and error that each situation may require a different approach. Here’s a breakdown of what I typically adjust:
- ISO: In low light, I often start at ISO 800 and adjust from there. Higher ISO settings can introduce noise, so finding the right balance is essential.
- Aperture: I prefer to use a wide aperture (like f/2.8) to let in more light. However, if I want a greater depth of field, I may stop down to f/8. It’s all about what I want to capture.
- Shutter Speed: This is where it gets fun; I usually start with a shutter speed of around 1/60 seconds for handheld shots and adjust as necessary. For lower light scenarios or intentional light trails, I may go for longer exposures of several seconds.
- White Balance: I often shoot in auto white balance, but I’ll review images and switch to manual if the colors look off. Many times, I find that the city lights add their own color cast, which can be beautiful.
As I experimented with these settings, I found a rhythm that worked for me. It’s all about understanding the interplay between these elements and adjusting based on the scene in front of you. Sometimes, I’ll take a test shot to see how it turns out, then tweak my settings before getting the shot I envision.
Each time I head out to capture the night, I feel a rush of excitement. The thrill of seeing how a familiar place can transform in the dark keeps me coming back for more. I believe anyone can capture breathtaking images of urban landscapes at night with the right equipment, settings, and a bit of practice. I encourage you to pick up your camera and explore your city after hours; you might just discover a new favorite side of it that you never knew existed. For more inspiration, check out Best Destinations for Unforgettable Safari Photography.
Best Cities for Night Photography
New York City: The City That Never Sleeps
I have to start with New York City. There’s something about the energy here that captivates me every time I walk its streets at night. From the iconic skyline to the bright billboards of Times Square, every corner offers a unique photo opportunity. One of my favorite spots is Brooklyn Bridge, where I can capture both the bridge itself and the stunning backdrop of Manhattan. The way the lights of the city reflect off the East River creates a mesmerizing scene. I often find myself wandering through neighborhoods like SoHo or Greenwich Village, where the streets are lined with charming brownstones and vibrant nightlife. I think NYC’s charm at night is unparalleled—every shot I take feels alive, as if the city is telling its own story.
Tokyo: Neon Lights and Urban Energy
When I think of Tokyo, the image of neon lights flashing against the night sky comes to mind. I remember my first night in Shibuya, standing at the famous crossing, feeling overwhelmed by the sea of people and lights. The energy is contagious! I can’t recommend taking a stroll through Akihabara enough; the electric town is alive with color and technology, perfect for capturing the essence of this vibrant city. I also love heading to the Tokyo Tower at night. The tower’s illumination adds a touch of elegance to my shots, making them feel both modern and timeless. It’s fascinating how Tokyo offers both futuristic and traditional scenes, all beautifully lit at night.
Paris: Romantic Nightscapes
Ah, Paris—the City of Light. There’s a reason it’s famous for its romantic ambiance, especially at night. I remember walking along the Seine with the Eiffel Tower sparkling in the distance. The reflections on the water create a magical atmosphere that is hard to resist photographing. Montmartre is another one of my favorite spots. The charming streets, lit by warm street lamps, offer countless opportunities for stunning shots of the Sacré-Cœur and the surrounding cafes. I’ve learned that capturing the mood of Paris at night is all about the soft glow of the lights and the intimate moments of people enjoying the city. It’s like stepping into a painting.
London: Historic Landmarks at Night
London holds a special place in my heart for night photography. The mix of history and modernity makes for some captivating shots. I’ve spent many evenings by the Thames, capturing the illuminated Tower Bridge and the Houses of Parliament. The way the city lights reflect on the water creates a dramatic effect that I can’t get enough of. I also love exploring neighborhoods like Covent Garden, where street performers and cozy eateries come alive at night. One tip I have is to look for unique angles of famous landmarks, like the London Eye, to capture something different from the usual tourist shots. Each photo I take here tells a story of its rich history.
Barcelona: Vibrant Nightlife and Architecture
Barcelona is another gem for night photography. I remember the first time I wandered through the Gothic Quarter at night; the narrow, winding streets felt like stepping back in time. The soft lighting on the ancient architecture creates a surreal atmosphere, perfect for capturing the essence of the city. I also love Gaudí’s masterpieces, like the Sagrada Família, which looks stunning against the night sky. The colors and intricate details of his work come alive in my photos, giving a whole new perspective. Nightlife in Barcelona is vibrant, and I often find myself at tapas bars or beach clubs, where the energy of the city truly shines through in my images. If you’re a photography enthusiast, consider exploring Top Budget Destinations for Bird Photography Enthusiasts as well.
When to Shoot: Timing Your Night Photography
Golden Hour vs. Blue Hour
Timing is everything in photography, especially at night. I’ve learned that the golden hour, just before sunset, offers incredible lighting to set the stage for a great night shot. The warm hues can complement the upcoming city lights beautifully. However, the blue hour, which follows sunset, is equally magical. The sky takes on a deep blue shade, creating a striking contrast with the bright lights of the city. I often plan my outings to coincide with these times to capture that perfect balance of natural and artificial light.
Finding the Best Time for City Lights
One thing I’ve noticed is that not all city lights are created equal. Some places truly come alive after the sun goes down, while others might be better during twilight. For instance, I find that cities like New York and Tokyo have their best lighting once the sky is fully dark, while other locations, like Paris, can be stunning even during the blue hour. I typically scout my locations during the day, then return at night to see how the scene changes. It’s fascinating to see how the same spot can evoke different feelings depending on the time of day.
Seasonal Considerations for Night Photography
Seasonality plays a significant role in urban night photography as well. I’ve learned that winter nights can feel especially magical, with holiday lights illuminating the streets. Conversely, summer nights often bring a lively atmosphere, with people out and about enjoying the warm weather. Each season offers unique opportunities; for example, I love capturing autumn leaves illuminated by streetlights or the festive spirit of winter markets. No matter when you decide to shoot, there’s always something special to capture in every season.
Techniques for Capturing Stunning Night Shots
Using Long Exposures for Light Trails
One of my favorite techniques for night photography is using long exposures to capture light trails. The first time I tried this, I was standing on a bridge overlooking a busy street. As the cars zipped by, I set my camera to a longer shutter speed, and the mesmerizing streaks of light transformed my shot into something truly dynamic. I love how it adds a sense of movement and energy to urban scenes. Generally, I start with a shutter speed of about 5 to 10 seconds, depending on the amount of traffic. It’s amazing how something as simple as a moving vehicle can create beautiful lines in an otherwise still image. Just make sure you have a stable tripod to avoid any unwanted blurriness.
Incorporating Foreground Elements
Another technique I’ve found incredibly useful is incorporating foreground elements in my compositions. This approach adds depth and context to my night shots, which can transform an ordinary photo into something extraordinary. For example, I remember capturing a shot of the Tokyo skyline from a distance, but instead of just shooting the buildings, I included a railing in the foreground. It drew the viewer’s eye into the image, making them feel as if they were standing right there beside me. Whether it’s a tree, a statue, or even a passerby, finding interesting foreground elements can create layers in your photos that make them more engaging.
Experimenting with Different Angles and Perspectives
Night photography is a great time to get creative with angles and perspectives. I can’t tell you how many stunning shots I’ve taken just by changing my viewpoint. For instance, when photographing the Eiffel Tower, instead of taking the traditional shot from the Trocadéro, I decided to shoot from the Champ de Mars, using the pathways and gardens to frame the tower. The result was a unique photo that stood out from the typical tourist shots. I often remind myself that getting low to the ground or finding a higher vantage point can completely change the feel of an image. Don’t be afraid to explore and try different perspectives; you never know what magic you might capture!
Using Tripods and Stabilization Techniques
Having a sturdy tripod is essential for night photography, especially when using longer exposures. I learned this lesson the hard way when I tried shooting without one and ended up with a series of blurry images. I recommend investing in a good tripod that can handle various terrains, as some nights I find myself shooting on uneven ground. Additionally, I’ve found that using a remote shutter release or the camera’s timer can greatly reduce camera shake, which is crucial for clarity in low-light situations. If I don’t have my tripod with me, I’ll look for sturdy surfaces to rest my camera on, like a ledge or a wall, to stabilize my shots. Every little bit helps when it comes to capturing those crisp night images.
Post-Processing Tips for Night Photos
Editing Software Recommendations
Once I’ve captured my night shots, the next step is post-processing. I’ve tried various editing software, but I keep coming back to Adobe Lightroom for its user-friendly interface and powerful tools. I love how I can easily adjust exposure, contrast, and color balance to make my images pop. If you’re new to editing, there are plenty of tutorials online that can help you get started. I also dabble in Photoshop for more advanced edits, especially when I need to blend multiple exposures or make detailed adjustments. It’s amazing how a little editing can elevate an already stunning photo.
Enhancing Colors and Contrast
One of my favorite aspects of post-processing is enhancing the colors and contrast in my night photographs. The city lights can sometimes look washed out, so I usually increase the vibrance and saturation slightly to make them stand out. I’ve found that adjusting the contrast helps separate the highlights and shadows, giving my images more depth. I remember going back to an old shot of London’s skyline, and with just a few tweaks in color and contrast, it transformed into a breathtaking image that truly captured the essence of the city at night.
Noise Reduction Techniques
Night photography often comes with the challenge of noise, especially when shooting at higher ISO settings. I’ve experienced this firsthand, and it can be frustrating to see beautiful images marred by grainy spots. Thankfully, most editing software has noise reduction tools that can significantly improve image quality. I typically use these features cautiously, as too much noise reduction can make photos look overly smooth and unnatural. I’ve learned to balance noise reduction with detail retention, which helps keep the integrity of the image while minimizing distractions.
Safety Tips for Night Photography in Urban Areas
Staying Aware of Your Surroundings
As much as I love capturing the beauty of cities at night, I’ve learned the importance of staying aware of my surroundings. It’s easy to get lost in the moment and forget about potential safety concerns. I always make a point to scout my location before dusk and familiarize myself with the area. This way, I can identify any spots that might be less safe and avoid them. I also keep my gear secure and close to me, as night shooting can sometimes attract unwanted attention.
Choosing Safe Locations for Shooting
When selecting locations for night photography, I tend to stick to well-lit and populated areas. I’ve found that shooting in busy neighborhoods not only creates great photo opportunities but also provides a sense of security. In my experience, places with vibrant nightlife, such as markets or popular tourist spots, are ideal. It’s comforting to know that there are people around, and it often leads to spontaneous interactions that can enhance my photography experience.
Traveling in Groups vs. Solo Shooting
While I enjoy the solitude of solo night photography, I’ve realized that traveling in groups can be safer and more fun. There’s something special about sharing the experience with fellow photography enthusiasts, and it’s a great way to learn from each other. Often, we brainstorm ideas for shots together, and it ends up being a collaborative effort. If I do decide to shoot alone, I make sure to tell someone where I’ll be and check in periodically. This way, I can focus on capturing the beauty of the night without worrying too much.
Frequently Asked Questions
What is urban night photography?
Urban night photography is the practice of capturing the beauty of cities after sunset, showcasing their unique ambiance and energy through visuals that tell captivating stories.
What equipment is essential for night photography?
Essential equipment for night photography includes a DSLR or mirrorless camera, a fast lens with a wide aperture, a sturdy tripod, a remote shutter release, and extra batteries and memory cards.
What camera settings should I use for low light conditions?
For low light conditions, you should start with an ISO of around 800, use a wide aperture (like f/2.8), adjust shutter speed based on the scene (starting with around 1/60 seconds), and set white balance to auto or manual as needed.
Which cities are recommended for night photography?
Recommended cities for night photography include New York City, Tokyo, Paris, London, and Barcelona, each offering unique lighting and ambiance that enhance night shots.
When is the best time to shoot night photography?
The best times to shoot night photography are during the golden hour just before sunset and the blue hour after sunset, as they create beautiful contrasts between natural and artificial light.
What techniques can enhance night photography shots?
Techniques to enhance night photography include using long exposures for light trails, incorporating foreground elements for depth, and experimenting with different angles and perspectives to capture unique images.
How can post-processing improve night photos?
Post-processing can improve night photos by enhancing colors and contrast, reducing noise, and adjusting exposure and balance to make the images pop and better reflect the night scene.
What safety tips should I consider for night photography in urban areas?
Safety tips for night photography include staying aware of your surroundings, choosing well-lit and populated locations, and considering traveling in groups for added security.
How can I avoid camera shake during long exposures?
To avoid camera shake during long exposures, use a sturdy tripod, a remote shutter release, or the camera’s timer to minimize movement when pressing the shutter button.
What are some seasonal considerations for night photography?
Seasonal considerations for night photography include capturing holiday lights in winter, vibrant nightlife in summer, and unique autumn colors illuminated by streetlights, each season offering distinct photographic opportunities.