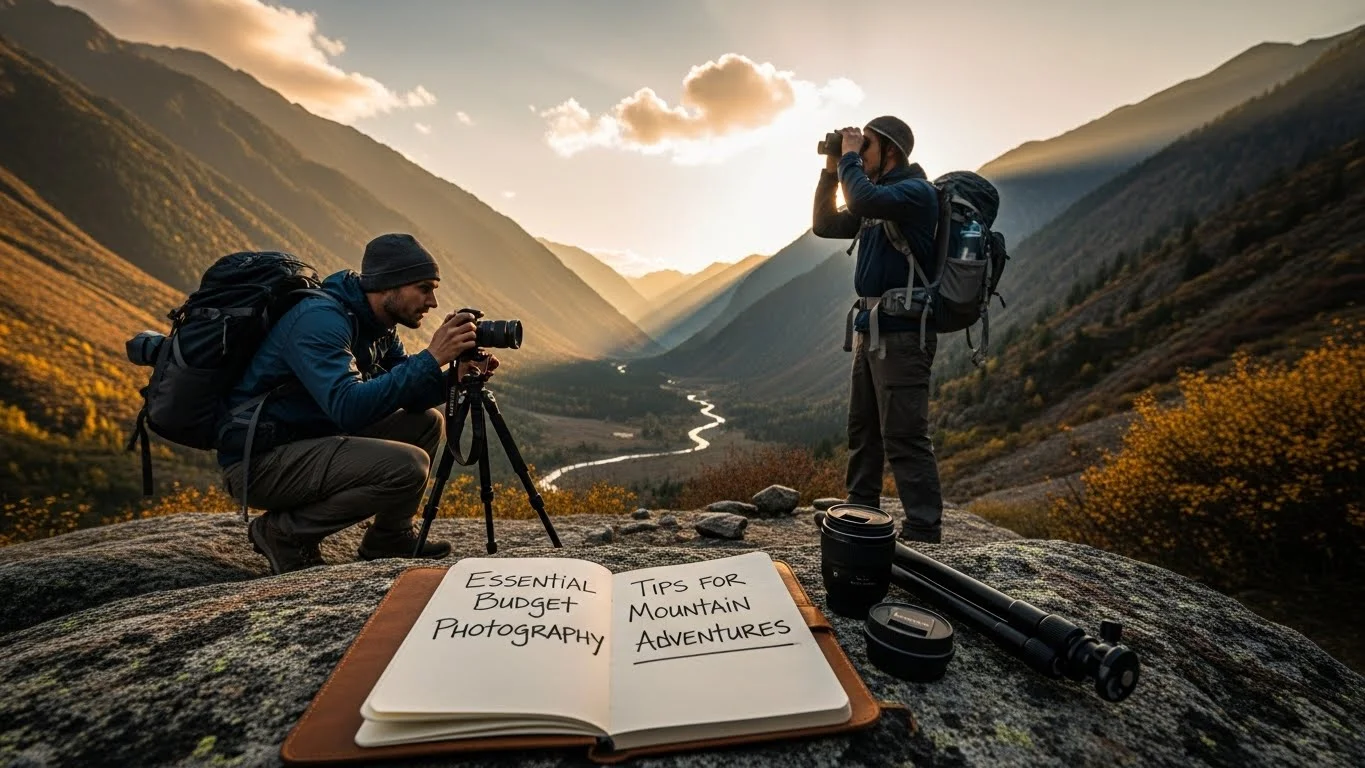
Mountain photography is a thrilling adventure that allows us to capture breathtaking moments in nature. With the right tips and tricks, we can explore stunning landscapes without breaking the bank. For those looking to enhance their skills, check out this guide on how to Capture Stunning Mountain Landscapes on a Budget.
Understanding Mountain Photography
What is Mountain Photography?
Mountain photography is all about capturing the beauty of mountainous landscapes. I remember the first time I hiked to a peak with my camera in hand, filled with excitement and anticipation. There’s something magical about how the light plays on rugged cliffs, the way clouds drift around towering summits, and how the colors of nature change throughout the day. It’s more than just taking pictures; it’s about telling the story of the mountains and our experiences within them. Whether it’s a panoramic view or an intimate shot of flora, mountain photography allows us to express our connection to these stunning environments.
The Importance of Budgeting in Photography Adventures
When I first started my journey in mountain photography, I quickly realized that budgeting is crucial. Adrenaline can sometimes lead to impulsive decisions, whether it’s buying the latest gear or booking an expensive guided tour. However, I learned that with careful planning and budgeting, we can enjoy our adventures without feeling financially strained. In my experience, setting a budget helps prioritize essential gear, travel costs, and other necessities, ensuring that we can have an incredible experience while keeping our finances in check.
Every adventure can become more fulfilling when we’re not stressed about money. I’ve found that being mindful of expenses opens up opportunities for more trips, allowing me to explore various landscapes and improve my skills as a photographer. By planning ahead and sticking to a budget, I’ve learned to appreciate the journey just as much as the destination.
Essential Gear for Mountain Photography on a Budget
Camera Options for Budget-Friendly Photographers
Choosing the right camera is one of the most important decisions we make as mountain photographers. I remember starting out with an entry-level DSLR that I found at a great price. While it wasn’t the most advanced model, it had all the features I needed to get stunning shots. There are also excellent mirrorless options that are lightweight, making them perfect for hiking up those steep trails. Brands like Canon, Nikon, and Sony often have models that are budget-friendly but still offer great image quality.
For those who are really looking to save, consider purchasing used or refurbished cameras. I’ve had great luck finding quality gear at a fraction of the price. Websites like KEH, B&H, and Adorama often have a selection of used cameras that can fit anyone’s budget. Just be sure to check the return policy and warranty options!
Lens Recommendations for Mountain Landscapes
The lens can make a huge difference in mountain photography. I found that a wide-angle lens became my best friend when capturing sweeping landscapes. A lens with a focal length of 10-18mm or something similar is perfect for showcasing the vastness of the mountains. Remember, you don’t need to have every lens available; starting with a versatile zoom lens can provide a good range for various scenes.
When I want to focus on details, such as a unique flower or the texture of a rock, I switch to a macro lens. I recommend looking for lenses that fit your camera’s mount and have good reviews. Sometimes, there are affordable third-party options available, like those from Sigma or Tamron, that perform well.
Tripods and Stabilizers: Affordable Choices
A sturdy tripod is a must-have for mountain photography, especially if you’re planning to shoot in low light during sunrise or sunset. I invested in a lightweight tripod that’s easy to carry but also sturdy enough to handle windy conditions. Look for tripods made from aluminum or carbon fiber, which can be found at different price points. I suggest checking out brands like Manfrotto or Joby for reliable budget options.
Accessories: Filters, Batteries, and More
Accessories can enhance our mountain photography without costing a fortune. I always carry a polarizing filter with me. It helps reduce glare from water and enhances the colors of the sky and foliage. These filters are relatively inexpensive and can make a significant difference in image quality.
Extra batteries are another essential item. I’ve learned the hard way that running out of battery power means missing out on incredible shots. I recommend investing in a couple of high-capacity batteries for those long hikes. Additionally, don’t forget memory cards! Having a few spares ensures we won’t miss capturing a moment because of a full card.
Ultimately, while it can be tempting to splurge on high-end gear, I found that with smart choices and a little research, we can assemble a solid kit on a budget. It’s all about prioritizing what we need, being resourceful, and choosing quality over quantity.
Planning Your Mountain Photography Adventure
Choosing the Right Location for Stunning Shots
When it comes to mountain photography, selecting the right location can make all the difference. I remember my excitement the first time I visited the Rocky Mountains; the sheer scale and beauty took my breath away. I believe that the best locations are often ones that resonate with us personally. Whether it’s a local trail or a renowned national park, finding a place that inspires you is key.
In my experience, it helps to explore less-traveled paths. Some of my most cherished photographs come from hidden gems that aren’t crowded with tourists. Apps like AllTrails or even Google Maps can be great resources for discovering trails and viewpoints that might not be on everyone’s radar. I often find that the best shots come when we venture a little off the beaten path. For those interested in exploring more, consider Experience Nature: Budget-Friendly National Park Tours.
Researching Weather Conditions
Weather can be unpredictable in the mountains, and I’ve definitely had my share of sunburns and rain-soaked gear. Before heading out, I recommend checking the forecast to ensure you’re prepared for any conditions. Mountain weather can change rapidly, so having a plan can make a huge difference.
Using apps like Weather Underground or Mountain Forecast can give you detailed information on temperature, wind speed, and precipitation. I’ve learned that it’s best to be prepared for anything, so I always pack a lightweight rain jacket, even if the forecast looks clear. I also keep a close eye on the golden hours—sunrise and sunset—when the lighting for photography is often at its best.
Best Times of Year for Mountain Photography
Timing is everything in mountain photography. I’ve found that spring and fall offer some of the most striking landscapes. In spring, the melting snow creates beautiful waterfalls, and wildflowers begin to bloom, adding vibrant colors to the scenery. In contrast, fall brings a stunning array of warm colors as the leaves change, and the landscape transforms into a breathtaking palette of oranges and reds.
I also try to plan my trips during weekdays when popular spots are less crowded. This way, I can capture the beauty of the landscape without the distraction of other visitors. Midweek adventures have often resulted in some of my favorite photographs, as I’ve been able to connect more intimately with the environment.
Permits and Regulations: What You Need to Know
Before heading out to shoot, I always check if the location requires any permits. Many national parks and protected areas have specific regulations regarding photography, especially if you’re using professional equipment. I’ve learned this the hard way when I showed up at a park without the necessary documentation, only to be turned away.
Researching in advance can save a lot of time and frustration. Websites for national parks or local land management offices typically provide information on permits and regulations. I’ve also found that some areas offer special photography permits for a small fee, which can be worth it if it means I get to capture amazing shots without worrying about legalities.
Budget-Friendly Travel Tips
Finding Affordable Accommodations
When planning my mountain photography trips, I always look for ways to stretch my budget, especially when it comes to accommodations. I’ve discovered that camping can be a fantastic way to save money while immersing myself in nature. Many national parks offer campgrounds at low rates, and waking up to a mountain sunrise is an experience like no other.
If camping isn’t your thing, consider budget-friendly lodging options like hostels or motels. I’ve had great experiences staying in cozy lodges that offer shared amenities. Websites like Airbnb can also have affordable options, and sometimes local homeowners offer rooms at a fraction of hotel prices. I always prioritize places that provide easy access to trails and stunning views.
Transportation Options: Saving on Travel Costs
Getting to the mountains can be one of the more expensive parts of the trip, but there are ways to save. Carpooling with friends or fellow photographers not only cuts down on gas costs but also makes the journey more enjoyable. I remember a road trip where we shared not just the fuel expenses but also great conversations and laughter.
If you’re traveling solo, consider public transportation or shuttles that service popular mountain areas. I’ve found this to be a great way to relax and soak in the scenery, rather than stressing about driving and parking in crowded areas. It can also be helpful to research any available discounts or deals on transportation services.
Dining on a Budget While Adventuring
Food can quickly add up when you’re on the road, but I’ve learned some tricks to keep costs down without sacrificing satisfaction. I often pack meals and snacks for my trips, which not only helps save money but also allows me to enjoy a meal surrounded by nature. Simple sandwiches, fruits, and trail mix make for easy-to-carry options.
If dining out is on the agenda, I usually search for local diners or cafes instead of tourist traps. I’ve found that local eateries often provide delicious meals at reasonable prices. Plus, they usually have a vibe that reflects the spirit of the area, which enriches the experience. Sometimes, it’s the small, homey places that have the best food and stories to tell.
Photography Techniques for Capturing Mountain Landscapes
Understanding Lighting for Outdoor Photography
Lighting is a crucial element in photography, and mountain landscapes offer some of the most stunning natural light I’ve ever seen. I’ve learned that the time of day can dramatically change the mood and appearance of a scene. For instance, I remember standing atop a ridge during sunrise, watching as the first warm rays of sunlight kissed the peaks, turning them golden. This is what photographers call the “golden hour,” which occurs shortly after sunrise and before sunset. The soft, diffused light during these times creates a magical atmosphere that enhances the beauty of any landscape.
On the flip side, midday light can be harsh and create strong shadows, which isn’t always flattering for mountain shots. I’ve often found that if I’m out during the day, finding shaded areas or waiting for clouds to diffuse the sunlight can help improve my photos. If you can, try to plan your shooting times around these golden hours for the best results.
Composition Tips for Mountain Scenes
Composition can make or break a photograph, and I’ve spent a lot of time honing my skills in this area. One of my favorite techniques is using the “rule of thirds.” I remember a time when I captured a breathtaking mountain lake. By placing the horizon along the top third of the frame and the lake in the bottom third, I created a more dynamic image. It’s amazing how such a simple adjustment can transform a photo.
I also encourage you to experiment with leading lines. Trails, rivers, or even the edges of mountains can draw the viewer’s eye through the image. When I shot a winding trail leading up a mountain, it created a sense of journey and discovery. Also, don’t forget to include interesting foreground elements, like rocks or wildflowers, to add depth to your images. This technique can make your landscape photos feel more immersive and inviting.
Using Natural Elements for Impactful Shots
Nature provides a wealth of elements that can enhance our mountain photography. I often look for unique trees, boulders, or even wildlife to incorporate into my compositions. For instance, I remember capturing a lone tree standing against a backdrop of towering mountains. The tree added a striking contrast and a sense of scale to the photo, making it more engaging.
Weather can also play a significant role in how we capture mountain scenes. A dramatic sky filled with clouds can add intensity to an image, while a clear blue sky may evoke a different mood. I’ve found that capturing storms rolling in can create powerful, atmospheric images. Don’t shy away from unpredictable weather; instead, embrace it and see how it can enhance your storytelling.
Additionally, I recommend taking multiple shots of the same scene from different angles and distances. This practice allows you to explore different perspectives and discover unique compositions you might not have considered initially. Who knows? The best shot could be just a slight shift away!
Post-Processing Tips for Mountain Photography
Free and Budget-Friendly Editing Software
Once we’ve captured those stunning mountain photos, the next step is to enhance them through post-processing. I’ve found that editing can really bring out the best in our images. Thankfully, there are plenty of free and budget-friendly editing software options available. For instance, I love using GIMP, which is a powerful, open-source program that rivals many paid options. It took me a little time to learn, but I found plenty of tutorials online that made the process smoother.
Another great option is Darktable. It’s designed specifically for photographers and offers a range of features for managing and editing images. Adobe also offers a free trial for Lightroom, which I found useful for quick edits. I often use it to adjust exposure and color balance, and it’s user-friendly enough that I didn’t feel overwhelmed as a beginner. These tools allow us to fine-tune our photos without spending a lot of money.
Basic Editing Techniques to Enhance Photos
In my experience, there are a few basic editing techniques that can significantly improve our mountain photography. One of my favorites is adjusting the contrast and brightness. I’ve seen how a slight increase in contrast can make the mountains pop and add depth to the shot. It’s amazing what a little tweak in brightness can do to bring out the details in shadows and highlights.
Another technique I often use is cropping. I remember a particular shot of a mountain range that felt cluttered. By cropping, I focused on the most striking peaks and created a more impactful image. I also play around with saturation to make colors more vibrant, especially for those beautiful sunsets. However, I try to keep it natural; overdoing it can lead to unrealistic results. A little goes a long way, and keeping the essence of the scene is key.
Preserving the Natural Look of Your Images
While editing is essential, I always strive to preserve the natural look of my mountain photography. I believe it’s important to maintain the authenticity of the environment. I usually avoid heavy filters that can alter the true colors of the landscape. Instead, I focus on bringing out the natural beauty that was captured in-camera.
Another tip is to shoot in RAW format whenever possible. This file type retains much more detail than JPEGs, allowing for more flexibility during editing. I’ve appreciated how RAW files enable me to make significant adjustments without compromising image quality. Ultimately, I want my photographs to reflect the breathtaking beauty I experienced in the mountains, and careful editing helps me achieve that goal.
Sharing Your Mountain Photography
Best Platforms for Showcasing Your Work
Once we’ve polished our mountain photography, it’s time to share it with the world! I’ve discovered that social media platforms like Instagram and Facebook are great for showcasing our work. I love how Instagram, in particular, is visually driven, making it easy to connect with fellow photographers and nature lovers. I often use relevant hashtags to reach a broader audience and discover other photographers’ incredible work.
For those looking for a more formal way to present their photography, creating a blog or using portfolio sites like Behance can be rewarding. I started a simple blog to share my adventures and photos, and it’s been a great way to connect with others who share my passion. Plus, it’s fun to look back at my journey and see how much I’ve grown as a photographer.
Engaging with the Photography Community Online
Engagement is crucial in the photography community. I’ve found that commenting on others’ posts and participating in photography challenges can lead to valuable connections. Platforms like Reddit and dedicated photography forums are excellent places to seek advice, share experiences, and receive constructive feedback. I remember posting one of my photos on a forum and receiving tips that helped me improve my work. It’s a supportive community, and I love being part of it.
Tips for Creating an Online Portfolio on a Budget
Creating an online portfolio doesn’t have to break the bank. I started mine using free website builders like Wix or WordPress. They offer templates that are easy to customize, allowing us to showcase our photography beautifully without needing advanced tech skills. I recommend curating a selection of our best work to keep the portfolio focused and impactful. Remember to include an “About Me” section where we can share our journey and passion for mountain photography. This personal touch can resonate with viewers, making our work more relatable.
Safety and Preparedness for Mountain Photography Adventures
Essential Safety Gear for Mountain Environments
Safety is paramount when we’re out in the wild, especially in mountainous areas. I always pack essential safety gear like a first-aid kit, a multi-tool, and a reliable flashlight. I remember a hike where I relied on my headlamp as the sun set earlier than expected. It allowed me to navigate safely back to my car without panicking. I also suggest wearing sturdy hiking boots to prevent slips and falls on rugged terrain.
Staying Safe While Capturing the Perfect Shot
When taking photographs in the mountains, I’ve learned to be mindful of my surroundings. It’s easy to get lost in capturing the perfect shot, but I always make it a point to keep an eye on my footing and the weather conditions. I try to stay aware of the trail and avoid getting too close to steep edges. I also share my plans with a friend or family member before heading out, so someone knows where I am—safety in numbers, right?
Emergency Preparedness: What to Pack
Finally, being prepared for emergencies can make a world of difference. I pack extra food and water, as well as a map and compass in case my phone loses signal. I’ve experienced the frustration of getting turned around in unfamiliar terrain, and having a physical map has saved me more than once. Additionally, I carry emergency blankets and a whistle, just in case I ever find myself in a tough spot. It’s better to be overprepared than to regret not having what I need.
Final Thoughts
Mountain photography is not just about capturing beautiful images; it’s a journey filled with adventure, creativity, and connection to nature. I’ve shared countless moments in the mountains, from breathtaking sunrises to the thrill of discovering hidden trails. Through this journey, I’ve learned the importance of budgeting, planning, and safety. Each photograph tells a story, and I believe that with the right mindset and tools, anyone can embark on their own mountain photography adventure. So grab your camera, hit the trails, and let the mountains inspire you!
Frequently Asked Questions
What is mountain photography?
Mountain photography is about capturing the beauty of mountainous landscapes, telling the story of the mountains and our experiences within them. It allows photographers to express their connection to stunning environments through various types of shots, from panoramic views to intimate close-ups of flora.
Why is budgeting important in mountain photography?
Budgeting is crucial in mountain photography to avoid impulsive spending on gear or tours. With careful planning, photographers can prioritize essential gear and travel costs, ensuring they can enjoy their adventures without financial strain and allowing for more trips to improve their skills. For those interested, check out Budget-Friendly Wildlife Photography Tours You Can’t Miss.
What camera options are suitable for budget-friendly mountain photography?
Budget-friendly options include entry-level DSLRs or lightweight mirrorless cameras from brands like Canon, Nikon, and Sony. Purchasing used or refurbished cameras from websites like KEH, B&H, and Adorama can also provide quality gear at lower prices.
What type of lens is recommended for mountain landscapes?
A wide-angle lens with a focal length of 10-18mm is ideal for capturing sweeping landscapes. Starting with a versatile zoom lens can provide a good range for various scenes, and a macro lens can be used for focusing on details like flowers or textures.
What accessories should I consider for mountain photography?
Essential accessories include a polarizing filter to reduce glare and enhance colors, extra high-capacity batteries to avoid running out of power, and spare memory cards to ensure you can capture all moments without interruptions.
How do I choose the right location for mountain photography?
Selecting the right location is key to capturing stunning shots. Exploring less-traveled paths and using apps like AllTrails or Google Maps can help find hidden gems that inspire. Personal resonance with the location often leads to the best photographs.
What should I know about weather conditions when planning a mountain photography trip?
Weather in the mountains can be unpredictable, so it’s important to check forecasts before heading out. Using apps like Weather Underground or Mountain Forecast can provide detailed information, and packing a lightweight rain jacket is advisable even if the forecast looks clear.
What are budget-friendly travel tips for mountain photography adventures?
Consider camping to save on accommodation costs, carpooling with friends to reduce gas expenses, and packing meals to keep dining costs down. Searching for local diners rather than tourist traps can also offer satisfying meals at reasonable prices.
What basic editing techniques can enhance mountain photography?
Basic editing techniques include adjusting contrast and brightness to make mountains pop, cropping to focus on striking elements, and carefully adjusting saturation to make colors vibrant while maintaining a natural look.
What safety measures should I take while mountain photography?
Pack essential safety gear like a first-aid kit, a multi-tool, and a reliable flashlight. Always stay aware of your surroundings while shooting, share your plans with someone, and prepare for emergencies by packing extra food, water, and a physical map.