As a passionate backpacker and portrait photographer, finding the right gear can make all the difference in capturing stunning images while on the go. Let’s explore the essentials that can elevate your backpacking photography experience! Read Interesting article: Top 5 Essential Portrait Photography Gear for Travelers
Understanding Portrait Photography
What is Portrait Photography?
Portrait photography is all about capturing the essence of a person or group. It’s more than just taking a picture; it’s about telling a story through expressions, emotions, and body language. I remember my first attempt at portrait photography on a hike. I spotted a fellow traveler with a vibrant scarf and decided to snap a few shots. The results were magical, and I realized how powerful a simple portrait could be in capturing a moment in time. Portraits can range from candid shots to more posed setups, and they often focus on the subject’s face and expressions, highlighting their unique features and personality.
The Importance of Gear in Portrait Photography
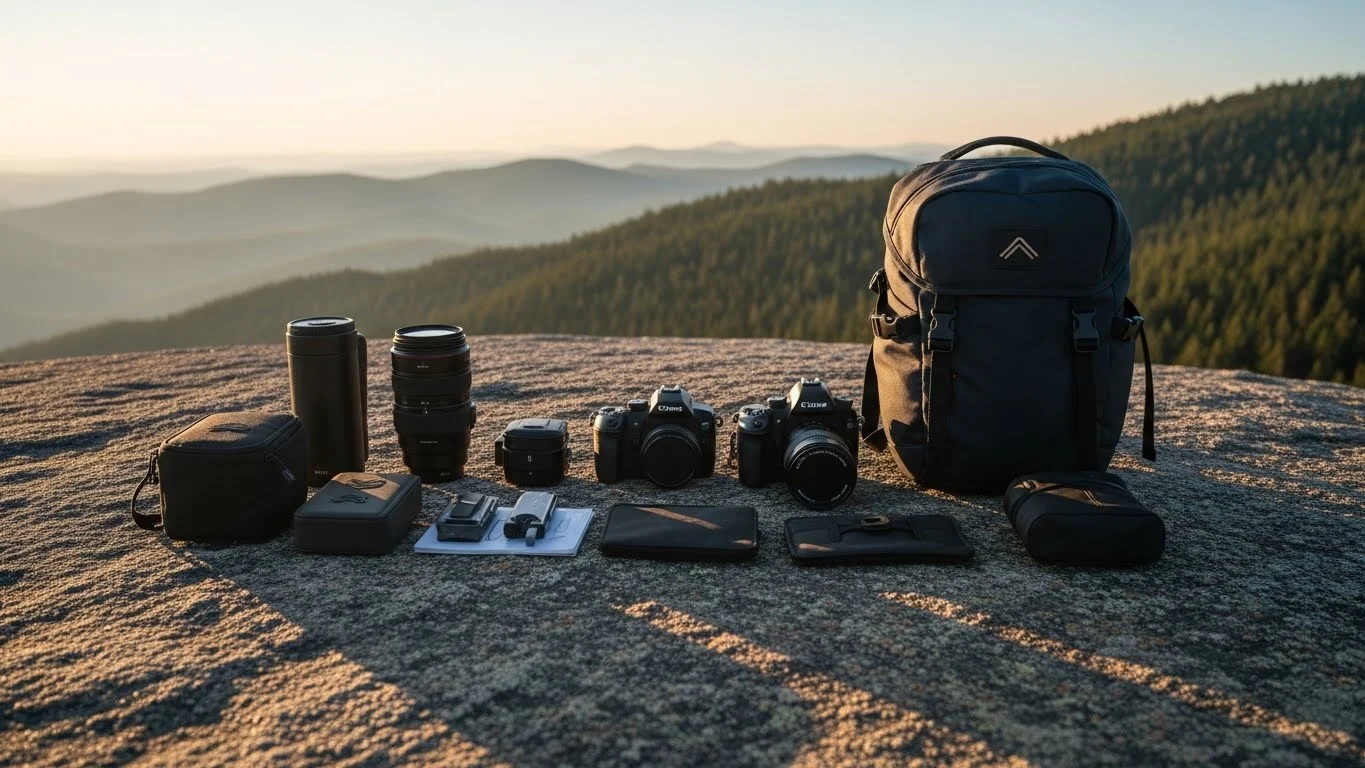
The right gear can truly make or break your portrait photography experience. I’ve learned this lesson the hard way! When I first ventured into the world of portrait photography, I used my old point-and-shoot camera. While it did the job, the results were often disappointing. I quickly discovered that investing in quality gear not only improved my photos but also made the experience more enjoyable. For backpackers, it’s crucial to balance quality and portability. We need gear that’s lightweight yet effective, allowing us to capture stunning portraits without weighing ourselves down. Each piece of equipment serves a purpose, enhancing our ability to create compelling images.
Essential Gear for Portrait Photography
Camera Options
Choosing the right camera is a key step in your portrait photography journey. I spent countless hours researching the best options before settling on a camera that perfectly fits my needs, especially for backpacking.
DSLR vs. Mirrorless Cameras
When it comes to cameras, you often hear the debate of DSLR versus mirrorless. In my experience, both have their pros and cons. DSLRs tend to be bulkier but offer great battery life and optical viewfinders. On the other hand, mirrorless cameras are generally lighter and more compact, making them ideal for backpackers like us. If you’re hiking long distances, the weight savings of a mirrorless system can be a game-changer. I’ve enjoyed using a mirrorless camera during my travels because it allows me to carry extra lenses without feeling overloaded.
Recommended Camera Models for Backpackers
For backpackers, I highly recommend considering models like the Sony A6400 or the Fujifilm X-T30. Both are lightweight and deliver excellent image quality. I’ve had amazing results with the A6400, especially in low-light conditions. These cameras also have interchangeable lenses, which brings me to the next essential part of gear—lenses!
Lens Selection
The lens you choose can significantly impact your portrait photography. After experimenting with various types, I’ve learned that the right lens can elevate the quality of your images.
Prime Lenses vs. Zoom Lenses
Prime lenses are known for their sharpness and wide apertures, making them perfect for portrait photography. I fell in love with my 50mm f/1.8 lens because it produces beautiful bokeh, focusing on the subject while softly blurring the background. However, zoom lenses offer versatility, allowing you to adjust your composition without changing your position. I often carry a zoom lens for travel portraits, as it lets me adapt to various shooting environments quickly.
Best Lenses for Portraits on the Go
If you’re a backpacker, consider a 35mm or 50mm prime lens for their lightweight design and great performance. My favorite backpacking lens is a 24-70mm zoom lens. It strikes the perfect balance between flexibility and image quality, making it ideal for capturing portraits in different settings. I’ve found that this combination has helped me adapt to various lighting conditions and environments while on the trail.
Tripods and Stabilizers
Stability is crucial in portrait photography, especially if you want to achieve sharp images. I learned this the hard way while trying to shoot in low light without a tripod!
Lightweight Tripod Options
When backpacking, a lightweight tripod is essential. I recommend a compact travel tripod, like the Manfrotto Befree. It’s sturdy yet lightweight, making it perfect for carrying on long hikes. Having a tripod allows you to experiment with different angles and compositions, and it really comes in handy for group shots where you want to be in the frame too.
Gimbals for Smooth Shots
If you’re looking to create video portraits or need smooth shots, consider investing in a gimbal. I’ve used a small handheld gimbal for my mirrorless camera, and it has transformed the way I capture moving subjects. It’s lightweight and easy to pack, allowing me to shoot dynamic portraits without the jitters that can come from handheld shots.
Lighting Equipment for Portraits
Natural Light Techniques
One of the biggest joys of backpacking photography is working with natural light. I’ve often found that the golden hour, just after sunrise or before sunset, offers the most stunning light for portraits. The soft, warm tones can really bring out the best in your subjects. I remember finding a perfect spot on a mountain trail where the light filtered through the trees, creating a magical atmosphere. It was an unexpected moment that turned into one of my favorite photographs.
When working with natural light, it’s essential to pay attention to your surroundings. I’ve learned to observe how light changes throughout the day and how it affects the mood of my images. Finding shaded areas can help soften harsh sunlight, while shooting directly into the light can create dramatic silhouettes. Experimenting with different angles and using the environment to your advantage can lead to breathtaking results. Read Interesting article: Travel Portrait Lighting: Essential Techniques for Backpackers
Portable Flash Options
While natural light is fantastic, there are times when you need a bit more control, especially in low-light situations. This is where portable flash options come into play. I’ve found that having a reliable flash can be a game-changer in my portrait photography. It allows me to fill in shadows and add a bit of sparkle to my subject’s eyes. There are a couple of types of flash I recommend exploring.
Speedlights vs. Strobe Lights
Speedlights are compact and easy to carry, making them ideal for backpacking. I use a speedlight that I can attach to my camera’s hot shoe, which gives me flexibility without the bulk of larger strobes. It provides a powerful burst of light, and I can bounce it off surfaces to create softer lighting. My favorite way to use it is to create catchlights in my subject’s eyes, which adds an engaging element to the portrait.
On the other hand, strobe lights are generally more powerful and perfect for studio settings, but they can be heavy and cumbersome for hiking. If you’re planning to do a photoshoot in one location rather than on the move, a strobe could be worth considering. For me, though, the ease and portability of a speedlight suit my backpacking adventures far better.
Reflectors and Diffusers
Reflectors and diffusers are often underrated tools in portrait photography, but they can significantly enhance your lighting setup. When I first started using a reflector, I was amazed at how it could redirect light onto my subject’s face, illuminating features beautifully. They’re lightweight and foldable, making them easy to pack in my backpack.
How to Use Reflectors Effectively
Using a reflector is simple but effective. I often position a reflector opposite the light source to bounce light back onto my subject. This technique softens shadows and creates a more balanced exposure. I’ve learned to experiment with different colors of reflectors—gold for warmth, silver for a cooler tone, or white for a natural look. Each color can dramatically change the mood of a portrait. In one memorable shoot, I had my friend hold a gold reflector, and the result was a warm, inviting glow that perfectly complemented the golden hour light.
Accessories Every Backpacker Should Have
Camera Bags and Backpacks
Your camera bag is just as important as the gear inside it. I’ve gone through a few different options, and I can’t stress enough the importance of choosing a bag that suits your travel style. A good camera bag should protect your gear while being comfortable to carry on long hikes.
Choosing the Right Backpack for Travel
I personally love backpacks that offer padded compartments for my camera and lenses but also allow space for other essentials like snacks and water. My go-to is a bag with adjustable straps and a hip belt, which helps distribute the weight evenly. I remember a time when I opted for a smaller bag that barely fit my camera—by the end of the day, my shoulders were sore, and I regretted not choosing a more comfortable option. So, take the time to find a backpack that’s not only functional but also fits your body well. This way, you can focus on capturing those incredible moments instead of worrying about your gear!
Lens Filters
Lens filters can be a simple yet effective way to enhance your photography. I’ve found them particularly useful in various situations, especially when I want to protect my lenses or control light more precisely.
UV Filters, Polarizers, and ND Filters
A UV filter is a great investment for any backpacker. Not only does it protect your lens from scratches and dirt, but it also can improve clarity. I’ve had my fair share of accidents, and having a UV filter saved my lens from some serious damage. Polarizing filters are fantastic for reducing glare from water and enhancing colors, making landscapes pop in your portraits. I often use it when shooting near lakes or rivers. Neutral density (ND) filters allow you to shoot at wider apertures in bright conditions, giving you more creative control over the depth of field. I’ve learned that having these filters can open up possibilities for stunning outdoor portraits, even in challenging lighting.
Cleaning Kits
Taking care of your gear while on the road is essential, and that’s where a cleaning kit comes in handy. I always pack a small cleaning kit with lens wipes, a blower, and a microfiber cloth. Trust me, you’ll be grateful for it after a long day of hiking when dust and moisture find their way onto your lens!
Maintaining Your Gear on the Road
I’ve made it a habit to clean my gear each night after a day of shooting. It only takes a few minutes but ensures that I’m ready for the next adventure without worrying about dirt or smudges affecting my images. It’s a small step that makes a big difference in the long run, and I recommend incorporating this routine into your backpacking photography practices.
Post-Processing Tools
Software for Editing Portraits
Once you’ve captured those stunning portraits, the next step is to polish them up with some editing. I remember when I first started out, I thought the magic happened only behind the camera, but post-processing is where you can truly bring your vision to life. There are several software options available, but two of my favorites are Adobe Lightroom and Adobe Photoshop.
Lightroom vs. Photoshop
Lightroom is fantastic for photographers who want a streamlined way to organize and edit their photos. I love how it offers powerful editing tools while also allowing me to sort and categorize my images efficiently. The batch editing feature is a lifesaver, especially when I’m working with a series of portraits from a single shoot. I can apply similar adjustments across multiple images, saving me a ton of time.
Photoshop, on the other hand, is a bit like the Swiss Army knife of editing. It provides more advanced editing capabilities, which can be incredibly useful for retouching and compositing images. I’ve delved into Photoshop for tasks like skin retouching and background adjustments. It can feel overwhelming at first, but once you get the hang of it, the possibilities are endless. I recommend using both programs in tandem; start in Lightroom for initial edits and then jump into Photoshop for those special touches.
Mobile Editing Apps for Quick Touch-Ups
On those long hikes or while camping, I found that lugging my laptop around isn’t practical. That’s where mobile editing apps come in handy. I’ve tried several, but a few stand out for their ease of use and powerful features.
Snapseed is one of my go-to apps. It’s free and offers a variety of tools that can help enhance your portraits right from your phone. I love using the “Selective Adjust” feature to enhance specific areas of an image without affecting the entire photo. It allows me to brighten up a subject’s face or deepen the colors in the background, giving my images more depth and interest.
Another app I frequently use is Adobe Lightroom Mobile. It syncs with my desktop version, so any edits I make on the go are available when I get back to my computer. The mobile app is just as powerful as its desktop counterpart, allowing me to make fine adjustments to exposure, color, and sharpness. It’s a game-changer for those quick edits while waiting for the sunset or resting at camp.
Best Practices for Backpacking with Photography Gear
Weight Management and Packing Tips
When it comes to backpacking, weight management is crucial. I learned this lesson on one of my early trips when I overpacked and ended up regretting every ounce I carried. I realized that every piece of gear should earn its place in my pack. I recommend laying everything out before packing and asking yourself if each item is absolutely necessary. This helps in making tough decisions about what to leave behind.
I’ve adopted a system that includes packing lightweight gear and prioritizing versatility. For example, my zoom lens not only serves for portraits but also works beautifully for landscapes. I also like to keep my camera and essentials at the top of my pack for easy access. This way, I can quickly pull my gear out for spontaneous photo opportunities without rummaging through my bag.
Protecting Your Gear During Travel
Protecting my gear while on the trail is something I take very seriously. I’ve seen too many photographers lose their expensive equipment due to a single mishap. I invested in padded lens cases and a weather-resistant camera bag that keeps everything safe from bumps and harsh weather. I also use lens caps and body caps religiously. They may seem like small details, but they make a significant difference in protecting my gear from dirt and scratches.
Additionally, I always carry a rain cover for my backpack. I remember being caught in an unexpected downpour once, and it was a relief to have that extra layer of protection for my gear. Keeping my equipment safe allows me to focus on the photography instead of worrying about damage.
Staying Organized on the Road
Organization is key when you’re juggling multiple pieces of equipment while traveling. I’ve found that using small pouches helps keep similar items together. For instance, I have a pouch for my filters and another for my cleaning kit. This way, I don’t have to dig through my entire bag to find what I need. I also label my pouches, which saves time in the field.
Lastly, I make it a habit to do a quick inventory of my gear at the end of each day. This not only helps me ensure I haven’t left anything behind but also gives me a chance to assess what worked and what didn’t during the day’s shoot. It’s a simple practice that has saved me from potential headaches down the line.
Frequently Asked Questions
What is portrait photography?
Portrait photography is about capturing the essence of a person or group, telling a story through expressions, emotions, and body language. It can include candid shots or posed setups that focus on the subject’s face and unique features.
Why is gear important in portrait photography?
The right gear can significantly enhance your portrait photography experience. Quality equipment improves photo results and makes the shooting experience more enjoyable, especially for backpackers who need lightweight yet effective gear.
What camera types are best for backpacking portrait photography?
For backpackers, mirrorless cameras like the Sony A6400 or Fujifilm X-T30 are recommended due to their lightweight design and excellent image quality, making them suitable for long hikes.
Should I use prime lenses or zoom lenses for portrait photography?
Prime lenses are known for their sharpness and wide apertures, making them ideal for portraits. However, zoom lenses offer versatility for adjusting composition without changing position, which can be beneficial for travel portraits.
What type of tripod should I use for backpacking?
A lightweight and compact travel tripod, such as the Manfrotto Befree, is recommended for backpacking. It provides stability and allows for experimenting with different angles while being easy to carry on long hikes.
How can I utilize natural light in portrait photography?
Natural light is best during the golden hour, just after sunrise or before sunset. Observing how light changes throughout the day and using shaded areas can help create stunning portraits with soft lighting.
What are some portable flash options for outdoor photography?
Speedlights are compact and ideal for backpacking, providing a burst of light that can enhance portraits. They are easier to carry than larger strobes, making them suitable for outdoor settings.
Why are lens filters important for backpacking photographers?
Lens filters, such as UV filters for protection, polarizers for reducing glare, and ND filters for controlling light, are essential for enhancing photography and protecting lenses from damage during travels.
What are the best practices for packing photography gear while backpacking?
Weight management is crucial; every piece of gear should have its purpose. Packing lightweight and versatile equipment, keeping essentials accessible, and doing a quick inventory each day can help ensure a successful trip.
How can I protect my photography gear while traveling?
Investing in padded cases, a weather-resistant camera bag, and using lens caps are vital for protecting gear from damage. Additionally, carrying a rain cover for the backpack can safeguard equipment from unexpected weather conditions.
How can I create memorable travel portraits?
To create memorable travel portraits, focus on storytelling through your images, engage with your subjects, and utilize the surrounding environment creatively. Read Interesting article: Explore Cultures: How to Create Memorable Travel Portraits
“`