Have you ever dreamed of capturing breathtaking wildlife moments without breaking the bank? Let’s explore how to embark on an unforgettable wildlife photography adventure, even with a tight budget. Read Interesting article: Essential Wildlife Photography Tips for Budget Safari Travelers
Understanding Wildlife Photography
What is Wildlife Photography?
Wildlife photography, for me, is more than just snapping pictures of animals; it’s about telling their stories. It involves capturing the beauty, behavior, and natural habitat of animals in their environment. I remember the first time I ventured out to photograph wildlife—I felt an adrenaline rush as I spotted a herd of elephants in the distance, their majestic silhouettes framed against the sunset. That moment taught me that wildlife photography is about patience, observation, and a deep appreciation for nature.
Importance of Wildlife Photography
Wildlife photography holds immense importance, not just for photographers but for conservation as well. Through our lenses, we can showcase the beauty of species and their habitats, raising awareness about their plight in an ever-changing world. I’ve seen how powerful images can spark conversations and inspire action. For instance, a photo I took of a vulnerable species during my travels led to discussions in my community about wildlife conservation initiatives. This experience made me realize the role we play as photographers in advocating for these creatures and preserving their environments.
Essential Gear for Budget Wildlife Photography
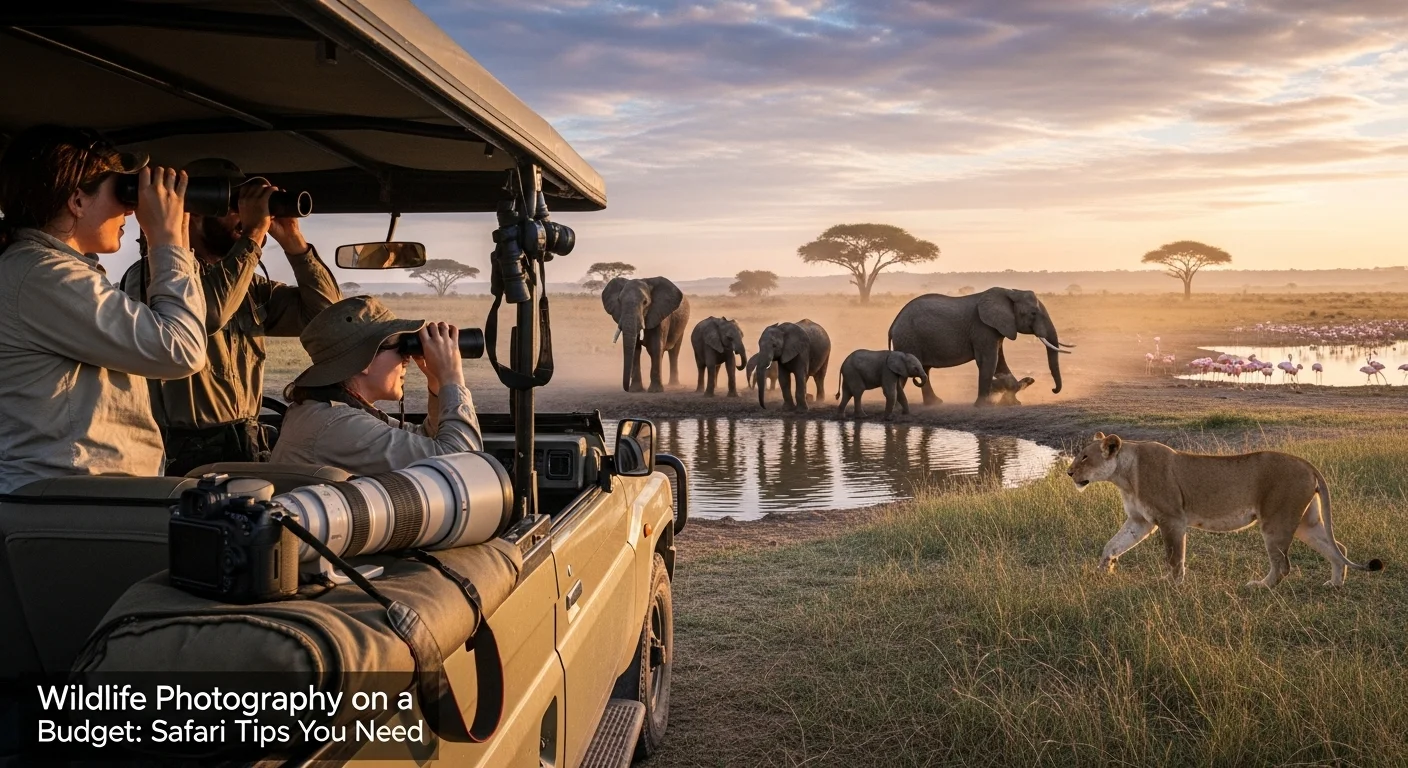
Camera Options for Beginners
As someone who started photography on a budget, I know how overwhelming it can be to choose the right camera. For beginners, I recommend starting with a DSLR or a mirrorless camera, as they provide flexibility and good image quality without costing a fortune. When I bought my first camera, I opted for a used model from a local shop, which saved me a lot of money while still delivering great performance. Brands like Canon and Nikon offer excellent entry-level options that won’t break the bank. Read Interesting article: Capture the Wild: Top Wildlife Photography Tips for Safaris
Choosing the Right Lens
The lens you choose can make a significant difference in your wildlife photography. I learned this the hard way when I initially used a standard kit lens, which limited my ability to capture distant animals. A telephoto lens is essential for wildlife photography, allowing you to zoom in and capture details without disturbing the animals. I found that a 70-300mm lens was a great compromise between price and performance. Renting lenses is also a fantastic option if you want to try before you buy or if you’re on a tight budget.
Accessories to Enhance Your Photography
While the camera and lens are crucial, don’t overlook the importance of accessories. A sturdy tripod can stabilize your shots, especially in low light conditions, and I can’t tell you how many blurry photos I avoided by using one. I also recommend investing in a good camera bag to protect your gear while you’re out in the field. Additionally, having extra batteries and memory cards is a must. I once missed capturing a stunning sunset because my battery died, which taught me the importance of being prepared.
Budget-Friendly Safari Options
Choosing Affordable Safari Destinations
When it comes to planning a wildlife photography safari, the destination can greatly impact your budget. Some of my favorite affordable locations include national parks in countries like Kenya, Tanzania, and South Africa, where you can often see incredible wildlife without spending a fortune. I remember visiting Amboseli National Park, where the entry fees were reasonable, and the wildlife was abundant. Researching lesser-known parks can also lead to stunning photography opportunities without the crowds.
Best Time to Visit for Budget Safaris
The timing of your safari can also affect your budget. Traveling during the off-peak season can lead to significant savings. I’ve found that visiting during shoulder seasons, like late spring or early fall, can provide a balance of good wildlife viewing and lower prices. The weather might be a bit unpredictable, but I’ve enjoyed some of my best wildlife encounters when fewer tourists were around.
Cost-Effective Safari Packages
While some safari packages can be quite pricey, I discovered that many operators offer budget-friendly options. Group safaris tend to be more affordable, and I’ve made lifelong friends while sharing rides and experiences with fellow travelers. Additionally, some companies offer “self-drive” safaris where you can rent a car and explore parks on your own, which can save you a lot of money. This approach allowed me to set my own pace and choose the best spots for photography.
Photography Techniques for Wildlife on a Budget
Understanding Animal Behavior
One of the most important lessons I’ve learned in wildlife photography is the value of understanding animal behavior. When I first started, I often rushed to take photos without truly observing the animals. Over time, I discovered that spending a little extra time watching them can lead to more compelling shots. For instance, I noticed that elephants tend to be more active during the early morning or late afternoon when the temperatures are cooler. By planning my outings around these peak times, I’ve been able to capture stunning images that showcase their natural behaviors, like feeding or playing with their young.
Taking the time to study the animals can also help you anticipate their movements. I remember sitting quietly near a watering hole, watching a pride of lions. Instead of just photographing them when they were lounging, I waited patiently for one to stand and stretch, creating a much more dynamic image. Understanding their habits allows us to tell a richer story through our photographs.
Using Natural Light Effectively
Lighting can make or break a photograph, and I quickly learned that natural light is my best friend in wildlife photography. I prefer to shoot during the golden hours—the hour after sunrise and the hour before sunset—when the light is soft and warm. These times create a beautiful glow that enhances colors and adds depth to my images. I recall a morning spent in a savanna, where the sun rose slowly, casting a magical light over the landscape. The way the light illuminated the dust kicked up by grazing animals created a scene I still cherish.
Even on cloudy days, I’ve found that diffused light can produce striking images. The soft light helps to reduce harsh shadows and highlights, making it easier to capture the details of an animal’s fur or feathers. I usually experiment with different angles and compositions until I find the most flattering light for the subject. One tip I learned is to always keep an eye on the direction of the light and position myself accordingly—it’s a simple adjustment that can lead to significantly better outcomes.
Composition Techniques for Stunning Shots
Composition is another crucial aspect of wildlife photography that I’ve spent a lot of time refining. The classic rule of thirds is a great starting point. Instead of placing the subject in the center of the frame, I try to align it with the grid lines, which usually makes for a more engaging shot. There was a time I captured a beautiful cheetah in mid-sprint; by positioning it off-center, I was able to convey the sense of motion and space around it, which added drama to the image.
I also enjoy experimenting with perspectives. Sometimes, getting low to the ground helps create a more intimate connection between the viewer and the subject. I remember lying on my stomach in the grass to photograph a family of meerkats. This angle allowed me to capture their expressions and the surrounding environment in a way that felt personal and immersive.
Framing is another technique that I often use. By incorporating elements from the environment, such as branches or grass, I add context to my images. This technique can also help to draw the viewer’s eye to the main subject. The more I practice, the more I realize how small adjustments in composition can lead to significant improvements in my photographs.
Where to Stay on a Budget
Camping vs. Lodges
When it comes to accommodation while on a wildlife photography adventure, I’ve had my fair share of experiences with both camping and staying in lodges. Camping is often the more budget-friendly option, and for me, it brings a unique thrill. I remember camping in Kruger National Park, falling asleep to the sounds of the wild around me. There’s something magical about being so close to nature, and it also allowed me to wake up early and get out for morning shoots without the hassle of travel.
However, if you’re not keen on roughing it, lodges can provide a bit more comfort without breaking the bank. Often, you can find budget lodges or eco-lodges that offer affordable packages, including meals and guided tours. I stayed at one such lodge in Tanzania that offered stunning views of the surrounding landscape. The comfort of a warm shower and a cozy bed was a welcome treat after a long day of shooting! It’s all about balancing what you’re comfortable with while keeping an eye on your budget.
Hostels and Budget Accommodations
If camping or lodges aren’t your style, hostels or budget accommodations can be a great alternative. I’ve found that many hostels cater specifically to travelers looking for adventure, and they can be a fantastic way to meet like-minded people. I remember sharing stories and photography tips with fellow travelers while staying at a hostel near a national park. These connections often lead to opportunities for group outings, which not only save money but also enhance the overall experience.
Additionally, platforms like Airbnb can offer affordable stays in unique locations, sometimes even in the heart of nature. I booked a charming little cabin once that was just a short drive from a renowned wildlife area, allowing me easy access to incredible photography spots. It’s amazing how thoughtful accommodation choices can enhance your overall wildlife photography adventure.
Transportation Tips for Budget Safaris
Public Transport Options
When planning my wildlife photography adventures, I quickly learned that transportation could significantly affect my budget. I often rely on public transport when traveling to national parks, as it’s usually the most economical choice. For instance, in places like Kenya and South Africa, I’ve used local buses and matatus (shared minivans) to reach various parks. While it can be a bit crowded and less comfortable than a private vehicle, the experience of mingling with locals and fellow travelers adds a unique touch to the journey.
One memorable trip was when I took a bus from Nairobi to Amboseli National Park. The scenery along the way was stunning, and I felt a sense of connection with the landscape and the people. I also found that public transport often drops you off at the park entrance or nearby lodges, which saves you the hassle of navigating the roads yourself. Just be sure to plan your schedule carefully, as the timing can be unpredictable. I recommend checking the bus schedules in advance and giving yourself plenty of time for transfers.
Car Rentals vs. Organized Tours
If you prefer more freedom and flexibility, renting a car can be a great option. I’ve rented vehicles during my travels and loved the independence it provided. Being able to explore at my own pace and visit less touristy spots made for some of my best wildlife encounters. For example, driving through Kruger National Park on my own allowed me to stop whenever I spotted something interesting, whether it was a family of elephants crossing the road or a group of giraffes grazing in the distance.
However, renting a car does come with its considerations. I found that understanding the local driving rules and conditions is essential. In some countries, like South Africa, you drive on the left side of the road, which took some getting used to. Additionally, I always made sure to have a reliable GPS or offline maps handy, as cell service can be spotty in rural areas. On the other hand, if you’re not comfortable driving in a new country, joining an organized tour can be a hassle-free alternative. While it might be more expensive, these tours usually cover not only transportation but also guide services, which can enhance your wildlife photography experience by taking you to the best spots and sharing their knowledge about the animals and environment.
Planning Your Safari Itinerary
Must-Visit National Parks and Reserves
As I’ve explored various destinations, I’ve discovered that some national parks are simply must-visits for wildlife photography enthusiasts. One of my all-time favorites is Maasai Mara in Kenya. The sheer abundance of wildlife is astounding, especially during the Great Migration when thousands of wildebeest and zebras cross the plains. I remember sitting in my vehicle, heart racing, as I captured images of the dramatic river crossings. The energy and life in the Mara are unlike any other place I’ve visited.
Another fantastic spot is Serengeti National Park in Tanzania, where the vast landscapes and diverse animal species offer countless opportunities for stunning photographs. I also found that parks like Chobe in Botswana and Etosha in Namibia can be less crowded yet just as rewarding. Researching and selecting the right parks based on the wildlife you want to photograph can make a huge difference in your experience.
Finding the Best Wildlife Viewing Spots
Once I’ve chosen my destinations, I focus on identifying the best viewing spots within those parks. I often consult online forums, social media groups, and wildlife photography blogs to gather tips from others who’ve been there. One trick I’ve learned is that certain areas within a park are known hotspots for wildlife sightings. For instance, in Kruger National Park, I realized that the rivers and waterholes are often where animals gather, especially during the dry season. Finding these prime locations can maximize my chances of capturing incredible wildlife moments.
Additionally, it’s worth speaking to park rangers or local guides. They have invaluable insights about animal behavior and can recommend the best times and places to see specific species. During one trip, I chatted with a ranger in Tsavo National Park, who helped me discover a lesser-known lookout point where I witnessed a breathtaking sunset over a waterhole filled with elephants. These kinds of experiences remind me that the journey is just as essential as the photographs I take.
Post-Processing Tips for Wildlife Photos
Free and Budget Editing Software
After a thrilling day of capturing wildlife, the fun doesn’t stop there. For me, post-processing is where I get to breathe new life into my images. Thankfully, there are plenty of free and budget-friendly editing software options out there. I’ve personally used programs like GIMP and Darktable, both of which are powerful and don’t cost a dime. They allow for comprehensive editing, from basic adjustments to more advanced techniques.
If you’re looking for something more user-friendly, I suggest trying out Lightroom’s mobile app. It’s not only accessible but also offers a solid set of features for editing on the go. I remember tweaking a photo of a lioness at sunset, and the ability to adjust the light and colors really made the image pop. These tools can help you refine your work and bring your creative vision to life, all while keeping your budget intact.
Basic Editing Techniques to Enhance Images
Once you’ve chosen your editing software, it’s time to delve into some basic editing techniques. I’ve found that adjusting exposure, contrast, and saturation can significantly enhance my wildlife images. For instance, when I shot a vibrant bird perched on a branch, I played with the saturation levels to make its colors more vivid without making them look unnatural. It’s all about finding that balance.
Cropping is another technique I often use. It allows me to focus on the subject by eliminating distracting elements from the frame. I remember taking a wide shot of a herd of wildebeests, but after cropping, the image transformed into a dramatic scene that highlighted their unity and movement. I also advocate for sharpening your images a bit, especially if you want to highlight the fine details like textures on an animal’s fur or feathers. Just remember, less is more—over-editing can lead to unnatural results.
Sharing Your Wildlife Photography
Social Media Platforms for Photographers
Once I’ve edited my photos, sharing them is the next exciting step! Social media has become a fantastic platform for photographers like us to showcase our work. I frequently use Instagram, where the visual nature of the platform allows my wildlife images to shine. I’ve connected with fellow wildlife enthusiasts and received valuable feedback on my shots. Don’t forget to use relevant hashtags to reach a broader audience; I often include tags like #WildlifePhotography, #NatureLovers, and specific animal tags to help others find my work.
Facebook groups and photography forums are also great places to share your images. I joined a wildlife photography group where I can post my work and engage in discussions about techniques and experiences. Everyone is there to share their passion, and I’ve learned a lot from others just by being part of these communities.
Creating an Online Portfolio on a Budget
Having an online portfolio is a great way to present your best work. I recommend using platforms like Wix or WordPress, which offer free options and templates that can help you get started without a hefty investment. I created my portfolio using a simple template, showcasing my favorite wildlife shots. It serves as a central place for potential clients and friends to view my work, and I can easily share the link with others.
Another budget-friendly option is to use social media as your portfolio. By carefully curating your Instagram feed and using highlights, you can have a visually appealing showcase of your photography without the need for a separate website. The key is to keep it organized and ensure that your best images are front and center.
Final Thoughts
Embarking on a wildlife photography adventure doesn’t have to drain your wallet. Through careful planning, smart choices, and a little creativity, we can capture stunning images and share the beauty of the natural world. I’ve learned that the journey itself—whether it’s hiking to the perfect vantage point, waiting patiently for the right moment, or connecting with fellow photographers—is just as rewarding as the photos we take. I hope my experiences inspire you to get out there, explore, and create your own wildlife stories through photography. Remember, it’s not about the gear you have, but the passion you bring to your craft. Read Interesting article: Mastering Wildlife Photography: Tips for Your Next Safari Trip
Frequently Asked Questions
What is wildlife photography?
Wildlife photography is about capturing the beauty, behavior, and natural habitat of animals in their environment, telling their stories through images.
Why is wildlife photography important?
Wildlife photography raises awareness about species and their habitats, showcasing their beauty and inspiring conservation efforts through powerful images.
What camera options are recommended for beginners in wildlife photography?
Beginners are encouraged to start with a DSLR or mirrorless camera, as they offer flexibility and good image quality at an affordable price. Used models can also be a cost-effective choice.
What type of lens is essential for wildlife photography?
A telephoto lens is essential for wildlife photography, as it allows you to capture distant animals without disturbing them. A 70-300mm lens is often a good compromise between price and performance.
What are some budget-friendly safari destinations?
Affordable wildlife photography safari destinations include national parks in Kenya, Tanzania, and South Africa, such as Amboseli National Park, where entry fees are reasonable and wildlife is abundant.
When is the best time to visit for budget safaris?
Traveling during the off-peak season, such as late spring or early fall, can lead to significant savings while providing good wildlife viewing opportunities.
What are some tips for understanding animal behavior in wildlife photography?
Spending time observing animals can lead to more compelling shots. Planning outings around peak activity times, such as early morning or late afternoon, can help capture natural behaviors.
What are the benefits of using natural light in wildlife photography?
Naturally occurring light enhances photographs, especially during golden hours, creating a soft glow that adds depth and warmth to images. Cloudy days can also provide diffused light for striking photos.
What are some accommodation options for budget wildlife photography adventures?
Budget-friendly accommodation options include camping, budget lodges, hostels, and platforms like Airbnb, which can enhance the overall experience while keeping costs down.
What editing software is recommended for post-processing wildlife photos?
Free and budget-friendly editing software options include GIMP, Darktable, and Lightroom’s mobile app, which allow for comprehensive editing to enhance wildlife images.