Backpacking opens up a world of adventure, and capturing those breathtaking moments from above can elevate your travel memories. With a few simple edits, you can transform your aerial photos into stunning masterpieces. Read Interesting article: Transform Your Aerial Shots: Editing Tips for Travelers
Understanding Aerial Photography for Backpackers
What is Aerial Photography?
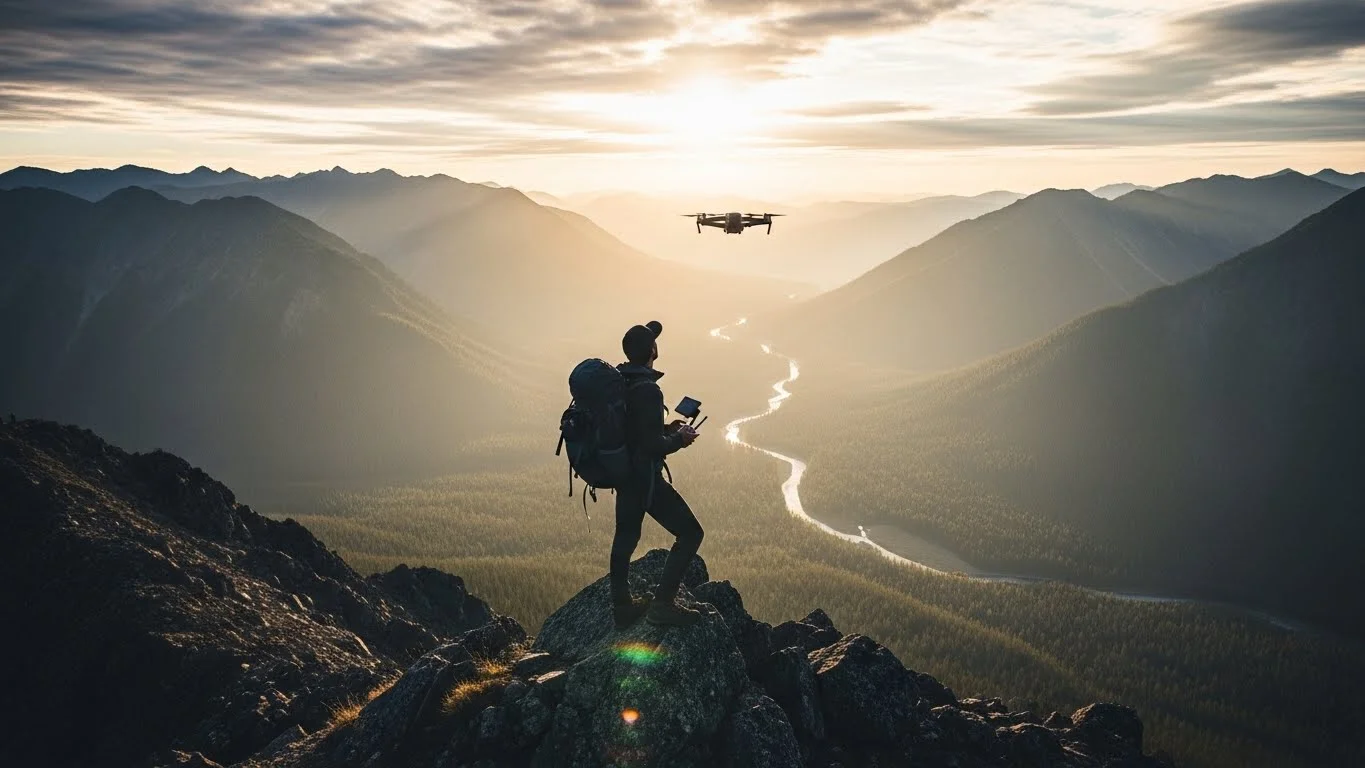
Aerial photography involves capturing images from above the ground, often using drones or other flying devices. I remember the first time I took an aerial photo; it completely changed how I viewed landscapes. Instead of just seeing trees and hills, I saw patterns, shapes, and the bigger picture. It’s like stepping into a new dimension where the world unfolds beneath you. Aerial photography is not just about taking pictures; it’s about telling a story from a new perspective. For backpackers like us, this can mean showcasing the beauty of a hard-earned vista or capturing the vastness of nature.
Benefits of Aerial Photography for Backpackers
In my experience, aerial photography brings several unique benefits to backpackers:
- Showcases Scale: When you’re on the ground, it’s hard to appreciate the scale of a mountain or canyon. Aerial shots reveal how small we are in comparison to the grandeur of nature.
- Captures Unique Perspectives: Traditional photos might miss the essence of a breathtaking view. Aerial photography gives us a fresh angle, highlighting features we might overlook.
- Memorable Souvenirs: After a long trek, returning home with stunning aerial photos to share with friends and family adds to the adventure. It’s like giving them a glimpse into our journey.
Essential Equipment for Aerial Photography
Before diving into the world of aerial photography, I learned about the essential gear we need. It’s not just about having a fancy drone; understanding what works for our backpacking adventures is crucial. Here’s what I recommend:
- Drones: These are the most popular tools for aerial photography. Lightweight drones with good camera capabilities are perfect for backpackers. Look for models known for their portability and decent battery life.
- Smartphones: Surprisingly, many smartphones today come equipped with impressively high-quality cameras. If you’re not ready to invest in a drone, using your phone can still yield fantastic results. I’ve captured some of my favorite aerial shots using just my smartphone.
- Camera Stabilizers: If you’re using a camera instead of a drone, stabilizers help keep your shots steady, especially when taking photos while moving.
- Extra Batteries: When backpacking, I always bring extra batteries for my equipment. The last thing I want is to miss a stunning sunset because my drone ran out of juice!
Budget-Friendly Aerial Photography Gear
Affordable Drones for Backpackers
Finding the right drone can be tricky, especially on a budget. I’ve researched several affordable options that pack a punch without breaking the bank. One of my favorites is the DJI Mini series. They are compact, lightweight, and offer excellent photo quality. Another great option is the Holy Stone HS720, which is also budget-friendly and has features that make it user-friendly, even for beginners. Remember, when choosing a drone, consider its flight time and camera quality to ensure you get the best value for your investment.
Smartphone Camera Options
If you’re not keen on carrying a drone, smartphones can surprise you. Many models, like the iPhone or Samsung Galaxy series, come with advanced camera features like panoramic shots and aerial view modes. You can even enhance your phone’s camera with clip-on lenses, which can improve your aerial photography significantly. I often use my smartphone when hiking in remote areas, as it’s lightweight and easy to carry. Plus, there’s a certain thrill in snapping a photo that looks like it was taken from a drone!
Accessories to Enhance Your Aerial Shots
To get the most out of your aerial photography, consider investing in a few accessories. For drones, a set of ND filters can help manage light exposure, giving your photos a more professional touch. If using a smartphone, a sturdy tripod can stabilize your shots, especially in windy conditions. I also recommend carrying a good quality backpack to protect your equipment while on the trail. It’s important to keep everything safe and organized so you can focus on capturing those beautiful moments. Read Interesting article: Top Techniques for Editing Aerial Photos on a Budget
Basic Aerial Photography Techniques
Framing and Composition
When I started taking aerial photos, I quickly realized that framing and composition are crucial in making a shot truly captivating. Just like any photograph, the way you frame your subject can change everything. I found that using the rule of thirds works wonders. This technique involves dividing your image into a grid of nine equal sections and placing the focal point at one of the intersections. It draws the viewer’s eye to the most interesting parts of the landscape, creating a sense of balance.
Another tip I picked up is to include leading lines in your shots. Roads, rivers, or the edges of fields can guide the viewer’s gaze through the image. I remember capturing a winding river from above, and the way it snaked through the landscape added depth and intrigue to the photo. Experimenting with different angles can also bring out unique textures and patterns in the earth below. Sometimes, that slight shift in angle can make all the difference in how the photo turns out.
Optimal Flying Altitudes for Stunning Shots
The altitude at which you fly your drone can dramatically impact your aerial photography. After some trial and error, I discovered that different heights can yield varying perspectives. For broad landscapes, flying at a higher altitude can help capture the vastness and scale of the scene, giving viewers a sense of space and context. I’ve taken some of my best panoramic shots from about 300 feet up, where the horizon stretches endlessly.
On the other hand, for more intimate shots, flying lower can reveal details that higher altitudes might miss. If you’re capturing a specific feature, like a stunning rock formation or a hidden waterfall, getting down to around 50-100 feet can provide a more personal connection with the subject. I often adjust my altitude based on the composition I’m aiming for, which has led to some breathtaking captures. Just be sure to follow local regulations regarding drone flight heights!
Lighting Considerations for Aerial Photography
Lighting can make or break an aerial photograph. I learned this the hard way when I took photos during the harsh midday sun, resulting in images that were washed out and lacking vibrancy. The golden hour, which is the hour just after sunrise or before sunset, is my favorite time to shoot. The soft, warm light during this time creates beautiful shadows and brings out the colors of the landscape.
Overcast days can also be a blessing in disguise. I’ve found that cloudy skies can help diffuse sunlight, reducing harsh shadows and making colors pop. This can be particularly helpful when capturing vibrant foliage or serene water bodies. It’s all about experimenting with different lighting conditions and noticing how they affect your shots. When I plan my backpacking trips, I try to align my drone flights with these optimal lighting times, ensuring I get the best possible results.
Simple Edits to Enhance Aerial Photos
Choosing the Right Editing Software
Once I’ve captured my aerial shots, the next step is editing. I used to think that editing was only for professional photographers, but I quickly realized that simple tweaks can elevate my photos significantly. There are plenty of editing software options out there; some are user-friendly and perfect for beginners. Adobe Lightroom and Photoshop are two of my go-to choices. They offer powerful tools, but I appreciate that they also have basic features that are easy to grasp.
If you’re looking for something even simpler, mobile apps like Snapseed and VSCO can do wonders right from your phone. I often edit my photos on the go, especially when I want to share them quickly with friends. It’s convenient to make adjustments directly from my smartphone while reflecting on the day’s adventure! Read Interesting article: Mastering Aerial Photo Editing: Essential Tips for Backpackers
Basic Editing Techniques
Crop and Straighten
One of the first things I do after uploading my photos is to crop and straighten them. Sometimes, I find that I’ve captured something amazing, but a little extra sky or ground can distract from the main subject. Cropping helps me hone in on what I want to highlight. Straightening is equally important; a tilted horizon can throw off the balance of the entire image. I’ve seen how a little adjustment can make a photo feel much more polished.
Adjusting Brightness and Contrast
Adjusting brightness and contrast is another simple yet effective technique that can breathe new life into your aerial photos. I remember a shot I took of a sunset where the colors looked muted in the original. After a little increase in brightness and contrast, the colors exploded! It’s like giving your photo a fresh coat of paint. Just be careful not to overdo it, as I’ve learned that a subtle touch often yields the best results.
Color Correction and Saturation
Color correction is something I pay close attention to, especially in aerial photography where the colors of the landscape can vary significantly. Sometimes, the camera doesn’t capture the hues as I see them in real life. By adjusting saturation levels, I can make the greens of the trees and the blues of the sky pop, bringing the image closer to the vibrant scene I experienced. I’ve found that a little color enhancement can transform a good photo into a stunning one.
Advanced Editing Techniques for Beginners
Applying Filters and Presets
For those who want to add a creative flair to their aerial photography, applying filters and presets can be a fun way to experiment. I’ve enjoyed using filters that give my photos a vintage or cinematic look. It’s a quick way to change the mood and feel of an image without spending too much time on detailed adjustments.
Creating HDR Images
Creating High Dynamic Range (HDR) images is something I’ve recently started exploring. This technique combines multiple exposures of the same scene to capture the full range of light and detail. I’ve found that it works particularly well in landscapes with contrasting light, like a bright sky above a dark forest. The results can be breathtaking! There are apps and software that make this process straightforward and beginner-friendly.
Best Practices for Sharing Aerial Photos
Optimal Image Formats and Sizes
After putting in all that effort to capture stunning aerial shots, it’s important to share them in a way that does justice to their beauty. I used to overlook the importance of image formats, but I’ve learned that the right choice can make a big difference. For most online platforms, JPEG is the go-to format because it compresses images without too much loss in quality, making it ideal for sharing on social media. However, for higher quality prints, I recommend using TIFF or PNG formats. These preserve more detail, which can be vital when showcasing the intricate beauty of landscapes.
When it comes to image size, I always keep in mind the platform I’m using. Social media sites have specific recommendations to ensure your photos display well. For instance, Instagram favors images that are 1080 pixels wide, while Facebook offers an optimal size of 1200 pixels wide. By resizing my images to fit these dimensions, I’ve noticed they look much sharper and more engaging. Adjusting the size before uploading also helps with loading times, which is crucial for keeping viewers engaged.
Using Social Media to Showcase Your Work
Sharing my aerial photos on social media has been one of the most rewarding experiences. Platforms like Instagram and Facebook allow me to reach a wide audience and connect with fellow backpackers and photographers. I’ve found that using relevant hashtags can dramatically increase my visibility. For instance, hashtags like #AerialPhotography, #BackpackingAdventures, or even specific location tags can help others discover my work. I also try to engage with other photographers by commenting on their posts and sharing tips, creating a sense of community.
Stories and reels are another fantastic way to showcase my adventures. I often compile short clips of my aerial shots along with snippets from my hikes. This not only keeps my audience engaged but also gives them a glimpse into my journey, making the experience personal. I remember sharing a reel of a sunrise hike that led to stunning aerial views, and the feedback was incredible. People love to see the story behind the shots!
Building an Online Portfolio
Creating an online portfolio has been a game changer for me. It’s a space where I can curate my best aerial photography and share my backpacking adventures in one place. I started by using platforms like Wix and Squarespace, which offer user-friendly templates tailored for photographers. This way, I can showcase my aerial shots alongside stories from my travels, giving visitors a deeper insight into my experiences.
Having a dedicated website allows me to present my work professionally. I’ve also included sections for prints and commissions, which have opened up opportunities for me to sell my work. I believe that sharing my journey, along with my images, helps to connect with people who share similar interests. It’s rewarding to hear from others who feel inspired by my travels, and it motivates me to keep exploring and capturing more.
Common Mistakes to Avoid in Aerial Photography
Over-editing Your Photos
When I first started editing my aerial photos, I went a little overboard. With so many tools at our fingertips, it’s easy to get carried away with filters and adjustments. I remember one particular photo where I cranked up the saturation and contrast, thinking it would make the colors pop. Instead, it looked unnatural and over-processed. I learned that sometimes, less is more. Maintaining the integrity of the original shot allows the natural beauty of the landscape to shine through.
Now, I aim for subtle adjustments that enhance the photo without losing its essence. I often take a step back and ask myself if the edits really reflect what I saw during my adventure. Keeping a consistent style across my images also helps create a cohesive look that’s appealing to viewers.
Ignoring Local Regulations and Safety Guidelines
Flying a drone comes with responsibilities, and I learned this the hard way. Before embarking on a trip, I always research local regulations regarding drone usage. Some national parks and protected areas have strict rules about where and when you can fly. I once found myself at a breathtaking lookout only to realize that drones were prohibited in that area. It was a disappointing moment, and I had to make do with ground shots instead.
Additionally, safety is paramount. I’ve taken the time to familiarize myself with my drone’s features, ensuring I can operate it confidently. Weather conditions can change quickly, especially in mountainous areas, so I always check forecasts before taking off. Being prepared helps me avoid mishaps and ensures that I can focus on capturing stunning aerial shots instead of worrying about potential issues.
Neglecting Backup Options for Your Images
After a long day of hiking and photographing, the last thing I want is to lose my photos. I learned this lesson when my laptop crashed and I lost a whole trip’s worth of images. Since then, I make it a point to back up my photos in multiple locations. I use an external hard drive and cloud storage to ensure my images are secure.
Also, I’ve started bringing a portable hard drive on my trips. It’s a great way to transfer my photos from my camera or drone after a day of shooting, ensuring I have a backup while still on the trail. This way, I can focus on enjoying my adventure without the fear of losing my hard-earned memories!
Inspiring Aerial Photography Locations for Backpackers
National Parks and Natural Wonders
The world is filled with breathtaking locations perfect for aerial photography, and I’ve had the privilege to explore many of them. National parks, in particular, offer some of the most stunning vistas. Places like Yellowstone and the Grand Canyon provide vast landscapes that are simply mesmerizing from above. I remember flying my drone over the Grand Canyon, and the patterns of the rock formations truly left me in awe.
Another favorite spot of mine is Zion National Park. The contrast between the green valleys and the red rock cliffs creates a striking image, especially during sunrise or sunset. Each trip to these national parks not only allows me to capture incredible aerial shots but also deepens my love for nature and adventure.
Frequently Asked Questions
What is aerial photography?
Aerial photography involves capturing images from above the ground, often using drones or other flying devices. It allows photographers to see landscapes from a new perspective, showcasing the beauty of vistas and the vastness of nature.
What are the benefits of aerial photography for backpackers?
Aerial photography offers several benefits, including showcasing the scale of landscapes, capturing unique perspectives that traditional photos might miss, and providing memorable souvenirs from backpacking adventures.
What essential equipment do I need for aerial photography while backpacking?
Essential equipment includes lightweight drones with good camera capabilities, smartphones with high-quality cameras, camera stabilizers for steadiness, and extra batteries to ensure equipment doesn’t run out during use.
What budget-friendly drones are recommended for backpackers?
Affordable options for backpackers include the DJI Mini series, known for being compact and lightweight, and the Holy Stone HS720, which is budget-friendly and user-friendly for beginners.
What basic techniques should I consider for aerial photography?
Key techniques include framing and composition using the rule of thirds, optimizing flying altitudes to capture various perspectives, and considering lighting conditions to enhance the overall quality of photos.
What are some simple editing techniques to enhance aerial photos?
Simple editing techniques include cropping and straightening images, adjusting brightness and contrast for better color representation, and performing color correction to make landscapes more vibrant.
What are the best practices for sharing aerial photos online?
Optimal image formats for sharing are JPEG for social media and TIFF or PNG for high-quality prints. It’s also essential to resize images according to platform recommendations to ensure they display well.
What common mistakes should I avoid in aerial photography?
Common mistakes include over-editing photos, ignoring local regulations and safety guidelines regarding drone usage, and neglecting to back up images to prevent loss of valuable photos.
Where are some inspiring locations for aerial photography?
Inspiring locations include national parks like Yellowstone and the Grand Canyon, which offer stunning vistas from above. Zion National Park is also notable for its striking contrasts between green valleys and red rock cliffs.
How can I build an online portfolio for my aerial photography?
Creating an online portfolio can be done using user-friendly platforms like Wix and Squarespace, which allow photographers to showcase their work alongside stories from their travels, enhancing the connection with viewers.