Web Analytics

Recent Posts

Capture the Thrill: Extreme Sports Photography Tips

Extreme sports photography is all about capturing the adrenaline and excitement of action-packed moments. Whether you’re at the top of a mountain or beside a raging river, the challenge is to freeze those thrilling seconds in time. Read Interesting article: Unleash Adventure: Extreme Sports for Solo Travelers

Capture the Thrill: Extreme Sports Photography Tips

Understanding Extreme Sports Photography

What is Extreme Sports Photography?

Extreme sports photography is a dynamic and exhilarating genre that revolves around capturing high-energy sports like snowboarding, rock climbing, surfing, and BMX biking. For me, it’s more than just taking pictures; it’s about telling a story of adventure, courage, and the sheer joy of pushing human limits. The moments we capture in extreme sports photography are often fleeting, filled with raw emotion and intensity. I remember my first attempt at this type of photography; I was nervous but excited, standing at the edge of a cliff as my friend prepared to base jump. The thrill was palpable, and I felt the rush of adrenaline even before I pressed the shutter.

Importance of Capturing the Thrill

Capturing the thrill in extreme sports photography serves multiple purposes. It not only documents the action but also communicates the passion and dedication of the athletes. I’ve seen how a well-timed photograph can convey the emotion of a moment, making viewers feel as if they were right there experiencing it alongside the athlete. It can inspire others to step outside their comfort zones and try something new. Each shot can evoke feelings of excitement, fear, and awe, which is why I believe it’s essential to understand the nuances of this craft.

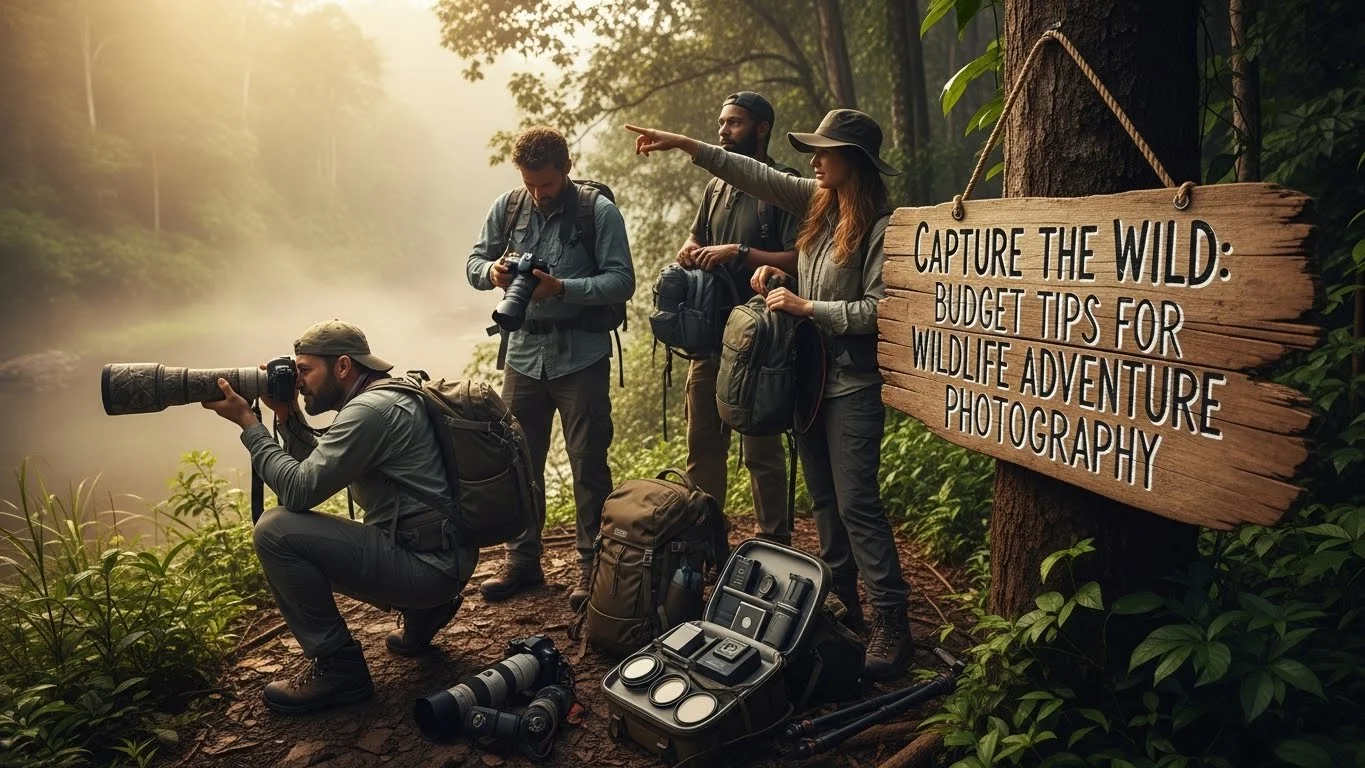
Essential Gear for Extreme Sports Photography

Cameras: DSLRs vs. Mirrorless

Choosing the right camera is crucial for capturing extreme sports. I’ve experimented with both DSLRs and mirrorless cameras and found that each has its advantages. DSLRs often have excellent battery life and a robust build, which is helpful in rugged environments. However, I’ve come to appreciate mirrorless cameras for their lightweight design and rapid autofocus capabilities. They allow me to track fast-moving subjects effectively. In my experience, the choice largely depends on your personal preference and what you feel comfortable using in the field. For those interested in budget options, I recommend checking out this Best Budget-Friendly Cameras for Travel Photography.

Lens Choices for Action Shots

The lens you choose can make all the difference in capturing stunning action shots. I generally recommend a fast lens with a wide aperture, such as a 24-70mm f/2.8. This type of lens allows for stunning close-ups while also providing versatility for different shooting scenarios. For extreme sports, a zoom lens can be particularly useful as it lets you quickly change your framing without having to move too much, which is often essential in fast-paced environments. I’ve also found that having a telephoto lens handy is great for capturing moments from a distance, like a snowboarder launching off a ramp.

Tripods and Stabilizers

While most extreme sports photography involves a lot of movement, I’ve found that having a sturdy tripod can be invaluable for capturing stable shots, especially in low-light conditions. A good tripod allows for long exposures without the risk of camera shake. Additionally, using a stabilizer can help when shooting video during high-energy events. I learned this the hard way after trying to capture a snowboarding event without one; my footage was shaky and unwatchable!

Protective Gear for Your Equipment

When you’re out in the field, your gear is exposed to the elements. I can’t stress enough the importance of protective gear for your equipment. Invest in weather-sealed camera bodies and lenses, and consider using lens filters to protect against scratches and dirt. When I was shooting an event by the ocean, I once got splashed by a wave, and thankfully my gear was well-protected. I also recommend using padded bags and cases to transport your equipment safely. Keeping your gear in top shape is essential for ensuring you capture those once-in-a-lifetime moments.

Techniques for Capturing Action

Choosing the Right Settings

Understanding your camera settings is essential for capturing high-speed action effectively. I’ve learned that shooting in manual mode can give you greater control over your images. I usually start by setting a fast shutter speed to freeze motion, which is critical for extreme sports. Depending on the lighting conditions, I adjust my ISO and aperture accordingly. It can be a juggling act, but practice makes perfect!

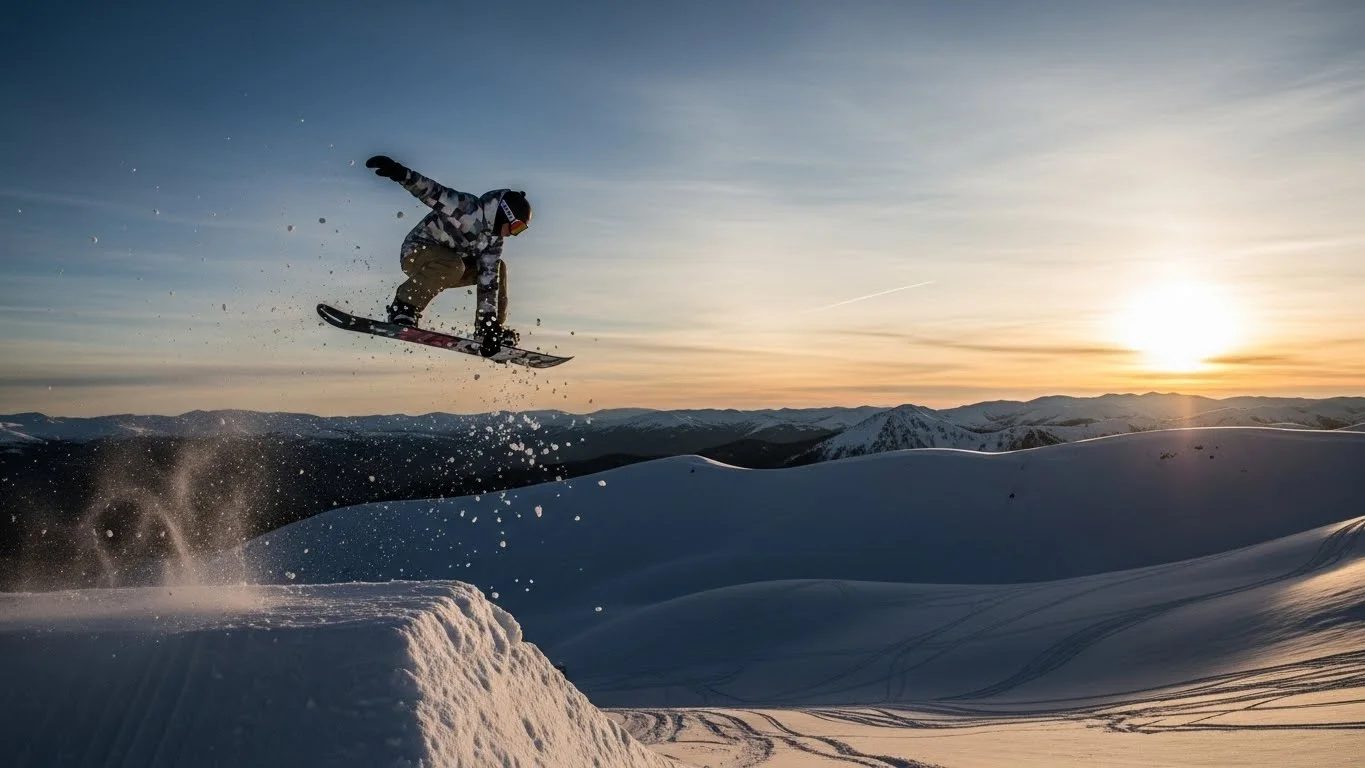
Understanding Shutter Speed and Motion Blur

Shutter speed plays a significant role in the outcome of your images. I’ve found that a speed of 1/1000th of a second or faster is often necessary to freeze action effectively. However, sometimes, a bit of motion blur can add a sense of speed and dynamism to a shot. I’ve experimented with slower shutter speeds to create artistic effects, capturing the movement of a skateboarder or mountain biker. The key is to practice and see what works best for the specific sport you’re photographing.

Using Continuous Shooting Mode

One of my favorite features to use is continuous shooting mode. This setting allows me to take multiple shots in quick succession, which is vital in extreme sports photography. I remember capturing a mountain biker as he took off a jump; using this mode, I was able to get the perfect frame of him mid-air, looking like he was flying. This feature increases the chances of capturing that ideal moment when the athlete is at their peak performance.

Framing and Composition Tips

Framing and composition can make or break your extreme sports photos. I always try to follow the rule of thirds, placing key elements along the grid lines to create a visually appealing shot. I also like to include the environment in my compositions to give context to the action. Widening the frame can show the scale of the athlete’s accomplishments against a dramatic landscape, which adds depth to the story. Experimenting with different angles and perspectives has led to some of my favorite shots, so don’t hesitate to get creative!

Locations for Extreme Sports Photography

Popular Extreme Sports Destinations

Finding the right location is crucial for capturing stunning extreme sports photography. I’ve been lucky enough to visit some incredible spots that are known for their adrenaline-pumping activities. For me, places like the rugged cliffs of Yosemite National Park, the waves of Hawaii’s North Shore, and the snowy peaks of the Alps have become my go-to destinations. Each location brings its unique flavor and challenges, and being there in person adds an electric vibe to the experience. I remember shooting a surfing competition in California; the energy of the athletes and the roar of the waves created an atmosphere that was simply unforgettable.

Another favorite spot is Moab, Utah, which is famous for rock climbing and mountain biking. The dramatic landscapes provide a stunning backdrop for action shots. I found that the red rock formations make the athletes pop in the frame, creating dynamic images that convey the essence of adventure. Additionally, destinations like Whistler in Canada are renowned for mountain biking and skiing. These places usually have established events and competitions, which means more opportunities to capture those thrilling moments.

Best Times of Day for Natural Lighting

The time of day you choose to shoot can greatly affect the quality of your photographs. I’ve learned that the golden hour—shortly after sunrise and before sunset—offers the most beautiful lighting for outdoor photography. The soft, warm light during these times can transform an ordinary shot into something magical, adding a glow to the athlete and the surrounding scenery.

However, I also enjoy shooting during the blue hour, the period just before sunrise or after sunset. The cooler tones can create a dramatic atmosphere, especially in extreme sports settings. I remember capturing a mountain biker as the sun was setting behind him, the light illuminating the dust from the trail. It created an incredible silhouette effect that I absolutely loved.

Midday, while often considered less ideal due to harsh shadows and bright highlights, can still be utilized effectively. Using a polarizing filter can help reduce glare and enhance colors, allowing for striking images even in the middle of the day. I’ve found that experimenting with different times can yield unexpected and stunning results.

Scout Locations for Unique Angles

Once I arrive at a location, I take the time to scout it thoroughly. Knowing your environment allows you to identify the best angles and compositions. I usually walk around, looking for vantage points that will help me capture the action in exciting ways. For instance, I once climbed a small hill during a snowboarding event to get an overhead shot of the riders going off a jump. The perspective added a dynamic aspect to my images that I wouldn’t have achieved from ground level.

Additionally, I look for natural frames in the environment, like tree branches or rock formations, to add depth and context to my shots. I remember framing a surfer against the cliffs of a beach; it not only highlighted the athlete but also showcased the dramatic landscapes surrounding them. Finding these unique angles can elevate your photography and tell a more compelling story.

Don’t hesitate to explore and take risks with your angles. Sometimes the most unexpected views yield the most breathtaking images. I once crouched low to the ground to capture a mountain biker speeding past; the shot was filled with energy and showcased the thrill of the sport. So, next time you’re at a shoot, take a moment to wander around and let your creativity flow.

Safety Considerations for Photographers

Staying Safe While Shooting

When diving into the world of extreme sports photography, safety must always be a top priority. I’ve learned this from firsthand experience; there have been moments when I was so focused on getting the perfect shot that I momentarily ignored the risks around me. I remember a time while shooting BMX riders at a local park; I was standing too close to the ramp. Just as I was about to click the shutter, a rider came barreling down. Luckily, I managed to jump back just in time! This was a wake-up call for me to always be aware of my surroundings.

Always ensure that you’re wearing appropriate clothing and gear. Sturdy shoes are a must, especially if you’re shooting in rugged terrains or near water. I’ve found that investing in a good pair of hiking boots has made a huge difference in my overall comfort and stability while on shoots. Additionally, if you’re shooting in locations with extreme weather conditions, layering your clothing and using weather-resistant gear can go a long way in keeping you safe and focused on the action.

Understanding the Risks of Extreme Sports

Each sport comes with its unique set of risks, and being aware of these can help you position yourself safely while capturing the action. I’ve noticed while photographing rock climbers that it’s essential to respect their space; they need to concentrate on their ascent without worrying about a photographer getting too close. I always ask for a safe distance that allows me to shoot effectively without becoming a hazard.

Also, be mindful of the athletes’ safety protocols. I once attended a downhill mountain biking event and made sure to understand the course layout and any potential hazards. This awareness not only helped me stay safe but also allowed me to anticipate moments that would unfold during the race. Respecting the inherent dangers of the sport will make the experience smoother for both you and the athletes.

Emergency Preparedness and First Aid

No one wants to think about accidents, but being prepared can make all the difference. I always carry a basic first aid kit with me when I’m shooting. It’s a small investment that can be a lifesaver. Just recently, while shooting a snowboarding event, a minor fall resulted in a scraped knee for an athlete. Thankfully, I had some antiseptic wipes and bandages on hand, which helped them out quickly.

Additionally, it’s essential to familiarize yourself with the emergency services available in the area where you’re shooting. Knowing the quickest route to a hospital or having contact information for local emergency services can provide peace of mind. I also recommend having a charged phone and a portable charger, as you never know when you might need to make an urgent call.

Post-Processing Techniques

Editing Software for Enhancing Photos

After capturing those thrilling moments, the next step is to make them shine through post-processing. I’ve found that using software like Adobe Lightroom and Photoshop can be incredibly rewarding. Both programs offer a range of tools that can elevate your images from good to stunning. I remember the first time I edited a photo of a surfer catching a wave; adjusting the contrast and saturation brought the colors to life and made the water shimmer brilliantly.

Lightroom is my go-to for organizing and making quick adjustments, while Photoshop is perfect for more intensive edits. Don’t be afraid to experiment with different styles and settings to find what works best for your vision. Some photographers prefer a more natural look, while others embrace a more dramatic, high-contrast style. I think it’s all about finding your unique voice through your edits.

Basic Editing Tips for Action Shots

When editing action shots, I prioritize clarity and focus. I’ve learned that cropping can significantly improve the composition of a photo. Sometimes, removing distracting elements from the edges helps draw attention to the athlete. I also pay close attention to sharpening my images, especially when capturing fast motion, as it can help maintain the details that make an action shot pop.

Another technique I often use is adjusting the exposure. It’s not uncommon for action shots to come out a bit dark or overexposed due to fast movements and changing light conditions. In these situations, I increase the exposure slightly or adjust the highlights and shadows to bring out the details without losing the essence of the shot. This fine-tuning can transform an ordinary photo into something truly spectacular.

Creating a Portfolio of Your Work

Building a portfolio is an exciting step in showcasing your extreme sports photography. I remember curating my first portfolio and feeling a mix of pride and anxiety. It’s essential to select your best work, highlighting a range of techniques and sports to show your versatility. I often include a few of my favorite shots from different events to showcase my ability to capture the thrill across various settings.

As I put my portfolio together, I was careful to maintain consistency in style and quality. This not only helps in presenting a cohesive body of work but also makes it easier for potential clients to understand your vision and approach. I suggest using a combination of physical prints and an online portfolio. Having an online presence allows you to reach a wider audience and easily share your work with others. I’ve received numerous opportunities simply by sharing my images on various platforms!

Sharing and Promoting Your Extreme Sports Photography

Building an Online Presence

In this digital age, having an online presence is crucial for any photographer, especially for those of us in the niche of extreme sports. I remember when I first started sharing my work online, it felt a bit intimidating, but it has opened so many doors for me. Creating a personal website or blog allows you to showcase your portfolio, share your experiences, and connect with your audience. I’ve used platforms like WordPress to build my site, where I can easily post galleries, write about my adventures, and even share tips for others looking to get into this thrilling field.

Additionally, platforms like Instagram and 500px are fantastic for photographers. The visual nature of these sites makes them ideal for showcasing action-packed shots. I’ve found that engaging with fellow photographers and enthusiasts on these platforms has helped me gain valuable feedback and connect with others who share my passion. It’s amazing how just one compelling shot can attract attention and lead to new opportunities.

Social Media Best Practices

When it comes to social media, consistency is key. I’ve learned to post regularly while keeping my content fresh and diverse. It’s not just about sharing my best shots; I also like to share behind-the-scenes moments and stories from my shoots. This humanizes my work and helps followers feel a connection to my journey as a photographer.

Using relevant hashtags is another tactic that has boosted my visibility. I often research trending hashtags related to extreme sports and photography to reach a wider audience. But I also try to create a few unique hashtags of my own; this helps to build my brand and allows others to easily find my work. Interacting with my followers through comments and DMs has also been vital in building a community around my photography. I enjoy hearing their thoughts and experiences, and it often leads to new friendships and collaborations.

Networking with Other Photographers and Athletes

Networking has played a significant role in my growth as an extreme sports photographer. Attending events and competitions has allowed me to meet both athletes and fellow photographers. I remember striking up a conversation with a seasoned photographer at a mountain biking event; he shared invaluable insights that helped refine my techniques. These connections can lead to collaborative projects, mentorship opportunities, or simply knowledge sharing.

Additionally, don’t hesitate to reach out to athletes and brands. I’ve had great experiences connecting with athletes on social media, and many are open to collaborating or sharing my work with their followers. Building these relationships can create a supportive network that benefits everyone involved. Whether it’s getting a shoutout from an athlete or collaborating on a project, these connections can significantly impact your exposure and opportunities.

Final Thoughts

Extreme sports photography is more than just a hobby; it’s a thrilling adventure that requires a blend of technical skills, creativity, and a passion for capturing the extraordinary moments of life. Throughout my journey, I’ve discovered the importance of preparation, safety, and continuous learning. From choosing the right gear to understanding the nuances of post-processing, every step is essential in creating compelling images that resonate with viewers.

As you dive into this exhilarating world, remember to stay true to your style and voice. Embrace the challenges and joys that come with photographing extreme sports, and don’t be afraid to push your limits. Whether you’re capturing an athlete soaring through the air or a serene moment in nature, each shot tells a story. So grab your camera, venture into the wild, and let your creativity flow; the world of extreme sports photography is waiting for you!

Frequently Asked Questions

What is extreme sports photography?

Extreme sports photography is a dynamic genre that focuses on capturing high-energy sports like snowboarding, rock climbing, surfing, and BMX biking. It aims to tell stories of adventure, courage, and the joy of pushing human limits through images filled with raw emotion and intensity.

Why is capturing the thrill important in extreme sports photography?

Capturing the thrill documents the action and communicates the passion and dedication of the athletes. A well-timed photograph can evoke feelings of excitement, fear, and awe, inspiring viewers to step outside their comfort zones and try new activities.

What types of cameras are best for extreme sports photography?

Both DSLRs and mirrorless cameras have their advantages. DSLRs typically offer excellent battery life and robust builds, while mirrorless cameras are lightweight and have rapid autofocus capabilities, making them effective for tracking fast-moving subjects. The choice depends on personal preference. How to Choose the Right Camera for Backpacking Trips

What lens is recommended for action shots in extreme sports photography?

A fast lens with a wide aperture, like a 24-70mm f/2.8, is recommended. This type of lens allows for stunning close-ups and versatility in various shooting scenarios. A zoom lens is particularly useful for quickly changing framing in fast-paced environments.

What safety considerations should photographers keep in mind while shooting extreme sports?

Photographers should prioritize safety by being aware of their surroundings, wearing appropriate clothing and gear, and understanding the risks associated with each sport. It is also essential to respect athletes’ space and safety protocols to ensure a smooth experience for both the photographer and the athletes.

What are the best times of day for natural lighting in extreme sports photography?

The golden hour, shortly after sunrise and before sunset, offers beautiful, soft lighting. The blue hour, just before sunrise or after sunset, can create dramatic atmospheres. Midday can be challenging due to harsh light, but using a polarizing filter can help improve image quality.

How can photographers enhance their images in post-processing?

Using software like Adobe Lightroom and Photoshop allows photographers to enhance their images. Key editing techniques include adjusting exposure, sharpening images, and cropping to improve composition. Experimenting with different styles can help photographers find their unique voice in edits.

What should be included when building a portfolio of extreme sports photography?

A portfolio should highlight the photographer’s best work across various sports and techniques, showcasing versatility. Maintaining consistency in style and quality is important, and both physical prints and an online presence can help reach a wider audience.

How can photographers build an online presence for their work?

Creating a personal website or blog to showcase a portfolio, sharing experiences, and connecting with the audience is crucial. Platforms like Instagram and 500px are excellent for sharing images and engaging with other photographers and enthusiasts.

What role does networking play in extreme sports photography?

Networking is essential for growth in this field. Attending events allows photographers to meet athletes and fellow photographers, leading to collaborative projects and mentorship opportunities. Building relationships with athletes can enhance exposure and create supportive networks.

10 Budget-Friendly Tips for Stunning Wildlife Photography

Wildlife photography can feel like a luxury pursuit, but it doesn’t have to break the bank. With a bit of creativity and resourcefulness, stunning wildlife images are within reach for everyone. Read Interesting article: Capture Nature’s Wonders: Budget Wildlife Photography Tours

10 Budget-Friendly Tips for Stunning Wildlife Photography

Understanding Wildlife Photography

What is Wildlife Photography?

Wildlife photography is an art that captures animals in their natural habitats. It goes beyond just taking pictures; it’s about telling a story and connecting with the natural world. I remember my first attempt at wildlife photography. Armed with a borrowed camera, I ventured into a nearby park, hoping to catch a glimpse of the local birds and squirrels. I was amazed at how just focusing on their behavior could turn a simple snapshot into a captivating image. Wildlife photography allows us to celebrate the beauty of nature and share its wonders with others.

The Importance of Patience and Timing

One of the most essential skills in wildlife photography is patience. Wildlife doesn’t perform on cue, and I quickly learned that waiting quietly often leads to the best shots. I’ve spent hours in the field, waiting for the perfect moment when a deer steps into the light or an eagle takes flight. Timing is also crucial; knowing the right time of day when animals are most active can dramatically improve your chances of capturing stunning images. Early mornings and late afternoons typically provide the best lighting and animal activity. I often find myself waking up at dawn, coffee in hand, excited to see what the day brings.

Essential Equipment for Wildlife Photography on a Budget

Camera Options: DSLRs vs. Mirrorless

When it comes to choosing a camera for wildlife photography, I’ve explored both DSLRs and mirrorless options. While DSLRs have long been a favorite for their reliability and lens selection, I found that mirrorless cameras are catching up quickly. They are often lighter and more compact, which is a big plus when hiking into the wild. If you’re starting on a budget, I recommend looking at entry-level models from reputable brands. You’d be surprised how much quality you can get without spending a fortune. I started with an older DSLR model, which served me well until I could invest in a newer mirrorless camera. Read Interesting article: Master Wildlife Photography on a Budget: Essential Gear Guide

Budget-Friendly Lenses for Wildlife Shots

Lenses can be a significant part of the wildlife photography budget, but I discovered that you don’t need to buy the most expensive option to get great shots. A good zoom lens can help you capture distant animals without disturbing them. I found that a 300mm lens was a perfect compromise between price and performance. If you can’t afford a brand-new lens, consider buying used or refurbished ones. Sites like eBay or local photography groups often have great deals. Investing in a quality lens has transformed my photography; I can now capture details that I could only dream of before.

Accessories: Tripods, Filters, and More

While the camera and lens are crucial, some accessories can enhance your wildlife photography experience. A sturdy tripod is invaluable, especially for low-light situations or when shooting with longer lenses. I remember struggling to keep my shots steady until I finally splurged on a decent tripod. It made a world of difference. Additionally, consider filters, like polarizers, which help reduce glare and enhance color vibrancy in your photos. I learned this the hard way after a day of shooting that yielded washed-out images. Investing in a few good accessories can help you maximize your budget and improve your images significantly.

Finding the Right Locations for Wildlife Photography

National Parks and Reserves

One of the best ways to find stunning wildlife photography opportunities is by visiting national parks or wildlife reserves. These areas are often teeming with life and provide a protected environment for animals. I’ve had some of my best experiences in places like Yellowstone and Yosemite, where I’ve spotted everything from bison to bears. Visiting during off-peak times can also help you enjoy the tranquility of nature while increasing your chances of capturing amazing shots. The key is to do a little research beforehand to find out where the animals are most frequently seen.

Local Wildlife Areas and Nature Preserves

If national parks feel out of reach, don’t overlook local wildlife areas or nature preserves. Often, these spots are less crowded and can still offer fantastic opportunities. I’ve discovered several hidden gems in my area, where I could get up close to various wildlife without the long travel. These local spots can become your go-to for regular photography outings, and they often surprise you with what you might find.

Urban Wildlife: Parks and Gardens

Wildlife photography isn’t limited to remote locations; urban parks and gardens can be rich with opportunities too. I once turned a mundane city stroll into a mini wildlife adventure by exploring a local park that was home to numerous birds, rabbits, and even the occasional fox. By being observant and patient, I was able to capture some remarkable shots right in my backyard. Urban wildlife can be just as fascinating, and it gives us a unique perspective on how animals adapt to city life.

Techniques for Capturing Stunning Wildlife Photos

Understanding Animal Behavior

One of the most rewarding aspects of wildlife photography is getting to know the animals you’re photographing. I remember when I first started, I had no idea how crucial it was to study animal behavior. By observing animals in their natural habitats, I learned about their patterns, social structures, and feeding habits. For example, I noticed that certain birds would always return to the same branch after foraging for food. By recognizing these behaviors, I was able to position myself for the best shot without disturbing them. Understanding animal behavior not only improves your chances of getting stunning photos but also deepens your connection with nature.

Using Natural Light to Your Advantage

Lighting can make or break a wildlife photograph, and I’ve found that natural light is often the best option. The golden hours—early morning and late afternoon—offer soft, warm light that brings out the beauty in animals and their surroundings. I’ve spent countless mornings anticipating the sunrise, my camera ready, as I captured the gentle light illuminating a deer grazing in the meadow. Midday sun can be harsh, creating unwanted shadows and highlights, so I try to avoid shooting during those hours unless it’s necessary. I often carry a reflector to help bounce light and soften shadows if I find myself out during the day. Learning to work with natural light has transformed my photography and made my images more vibrant and engaging.

Composition Techniques for Wildlife Photography

Composition is another crucial aspect of wildlife photography that I’ve become more aware of over time. I used to just point and shoot, but now I consider the elements in the frame. The rule of thirds is a classic guideline that can help create balanced images. By placing the subject off-center, I’ve noticed that my photos often feel more dynamic and interesting. Additionally, finding unique angles can set your photos apart. I remember lying on the ground to photograph a family of rabbits, capturing them at their level instead of towering above them. This perspective brought a whole new appreciation for their world. Framing the subject using natural elements like branches or leaves also adds depth and context, which can make a simple photo much more compelling.

Utilizing Free Resources and Communities

Online Forums and Social Media Groups

When I began my journey into wildlife photography, I was amazed at how many resources were available online. One of my favorite finds was a local wildlife photography group on social media. Joining these communities has been invaluable for sharing experiences, tips, and critiques. I found myself connecting with fellow enthusiasts who were eager to share their knowledge and experiences. It felt great to exchange ideas and get inspiration from others’ work. Plus, these groups often organize meetups and outings, which can be a great way to practice and learn together. I highly recommend diving into online forums and social media groups to connect with others who share your passion.

Wildlife Photography Workshops and Meetups

Workshops can be a fantastic way to immerse yourself in wildlife photography. I attended a local workshop where I had the opportunity to learn directly from a seasoned photographer. Not only did I gain practical skills, but I also made lasting friendships with others who shared my interests. I realized that learning doesn’t have to be a solitary journey; collaborating and sharing experiences with others can elevate your skills. Many organizations offer affordable workshops, and some local wildlife centers may even host events that are budget-friendly. Keep an eye out for announcements in your community; you never know what you might discover!

Free Online Tutorials and Courses

In this digital age, countless free resources can enhance your photography skills. I’ve spent hours watching tutorials on platforms like YouTube, where talented photographers share their techniques, tips, and tricks. From understanding camera settings to post-processing techniques, there’s a wealth of information available at your fingertips. I also stumbled upon free online courses focused on wildlife photography that helped me refine my skills at my own pace. I encourage you to explore these resources; investing time in learning can dramatically improve your photography without putting a dent in your wallet.

Post-Processing Your Wildlife Photos on a Budget

Free Editing Software for Beginners

Once I started capturing wildlife photos, I quickly realized that editing was a crucial part of the process. I needed to enhance my images to truly reflect the beauty I saw in the field. Thankfully, there are several free editing software options that are perfect for beginners. Programs like GIMP and RawTherapee have been my go-to tools. They may not have all the bells and whistles of expensive software, but they offer plenty of features to get you started. I remember my first time editing a photo of a fox; with just a few adjustments to exposure and color balance, it transformed from a simple snapshot into a striking image.

Basic Editing Techniques to Enhance Your Photos

Editing doesn’t have to be complicated. I’ve learned a few basic techniques that can significantly improve my wildlife photos. Cropping can help focus on the subject and eliminate distractions. Adjusting brightness and contrast can make details pop, while sharpening can enhance clarity. I also like to play around with color saturation to make the hues more vibrant, reflecting the vividness I experienced in the field. I remember one photo of a vibrant bluebird that looked dull before editing; after enhancing the colors, it looked like it jumped off the screen! These simple edits can elevate your photos without requiring professional software or expensive subscriptions.

Budget-Friendly Tips for Capturing Specific Wildlife

Bird Photography: Best Practices

Bird photography holds a special place in my heart because it challenges me to be both patient and observant. I remember the thrill of capturing my first clear image of a hummingbird hovering near a feeder. To get those stunning shots, I’ve learned a few best practices that have made a significant difference in my approach. First, I recommend investing in a decent pair of binoculars. Being able to spot birds from a distance allows you to anticipate their movements without startling them. When I’m out in the field, I often find a comfortable spot and wait until I see birds naturally behaving, rather than trying to rush the moment.

Another tip is to use a fast shutter speed. Birds can be quick and unpredictable, so I often set my camera to a faster setting, like 1/1000 of a second, to freeze their motion. I’ve found that using a continuous shooting mode can help capture a series of frames, ensuring I don’t miss that perfect moment when a bird takes flight or lands. Lastly, I’ve discovered the importance of learning about the local bird species and their habits. Knowing when they are most active—like during migration seasons—can lead to incredible photo opportunities.

Land Mammals: Tips for Close Encounters

Capturing images of land mammals can be one of the most rewarding aspects of wildlife photography. I’ll never forget the time I was fortunate enough to photograph a mother deer and her fawn in a quiet meadow. For mammal photography, I’ve learned that it’s essential to blend into the environment. Wearing neutral colors and moving slowly can make a significant difference. I often sit quietly and let the animals get used to my presence; this patience has led to some of my best shots.

Another tactic I’ve found useful is to look for animal tracks or signs of activity, such as droppings or feeding areas. By following these clues, I can anticipate where the animals might appear. I also make sure to use a longer lens when photographing mammals, as it allows me to capture them up close without disturbing their natural behaviors. Lastly, I’ve discovered the joy of photographing mammals at dawn or dusk, known as the golden hours. The soft lighting adds warmth and depth to the images, creating an enchanting atmosphere.

Aquatic Wildlife: Techniques for Success

Aquatic wildlife can be a bit trickier to photograph, but the rewards are often worth the effort. I’ve had some incredible experiences capturing seals and herons along the shorelines of lakes and rivers. One of the key techniques I recommend is to position yourself at water level. I found that getting low to the ground or sitting on the edge of a boat can provide a unique perspective that adds drama to the images. It brings the action closer to the viewer and offers a different view of the animal’s habitat.

Additionally, I’ve learned the importance of being aware of the water conditions. On calm days, reflections can create stunning mirror-like images that enhance the composition. I try to time my outings close to sunrise or sunset when the light is softer, which often leads to beautiful captures of fish jumping or birds diving into the water. Lastly, a waterproof camera bag has been my lifesaver on these trips. It protects my gear from splashes and unexpected rain, allowing me to focus on capturing the moment without worrying about my equipment.

Planning Your Wildlife Photography Trips

Budgeting for Travel and Accommodation

Planning a wildlife photography trip can be both exciting and overwhelming. I’ve learned that setting a budget is essential, especially if you want to maximize your experience without overspending. I usually start by researching destinations that offer great wildlife opportunities but don’t require expensive travel. Local parks and reserves often provide remarkable encounters without the need for a long road trip or costly flights. Read Interesting article: Wildlife Adventure Photography: Budgeting Your Next Trip

To save on accommodation, I often look for camping options if the location permits. Camping not only cuts costs but also allows me to be closer to nature and the wildlife I want to photograph. I remember one trip where I camped near a lake and was able to capture stunning dawn shots of loons and ducks right from my tent. If camping isn’t an option, I find budget hotels or hostels can also be great alternatives, especially if I book in advance and look for deals.

Best Times of Year for Wildlife Photography

Understanding the best times of year for wildlife photography is key to planning successful trips. I’ve discovered that different species are more active during specific seasons. For example, spring is often the best time to photograph migratory birds as they return to their nesting grounds. Summer offers lush landscapes and the chance to see young animals, while fall can provide breathtaking colors and opportunities to capture animals preparing for winter. Winter itself can also be stunning, as many animals are easier to spot against a snowy backdrop.

Monitoring local wildlife activity through online resources or community forums can help pinpoint the right time to visit certain locations. This is something I’ve started doing regularly, and it has greatly improved my success in capturing wildlife images.

How to Stay Safe While Photographing Wildlife

Safety is a top priority when venturing out for wildlife photography. I’ve learned this the hard way, and a few key practices have helped me avoid potential dangers. First, I always make sure to keep a safe distance from wild animals. While I want to capture intimate shots, it’s crucial to respect their space. I’ve invested in a good zoom lens to ensure I can photograph them without getting too close. I’ve also learned to be aware of my surroundings, especially in areas where larger mammals may roam, like bears or bison. Carrying bear spray in certain regions has given me peace of mind.

Additionally, I always inform someone of my plans before heading out, especially if I’m exploring remote areas. Having a buddy or letting someone know where I’ll be can be vital in case of emergencies. Staying aware of weather conditions is also essential; I’ve had to turn back on occasions due to sudden storms. Being prepared and staying safe allows me to enjoy the beauty of wildlife photography fully.

Frequently Asked Questions

What is wildlife photography?

Wildlife photography is an art that captures animals in their natural habitats, telling a story and connecting with the natural world.

Why is patience important in wildlife photography?

Patience is essential because wildlife does not perform on cue, and waiting quietly often leads to the best shots. Knowing when to capture images based on animal activity can dramatically improve the results.

What camera type is recommended for wildlife photography on a budget?

Both DSLRs and mirrorless cameras are good options, but mirrorless cameras are often lighter and more compact. Entry-level models from reputable brands are recommended for those starting on a budget.

How can I find good locations for wildlife photography?

Good locations include national parks and wildlife reserves, local wildlife areas, and urban parks and gardens. Researching these areas can help you discover where animals are most frequently seen.

What are some basic editing techniques to enhance wildlife photos?

Basic editing techniques include cropping to focus on the subject, adjusting brightness and contrast, sharpening for clarity, and playing with color saturation to make images more vibrant.

What best practices should I follow for bird photography?

Best practices for bird photography include using binoculars to spot birds from a distance, using a fast shutter speed to freeze motion, and learning about local bird species and their habits for better timing.

How can I safely photograph wildlife?

To stay safe while photographing wildlife, maintain a safe distance from animals, be aware of your surroundings, inform someone of your plans, and monitor weather conditions.

What types of accessories are useful for wildlife photography?

Useful accessories include a sturdy tripod for stability, filters to enhance image quality, and good lenses to capture distant wildlife without disturbing them.

What are some budget-friendly tips for wildlife photography?

Budget-friendly tips include looking for used or refurbished lenses, camping to save on accommodation, and utilizing free online resources and communities for learning and support.

When is the best time of year for wildlife photography?

The best time for wildlife photography varies by species; spring is ideal for migratory birds, summer for young animals, fall for vibrant colors, and winter for easier spotting against snow.

Wildlife Adventure Photography: Budgeting Your Next Trip

Wildlife adventure photography is an exhilarating way to connect with nature and capture breathtaking moments. Planning your trip on a budget ensures you get the most out of your adventure without breaking the bank. For more insights, check out Top Destinations for Affordable Wildlife Adventure Photography.

Wildlife Adventure Photography: Budgeting Your Next Trip

Understanding Wildlife Adventure Photography

What is Wildlife Adventure Photography?

Wildlife adventure photography is more than just snapping images of animals in their natural habitat; it’s about immersing yourself in the wild and telling a story through your lens. I remember my first experience—standing at the edge of a serene lake as the sun began to rise, the mist hovering above the water, and a family of deer grazing nearby. That moment was magical, but it took planning and effort to get there. Wildlife photography captures the beauty of nature, the behavior of animals, and sometimes even the harsh realities they face. It’s an art form that allows us to appreciate wildlife and advocate for conservation.

The Importance of Planning and Budgeting

When I first ventured into wildlife photography, I underestimated the importance of planning and budgeting. I thought I could just grab my camera and head out into the wild. However, I quickly learned that without a solid plan, my adventure could become overwhelming and costly. Budgeting is essential for a successful trip; it ensures that you can focus on your photography rather than fretting about finances. By setting a budget, you can allocate funds for travel, accommodation, food, and any necessary permits. I found that mapping out my costs ahead of time allowed me to explore more freely, knowing I had everything covered.

One of the first steps in planning is determining the location. Some places are more accessible and affordable than others, especially for wildlife photography. I’ve discovered that national parks often provide stunning opportunities to capture wildlife while also having frameworks in place that support photographers. Researching potential locations can help you identify the best time of year to visit, which can significantly impact costs. For example, visiting during the off-peak season might lead to lower accommodation rates and fewer crowds, allowing for a more intimate photography experience.

Another aspect to consider is the specific wildlife you want to photograph. Some animals have preferred habitats, and knowing these can make a huge difference. I once spent a week in a national park specifically to photograph migratory birds during their breeding season. The planning paid off as I returned home with images that told a powerful story of their journey. By budgeting, I was able to factor in travel to different locations within the park to maximize my chances of capturing diverse wildlife.

I also learned that some areas require permits for photography, especially in protected regions or during special events. It can be easy to overlook these details while budgeting, but they can come at a cost. I’ve paid for permits in the past that allowed me access to restricted areas where I was able to photograph animals up close. It was worth every penny to get those unique shots. So, I recommend checking the regulations of your chosen location early in the planning process to include these fees in your budget.

As you start to think about your budget, consider how you’ll get to your destination. Flights, fuel, and local transportation can add up quickly. I’ve found that being flexible with travel dates and using flight comparison websites helped me find more affordable options. Sometimes, I’ve even discovered hidden gems within driving distance from my home that offered fantastic wildlife photography opportunities without the hassle and expense of flying.

Once I arrive at my destination, finding affordable accommodations can significantly impact my overall budget. I often choose camping or budget lodges if I’m in a national park. Not only do these options save money, but they also enhance the experience of being closer to nature. I remember camping under the stars in a remote area of a national park, falling asleep to the sounds of the wild. It was one of my best photography trips! Plus, being within the park’s boundaries means you can start shooting at sunrise and stay out until sunset without spending extra time commuting.

Food is another critical area to budget for. Eating out can quickly drain your funds, so I usually plan to pack some meals. I love cooking simple meals over a campfire, which not only saves money but also adds to the adventure. I encourage friends to join me; sharing meals and stories around the fire creates memorable experiences. Plus, I always pack some snacks for long days out in the field while I’m waiting for that perfect shot.

In addition to all these costs, I also think about my photography equipment. Investing in high-quality gear is vital for wildlife photography, but it doesn’t have to be excessively expensive. I’ve built my collection over time, focusing on versatile lenses and a sturdy tripod. It can be tempting to splurge on the latest gear, but I’ve learned to prioritize what I really need based on my photography style. If you’re just starting, consider renting equipment instead of buying it outright. This way, you can test different options without a long-term commitment. For more on gear, visit Essential Gear for Wildlife Safari Photography Adventures.

Lastly, I can’t stress enough the importance of insurance. Protecting your gear from damage or loss while traveling is crucial. I once had a lens break during a trip; thankfully, I had insurance that covered it. While it may seem like an additional expense, it’s a safety net that can save you a lot of money in the long run.

Key Locations for Wildlife Photography

National Parks and Wildlife Reserves

When I think of the best locations for wildlife photography, national parks and wildlife reserves immediately come to mind. They are often teeming with biodiversity and provide a protected environment for animals to thrive. I’ve had some of my most memorable experiences in places like Yellowstone National Park, where I could photograph bison roaming the plains and wolves in their natural habitat. The beauty of national parks is that they are not only picturesque but also equipped with visitor centers that offer guidance on the best spots for capturing wildlife. I recommend checking out park maps and talking to rangers; they can provide invaluable insights on where to find specific animals, especially during different times of the year.

Another remarkable wildlife reserve I visited was the Maasai Mara in Kenya. It’s known for the Great Migration, where thousands of wildebeests and zebras cross the plains. I remember being in a safari vehicle, surrounded by the sounds of nature, and witnessing this incredible spectacle up close. The natural lighting in these settings can be unpredictable, but that’s part of the adventure! National parks and wildlife reserves often offer guided tours, which can enhance your experience and help you spot those elusive animals that might otherwise go unnoticed.

Wildlife Sanctuaries Around the World

Wildlife sanctuaries are another fantastic option for photographers looking to capture the beauty of animals while also supporting conservation efforts. I’ve seen firsthand how sanctuaries provide safe havens for endangered species, and they often allow for close encounters that are hard to find in the wild. One of my favorites is the Giraffe Centre in Nairobi, where visitors can feed and photograph the endangered Rothschild giraffe. It’s thrilling to be so close to these gentle giants and to learn about the efforts being made to save them.

Visiting sanctuaries allows for unique photography opportunities since the animals are often more accustomed to human presence. I remember a trip to a sanctuary for orangutans in Borneo, where I had the chance to capture candid moments of them playing and interacting. The intimate setting not only made for great photos but also deepened my understanding of these incredible creatures and the challenges they face in the wild.

Best Countries for Wildlife Photography

As I’ve traveled more, I’ve started to identify countries that stand out for their wildlife photography potential. Countries like South Africa, Tanzania, and India have become some of my go-to destinations. In South Africa, the Kruger National Park is fantastic for spotting the Big Five—lions, leopards, elephants, rhinos, and buffalo. Having the chance to photograph these animals in their natural habitat was nothing short of exhilarating. I also loved the diverse landscapes, from savannahs to mountains, which provided stunning backdrops for my photos.

In Tanzania, I recommend visiting the Serengeti, especially during the calving season when baby animals are born. The energy and life in the air are palpable, and it’s an extraordinary time to capture not just the animals but also the dynamics of life in the wild. India, with its rich biodiversity, offers a different experience altogether. I had an unforgettable time photographing tigers in Ranthambore National Park—watching these magnificent creatures in their natural habitat was a dream come true.

Every country has its unique wildlife and ecosystems, so I encourage you to explore different regions. I’ve found that learning about local habitats and the specific animals that call them home can significantly enhance your photography experience. Each trip has taught me something new, and I believe it’s essential to immerse ourselves in the culture and environment of these places to tell better stories through our images. For budget tips, check out Capture the Wild: Budget Tips for Wildlife Adventure Photography.

Budgeting for Your Wildlife Adventure Photography Trip

Estimating Travel Costs

When I start planning my wildlife photography trips, estimating travel costs is always one of the first things I tackle. I’ve learned from experience that transportation can take a big chunk out of my budget. Whether it’s booking flights or figuring out how much gas I’ll need for a road trip, having a clear estimate helps me stay on track. For me, using a travel budget app has been a game changer. It allows me to input various travel expenses, and I can see where I might need to adjust. I remember a trip where I was able to save money by choosing to fly into a smaller airport nearby instead of a major hub. The savings on both flights and car rentals made it worth the extra drive!

Accommodation Options

Finding the right place to stay can really help manage my expenses. I’ve experimented with various options over the years, from luxury lodges to camping in the wild. Camping is often my go-to choice because it brings me closer to nature and allows for those early morning photography sessions without the hassle of long commutes. I also use websites that specialize in budget accommodations, which often feature hostels or guesthouses. I remember one particular trip where I discovered a charming little cabin that was affordable and had a porch overlooking a stunning view. It felt like the perfect home base for my photography adventures!

Food and Dining Expenses

Food can quickly add up while traveling, especially in more remote areas. I’ve found that planning my meals in advance not only saves money but can also be part of the fun! When I pack a cooler with sandwiches, fruits, and snacks, I feel prepared for long days out in the field. Cooking over a campfire is one of my favorite rituals; I still remember the satisfaction of grilling fresh vegetables and meat while sharing stories with fellow photographers under a blanket of stars. Plus, it means I’m not relying on pricey restaurant meals, which can be a budget-buster.

Permits and Fees for Wildlife Photography

It’s easy to overlook permits and fees when budgeting, but they can make a significant difference in the overall cost of a trip. Many national parks and wildlife reserves charge for entry, and some locations require additional photography permits. I once experienced this firsthand when I planned a trip to a well-known wildlife area and didn’t account for the photography permit fees. Thankfully, I had a bit of extra money set aside, but it taught me a lesson to always research these details ahead of time. I recommend checking the specific rules for each location to ensure you’re prepared and to factor these costs into your budget.

Equipment Costs

I’ve spent quite a bit on my photography gear over the years, but I’ve also learned how to manage equipment costs wisely. If you’re just starting, it’s easy to feel overwhelmed by the options available. I’ve found it helpful to rent high-end equipment for specific trips instead of buying everything outright. This way, I can test lenses or cameras that I might not use frequently enough to justify the purchase. I remember renting a telephoto lens for a trip to photograph elephants in Botswana, and it made all the difference in capturing those close-up shots! Over time, I’ve gradually invested in the gear that has proven essential for my style of photography.

Insurance Considerations

Insurance is another aspect I can’t stress enough when budgeting for a wildlife photography trip. Protecting my gear gives me peace of mind, especially when traveling to remote locations where repairs or replacements could be hard to come by. After experiencing a broken lens on a trip, I realized just how vital this was. I now budget for gear insurance as part of my overall travel expenses. It may seem like an added cost, but knowing that I have a safety net allows me to focus on my photography without worrying about what could go wrong. I recommend looking for insurance that specifically covers photography equipment, as it often provides the best protection for our valuable gear.

Tips for Reducing Costs While Traveling

Finding Affordable Flights

I’ve always found that flights can be one of the biggest expenses when planning any photography trip. Over the years, I’ve learned a few tricks to help reduce those costs. First, I recommend being flexible with your travel dates. If you can, try searching for flights on weekdays instead of weekends; I’ve found that flights tend to be cheaper then. Also, using flight comparison websites can help you find the best deals. I remember one trip where I saved a significant amount by booking a flight with a layover instead of a direct one. It took a little longer to get to my destination, but the savings were worth it!

Choosing Budget Accommodations

When it comes to accommodations, I’ve become quite the expert at scouting out budget-friendly options. I often look for hostels, guesthouses, or even shared accommodations through platforms like Airbnb. Sometimes, I’ve even connected with fellow photographers who are traveling to the same locations and shared a place to stay. It not only cuts costs but also makes for great camaraderie. I remember finding a cozy little inn during my travels in Costa Rica that offered not just affordable rates but also breakfast included. It was a lovely way to start my days before heading out for photography sessions.

Using Public Transportation

Public transportation can be a fantastic way to save money while traveling. I’ve utilized buses and trains in various countries, which not only helps me stick to my budget but also allows me to experience local culture more authentically. I remember traveling through Europe, where the train system was efficient and affordable. It was a fun adventure meeting locals and fellow travelers along the way. Plus, it enabled me to focus on my photography without the stress of navigating unfamiliar roads.

Meal Planning and Cooking Options

Food expenses can sneak up on you while traveling, especially if you’re eating out for every meal. I love planning my meals ahead of time and packing essentials to keep costs down. I often bring a portable stove and some basic cooking gear on my trips. Cooking outdoors can turn into a delightful experience. I’ll never forget the time I made pasta with fresh vegetables I picked up at a local market while camping in a national park. Sharing that meal with friends under the stars made it even more special!

Essential Gear for Wildlife Photography

Camera Equipment Recommendations

When it comes to wildlife photography, having the right gear can make all the difference. I’ve spent years refining my equipment choices. A good starting point is a DSLR or mirrorless camera, paired with a versatile zoom lens. For wildlife, I usually recommend lenses with at least 300mm of reach; this allows you to capture those distant subjects without disturbing them. I’ve invested in a quality telephoto lens that has become my go-to. It’s allowed me to get stunning shots of animals in their natural habitats without getting too close.

Accessories to Enhance Your Experience

In addition to my camera and lens, I’ve found a few accessories that really enhance my wildlife photography experience. A sturdy tripod is essential for stability, especially in low light conditions. I also carry a camera backpack that fits all my gear comfortably while keeping it protected from the elements. I’ve learned the hard way that having extra memory cards and batteries on hand can save a trip from being cut short. There’s nothing worse than running out of space or power while waiting for that perfect shot!

Protecting Your Gear in the Field

Protecting my gear while I’m out in the wild is something I take very seriously. I always make sure to have a weather-sealed camera bag for rainy conditions and use lens filters to shield my lenses from dust and scratches. I remember being caught in a sudden downpour during a shoot; my gear stayed dry and safe, allowing me to keep shooting. It’s crucial to think ahead and prepare for the unexpected so you can focus on your photography.

When to Plan Your Trip

Best Seasons for Wildlife Photography

Timing is everything in wildlife photography, and I’ve learned that different seasons bring unique opportunities. For instance, spring is often the best time for baby animals, while fall can be spectacular for migrations. I remember planning a trip to photograph autumn colors in New England while also capturing migratory birds. Being aware of the seasonal changes not only helps in planning but also in enhancing the stories I tell through my photos.

Understanding Animal Behavior and Migration Patterns

Understanding animal behavior and migration patterns is something I’ve found invaluable. Researching the animals I want to photograph has taught me when and where to find them. For example, I’ve learned that certain species are more active during dawn and dusk. I try to align my photography sessions during those times, which has led to some of my best shots. I also recommend using resources like local wildlife websites or guides to get insights into the best times to visit specific locations.

Preparing for Your Trip

Researching Wildlife and Locations

Before any trip, I dedicate time to researching both the wildlife I hope to photograph and the locations I’ll be visiting. I’ve found that understanding the local ecosystem goes a long way in improving my photography. Knowing what animals are in the area and their behaviors helps me anticipate their movements and position myself accordingly. I often look up blogs, documentaries, or books about the region to deepen my understanding.

Creating a Shooting Plan

Creating a shooting plan has become a staple in my preparation process. I map out locations within the area where I might find specific wildlife. I also think about the types of shots I want to capture, whether it’s action shots or close-up portraits. This plan helps me stay organized and focused during my shoot. I remember a trip where I planned my shots ahead of time, which allowed me to maximize my time in the field and capture the images I envisioned.

Local Laws and Regulations for Wildlife Photography

Understanding local laws and regulations is crucial. I make it a point to research any restrictions related to wildlife photography in my chosen location. Some parks have specific guidelines to protect wildlife, and it’s essential to respect those rules. I once encountered a situation where I didn’t realize a certain area was off-limits, and it was a reminder of the importance of staying informed. I recommend checking official park websites or reaching out to rangers for guidance.

Staying Safe During Your Adventure

Wildlife Safety Tips

Safety is paramount while engaging in wildlife photography. I always keep a respectful distance from animals to avoid disturbing them and to protect myself. I’ve learned to be aware of my surroundings, especially when photographing larger wildlife. Carrying bear spray in certain regions has given me peace of mind, and I recommend anyone heading into bear country do the same. It’s better to be prepared than to find yourself in a precarious situation.

Health and Safety Precautions

Health and safety precautions are also critical. I always pack a first aid kit and make sure to have any necessary medications on hand. I learned this lesson the hard way during a remote trip when I got a minor injury and had to rely on my limited supplies. Staying hydrated and bringing sunscreen are also important, especially when spending long days outdoors.

Emergency Contacts and Resources

Before heading out, I always make a list of emergency contacts and resources. I make sure to inform someone of my itinerary so they know where I’ll be. Having local emergency numbers saved in my phone is something I never overlook, as it can make a difference during a crisis.

Final Thoughts

Wildlife adventure photography is a rewarding pursuit that allows us to connect with nature and share its beauty with others. Through careful planning, budgeting, and preparation, we can create memorable experiences while capturing breathtaking images. I’ve learned that the journey is just as valuable as the photographs we take; each trip teaches us something new about wildlife, ourselves, and the world around us. So, gear up, embrace the adventure, and let your passion for wildlife photography lead the way!

Frequently Asked Questions

What is Wildlife Adventure Photography?

Wildlife adventure photography involves immersing oneself in nature and capturing the beauty of animals in their natural habitats. It goes beyond just taking pictures; it tells a story and advocates for conservation.

Why is planning and budgeting important for wildlife photography trips?

Planning and budgeting are crucial as they help ensure a successful trip by allowing you to allocate funds for travel, accommodation, food, and permits. It prevents the adventure from becoming overwhelming and costly, enabling you to focus on photography.

What are some key locations for wildlife photography?

National parks and wildlife reserves are prime locations for wildlife photography due to their biodiversity and protected environments. Popular spots include Yellowstone National Park and Maasai Mara in Kenya.

How can I estimate travel costs for my photography trip?

Estimating travel costs involves accounting for transportation expenses like flights or gas for road trips. Using a travel budget app can help track various expenses and make necessary adjustments.

What accommodation options are recommended for wildlife photography trips?

Affordable accommodations include camping, budget lodges, hostels, and guesthouses. Camping, in particular, allows for a closer connection to nature and facilitates early morning photography sessions.

What should I consider when budgeting for food during my trip?

Planning meals in advance can save money while traveling. Packing meals and cooking over a campfire adds to the adventure and keeps costs down, rather than relying on expensive restaurant meals.

Are permits necessary for wildlife photography, and how do I budget for them?

Yes, many national parks and wildlife reserves require permits for entry or photography. It’s important to research these fees ahead of time and include them in your budget to avoid unexpected costs.

What essential gear should I have for wildlife photography?

Essential gear includes a DSLR or mirrorless camera, versatile zoom lenses (preferably with at least 300mm reach), a sturdy tripod, extra memory cards, and batteries. Weather-sealed bags and lens filters are also recommended for protection.

When is the best time to plan a wildlife photography trip?

The best time depends on the wildlife you want to photograph and their seasonal behaviors. Spring is ideal for baby animals, while fall is great for migrations. Researching specific animal behaviors can enhance your photography experience.

What safety precautions should I take during wildlife photography adventures?

Always maintain a respectful distance from wildlife and be aware of your surroundings. Carrying bear spray in certain regions is advisable, and packing a first aid kit, staying hydrated, and having emergency contacts are essential for safety.

Master Wildlife Photography on a Budget: Essential Gear Guide

Wildlife photography is a thrilling pursuit, offering a unique blend of adventure and artistry. You don’t need deep pockets to capture stunning images of nature’s wonders; with the right gear and mindset, you can master this craft on a budget. For more tips on gear, check out Essential Gear for Wildlife Safari Photography Adventures.

Master Wildlife Photography on a Budget: Essential Gear Guide

Understanding Wildlife Photography

What is Wildlife Photography?

Wildlife photography is all about capturing animals in their natural habitats. It’s not just about snapping pictures; it’s about telling stories through images. I remember my first experience in the field, crouched behind a bush, waiting for a deer to emerge. That moment of patience and anticipation is what makes wildlife photography so special. It connects us to nature in a profound way.

Importance of Wildlife Photography

Wildlife photography plays a crucial role in conservation efforts. Through our images, we can raise awareness about endangered species and their habitats. I’ve seen how powerful a single photograph can be in inspiring change. It can ignite passion in others, motivating them to protect our planet. Plus, wildlife photography offers a beautiful escape from our daily routines. I find it therapeutic, immersing myself in the great outdoors, and I believe many others feel the same way.

Ethics in Wildlife Photography

As a wildlife photographer, I’ve learned that ethics are essential. We must respect the animals and their environments. It’s tempting to get that perfect shot, but I always remind myself that the animals have their own lives to lead. Keeping a safe distance and not disturbing their natural behavior is key. I’ve often turned down opportunities for close-up shots to ensure I’m not interfering with their space. I think this respect enhances the authenticity of our work and showcases the true beauty of wildlife.

Essential Gear for Wildlife Photography

Cameras for Wildlife Photography

Choosing the right camera is fundamental in wildlife photography. I’ve experimented with various options, and I’ve found that both DSLRs and mirrorless cameras have their pros and cons. DSLRs offer great battery life and an extensive range of lenses, while mirrorless cameras are typically lighter and offer quicker autofocus, which can be a game-changer when capturing fast-moving wildlife.

DSLR vs. Mirrorless Cameras

When I first started, I went with a DSLR because I loved the feel of a traditional camera. However, as I ventured into the field more, I noticed the advantages of mirrorless systems, especially for their compact size and advanced features like in-body stabilization. If you’re just dipping your toes into wildlife photography, I recommend trying out both types to see which feels right for you.

Recommended Budget Cameras

For those on a budget, there are several excellent options available. I’ve had a great experience with the Canon EOS Rebel series. It’s user-friendly and offers fantastic image quality without breaking the bank. The Nikon D3500 is another great choice. It’s lightweight and easy to use, perfect for a beginner like I was. If you prefer mirrorless, consider the Sony Alpha a6000, which is compact yet powerful.

Lenses: Choosing the Right One

Choosing the right lens can truly make or break your wildlife photography. I’ve learned that having a good telephoto lens is essential for capturing wildlife from a distance without disturbing them. This allows you to get detailed shots while keeping a safe distance. For more insights, check out Essential Gear for Macro Wildlife Photography on a Budget.

Telephoto Lenses

Telephoto lenses are my go-to for wildlife photography. Personally, I love my 70-300mm lens; it gives me the flexibility to zoom in on animals without being intrusive. If you’re looking for a budget-friendly option, the Tamron 70-300mm is a reliable choice that won’t empty your wallet.

Wide-Angle Lenses

Wide-angle lenses can also be valuable, especially when photographing landscapes or large groups of animals. I find that a good 24-70mm lens helps to capture the environment around the wildlife, giving context to the shots. It’s a great way to tell a story through your images.

Budget-Friendly Lens Options

If you’re tight on budget, there are still fantastic options available. Look for used lenses or consider third-party brands like Sigma or Tamron, which often produce great quality for a fraction of the price. I’ve bought several used lenses in excellent condition at local camera shops, and it’s always worked out well for me.

Tripods and Stabilization Gear

A sturdy tripod is essential for capturing sharp images, especially in lower light conditions. I can’t tell you how many times my tripod has saved me from blurry shots! Investing in good stabilization gear can make a noticeable difference in the quality of your images.

Types of Tripods

There are various types of tripods, but I’ve found that a lightweight aluminum tripod is perfect for wildlife photography. They offer a good balance of stability and portability, which I find crucial when hiking to remote locations. I remember lugging around a heavier model and regretting it halfway through my hike!

Budget Tripod Recommendations

For budget options, I recommend the Manfrotto Befree series or the Vanguard Alta Pro. They’re both sturdy and won’t break the bank. I’ve used both models on various shoots, and they’ve held up beautifully, allowing me to focus more on my photography and less on my gear.

Camera Accessories

Don’t forget about the essential accessories that can enhance your photography experience. I’ve learned the hard way that being prepared can save you a lot of headaches in the field.

Memory Cards

Investing in quality memory cards is crucial. I’ve been in situations where a card failed, and it was devastating. I always carry multiple cards with me, opting for reliable brands like SanDisk or Lexar to ensure I don’t lose any precious shots.

Camera Bags

A good camera bag is another must-have. I personally love my Lowepro Slingshot bag, which allows for easy access to my gear while hiking. It’s comfortable and has plenty of space for my camera, lenses, and other essentials.

Cleaning Kits

Lastly, keep a cleaning kit handy. I can’t stress this enough! Dust and dirt can ruin your shots. A simple lens cleaning cloth and a blower can make a world of difference. I always make sure to clean my gear after a shoot, especially when I’ve been out in nature.

Budgeting for Wildlife Photography Gear

Setting a Realistic Budget

When I first jumped into wildlife photography, setting a budget felt daunting. I wanted all the best gear, but I quickly realized that I had to be realistic about my finances. I think it’s essential to assess what you can afford without breaking the bank. I usually start by listing the gear I think I need, prioritizing based on what will have the biggest impact on my photography. For instance, I decided my camera and lens were my top priorities, followed by accessories like a tripod and extra batteries.

In my experience, it helps to allocate a specific percentage of my budget for each category of gear. This way, I stay organized and focused on what I truly need. I also recommend leaving some room for unexpected expenses, like repairs or new lenses that might catch my eye. Flexibility is key, especially when diving into a hobby that can often lead to temptation!

Where to Find Discounts and Deals

One of the best things I discovered while budgeting for wildlife photography is that there are plenty of ways to snag discounts on gear. I regularly check online retailers during special sales events like Black Friday or Cyber Monday. I’ve scored some fantastic deals during these sales, allowing me to upgrade my camera or buy a quality lens without spending a fortune.

Another great tip is to sign up for newsletters from camera retailers. They often send out exclusive discounts or alerts on upcoming sales. I’ve also found that following photography blogs and social media pages can lead to great deals, as they sometimes share promotional codes or limited-time offers. Don’t overlook local camera shops either; they occasionally have clearance sales that can be very budget-friendly.

Buying Used vs. New Gear

When it comes to wildlife photography gear, I’ve learned that buying used can be a budget-saver without sacrificing quality. I remember the rush I felt when I found a gently used lens at a local camera shop—it was like finding a hidden treasure! Used equipment can often be in excellent condition, and you can save a significant amount of money. Just make sure to check the equipment thoroughly and ask about its history to avoid any surprises.

That said, there’s still merit in buying new gear, especially if it comes with a warranty or if you’re looking for the latest technology. I usually weigh the pros and cons. For instance, if I’m unsure about a particular used lens, I might opt for new to ensure it’s reliable. I’ve even seen some manufacturers offer refurbished gear at a reduced price, which can be a great middle ground between new and used.

Techniques for Effective Wildlife Photography

Understanding Animal Behavior

One of the most fascinating aspects of wildlife photography is the challenge of understanding animal behavior. I’ve spent countless hours observing animals in their natural habitats, and I’ve found that patience truly pays off. Each species has its quirks and patterns, and learning these can dramatically improve my chances of capturing that perfect shot. For example, I remember watching a family of foxes for weeks, learning their routines, and finally being able to anticipate their movements. That knowledge made my photography experience so much more rewarding.

Moreover, knowing when animals are most active can help you plan your outings more effectively. Early mornings and late afternoons are often the best times to spot wildlife. I’ve had the most incredible encounters during those golden hours, where the soft light adds an enchanting quality to my images.

Best Times for Wildlife Photography

Timing can make or break a wildlife photography session. I’ve learned the hard way that going out during harsh midday sunlight can result in washed-out images and unflattering shadows. Instead, I aim for the early morning or late afternoon when the light is softer and warmer. I’ve captured some of my favorite images during these times—especially when the light catches the dew on grass or the soft fur of an animal.

Seasonality also plays a role in wildlife photography. Certain animals are more active during specific seasons, and I always do my research ahead of time. For instance, spring is a fantastic time to capture baby animals, while autumn provides stunning foliage as a backdrop. I find that planning my trips around these seasonal changes adds an exciting twist to my photography adventures.

Composition Tips for Stunning Shots

Composition is an art in itself, and I’ve found that mastering it can elevate my wildlife photography significantly. One of my favorite techniques is the rule of thirds. It helps me create balanced images that draw the viewer’s eye naturally. I often visualize my frame divided into thirds, placing the subject off-center to create more interest. I remember one shoot where I positioned a majestic eagle in the right third of the frame, allowing the vast sky to emphasize its power and grace.

Another essential tip is to pay attention to the background. I’ve learned that a cluttered background can distract from the subject. Whenever I’m composing a shot, I always look for clean, simple backgrounds that help highlight the animal. Sometimes, even changing my angle or perspective can make a huge difference.

Post-Processing on a Budget

Affordable Software Options

When it comes to wildlife photography, the work doesn’t end once the shutter clicks. Post-processing is a vital part of the process, and I’ve found that having the right software can make a huge difference in bringing my images to life. However, I understand that not everyone wants to shell out big bucks for editing programs. That’s why I’m excited to share some affordable options I’ve come across.

One of my go-to programs is Adobe Lightroom. While it does have a subscription fee, the power and flexibility it offers for organizing and editing photos is worth it for many photographers. However, if you’re looking for something more budget-friendly, I recommend checking out software like Capture One Express, which is free and provides solid editing capabilities. Another great option is Luminar, which often runs sales, making it quite affordable if you keep an eye out for deals.

Basic Editing Techniques

Once I have my images loaded into my editing software, I usually follow a few basic steps that I believe can significantly enhance my wildlife photos. First, I start with cropping and straightening my images. I often find that a little adjustment can frame the subject better, bringing focus to the animal and removing any distracting elements around it. I remember one photo of a lion that I nearly discarded, but after cropping, it became one of my favorites!

Next, I adjust the exposure and contrast. Wildlife images can often benefit from a little boost to make them pop. I’ve learned to be cautious with brightness, though; too much can wash out the details. Adjusting the white balance is another important step. I usually find that images taken in shady areas can appear too cool, while those taken in bright sunlight might need a slight warm-up. Lastly, I love to play with colors and saturation to ensure the hues of the wildlife and landscape are true to life.

Free Online Resources for Learning Editing

As I dove deeper into wildlife photography, I wanted to improve my editing skills without spending a fortune on courses. I discovered a wealth of free online resources that have been incredibly helpful. YouTube is a goldmine for tutorials. I often search for specific techniques, like how to enhance wildlife images in Lightroom or Photoshop. Channels dedicated to photography usually offer step-by-step guides that are easy to follow.

Another fantastic resource is photography blogs. Many photographers generously share their editing workflows and tips for free. I’ve also found online forums and communities where fellow photographers critique each other’s work and offer advice on editing techniques. Joining these communities has not only improved my skills but also connected me with like-minded enthusiasts who share the same passion for wildlife photography.

Additional Tips for Wildlife Photography on a Budget

Finding Locations for Wildlife Photography

One of the most enjoyable aspects of wildlife photography is exploring new locations, and I’ve discovered that you don’t need to travel far or spend a lot of money to find great spots. Local parks, nature reserves, and even your own backyard can offer fantastic opportunities to capture wildlife. I remember one weekend, I decided to explore a nearby wildlife refuge and was thrilled to spot a family of otters playing by the water. Sometimes, the best experiences are right under our noses!

Another tip is to research wildlife migration patterns and seasonal behaviors. Many animals can be found in specific areas at particular times of the year. I’ve learned that visiting wetlands during migration seasons can yield incredible bird photography opportunities. Local wildlife organizations often provide information on where and when to find different species, which can be a great starting point for planning your outings.

Networking with Other Photographers

Networking has played a significant role in my growth as a wildlife photographer. Connecting with other photographers not only opens up new opportunities but also provides a platform to share knowledge and tips. I’ve joined local photography clubs where enthusiasts gather to share their experiences and even organize outings together. There’s something special about bonding over a shared passion, and I’ve made some great friends along the way.

Social media is another fantastic tool for networking. I often follow fellow wildlife photographers on platforms like Instagram and engage with their work. Many photographers are open to sharing their techniques and experiences in the comments, and I’ve found that creating a dialogue can lead to meaningful connections and collaborations.

Joining Wildlife Photography Groups and Forums

Being part of wildlife photography groups and online forums has been instrumental in my journey. I’ve joined several Facebook groups dedicated to wildlife photography, where members share their work and provide feedback. It’s inspiring to see the incredible images others capture and hear their stories. Plus, it creates a supportive environment where we can discuss challenges and successes.

Forums like Reddit’s photography community can be a treasure trove of information. Members often share tips, gear recommendations, and their experiences. I’ve even participated in challenges that encourage me to step out of my comfort zone and try new techniques. Overall, being part of these communities has enriched my photography journey, and I encourage anyone passionate about wildlife photography to seek out these groups.

Frequently Asked Questions

What is wildlife photography?

Wildlife photography is about capturing animals in their natural habitats and telling stories through images. It connects us to nature and involves patience and anticipation to capture special moments.

Why is wildlife photography important?

Wildlife photography plays a crucial role in conservation efforts by raising awareness about endangered species and their habitats. It can inspire others to protect our planet and provides a therapeutic escape into nature.

What types of cameras are recommended for wildlife photography?

Both DSLRs and mirrorless cameras are recommended for wildlife photography. DSLRs offer great battery life and a variety of lenses, while mirrorless cameras are lighter and provide quicker autofocus, ideal for fast-moving wildlife.

What lens is essential for capturing wildlife?

A good telephoto lens is essential for wildlife photography as it allows you to capture detailed shots from a distance without disturbing the animals. A 70-300mm lens is a popular choice for many photographers.

What are some budget-friendly camera options for beginners?

Beginner-friendly budget cameras include the Canon EOS Rebel series and Nikon D3500 for DSLRs, as well as the Sony Alpha a6000 for mirrorless options. These cameras offer great image quality without being too expensive.

What are the best times for wildlife photography?

The best times for wildlife photography are early mornings and late afternoons when the light is softer and warmer. This timing helps avoid harsh midday sunlight, resulting in better images.

How can I set a realistic budget for wildlife photography gear?

To set a realistic budget, assess what you can afford and prioritize the gear based on what will significantly impact your photography, such as your camera and lens. Allocate a percentage of your budget for each category and leave room for unexpected expenses.

What are some affordable post-processing software options?

Affordable post-processing software options include Adobe Lightroom (subscription-based), Capture One Express (free), and Luminar (often on sale). These programs help enhance and organize your wildlife photos effectively.

How can I find good locations for wildlife photography?

Good locations for wildlife photography can be found in local parks, nature reserves, and even your backyard. Researching wildlife migration patterns and seasonal behaviors can also help you identify the best spots at specific times of the year.

Why is networking with other photographers beneficial?

Networking with other photographers opens up opportunities for sharing knowledge and experiences. Joining local photography clubs and engaging on social media can lead to meaningful connections, collaboration, and personal growth in your photography journey.

Top Destinations for Affordable Wildlife Adventure Photography

Are you ready to embark on a thrilling journey into the world of wildlife photography? With affordable destinations worldwide, capturing stunning shots of animals has never been more accessible!

Top Destinations for Affordable Wildlife Adventure Photography

Understanding Wildlife Adventure Photography

What is Wildlife Adventure Photography?

Wildlife adventure photography is more than just taking pictures of animals; it’s about capturing the essence of nature in its most raw and beautiful form. For me, every click of the shutter reveals a story, whether it’s a lion lounging in the sun or a bird taking flight at dawn. This type of photography encourages us to connect with nature, understand its rhythms, and appreciate the diverse species that inhabit our planet. I remember the first time I attempted wildlife photography. The thrill of seeing a majestic elephant in its natural habitat and knowing I could capture that moment forever was exhilarating. It’s an adventure that combines artistry with nature, and each photograph serves as a window into a world we often take for granted.

Importance of Affordable Options

As an aspiring wildlife photographer, I quickly learned that amazing experiences don’t have to come with a hefty price tag. Affordable options allow us to explore new destinations without breaking the bank. When I was just starting, I realized the importance of budget-friendly travel. It opened up a world of possibilities and allowed me to discover stunning wildlife hotspots that were previously off-limits due to cost. I believe that everyone should have the chance to experience the thrill of wildlife photography, and there are many incredible places that offer affordable options. Whether you’re a beginner or a seasoned pro, finding low-cost destinations can enhance your skills and elevate your passion for capturing nature’s beauty. Read Interesting article: Capture the Wild: Budget Tips for Wildlife Adventure Photography

Top Destinations for Wildlife Photography

Africa

Serengeti National Park, Tanzania

Serengeti National Park is a dream destination for any wildlife photographer. The vast plains are teeming with life, from the famous Big Five to countless bird species. I remember my trip there, waking up before dawn to catch the golden light spilling over the savannah. The thrill of witnessing a pride of lions during the Great Migration was unforgettable. The park is accessible and offers various affordable accommodation options, like campsites and budget lodges, making it perfect for those looking to save while experiencing the wild.

Kruger National Park, South Africa

Kruger National Park is another gem in Africa. With self-drive options available, it provides an affordable way to explore the beauty of the African wilderness on your own terms. I loved being able to stop and take photos whenever I spotted something interesting. The park is known for its diverse wildlife, and the chance to photograph elephants, rhinos, and leopards is a massive draw for photographers. Budget lodges and campsites scattered throughout the park mean you can enjoy an immersive experience without overspending.

Namib Desert, Namibia

The Namib Desert might not be the first place that comes to mind for wildlife photography, but it offers unique landscapes and wildlife interactions that are simply breathtaking. The contrast of the orange dunes against the blue sky is mesmerizing. I had the opportunity to photograph desert-adapted elephants, which was a surreal experience. With several affordable guesthouses and camping options available, the Namib Desert is perfect for those seeking something different while still being budget-conscious.

North America

Yellowstone National Park, USA

Yellowstone National Park is a paradise for wildlife enthusiasts. From bison to grizzly bears, every corner of this park offers a chance to snap incredible photographs. I remember standing at the edge of a valley, watching a herd of bison roam freely. The park has numerous affordable lodging options, including campgrounds, making it accessible for all. Visiting in the shoulder season can also help save money while providing a less crowded experience for photography.

Banff National Park, Canada

Banff National Park is a stunning location in the Canadian Rockies, known for its breathtaking scenery and diverse wildlife. I was captivated by the turquoise lakes and snow-capped peaks. The best part? The park is home to an array of animals like elk, bears, and mountain goats. There are many affordable accommodations in the nearby town of Banff, and the opportunities for outdoor adventures and photography are endless. I found myself taking countless photos, each one more beautiful than the last.

Everglades National Park, USA

The Everglades offers a unique ecosystem and a chance to capture wildlife that’s different from what you’d find in traditional national parks. Alligators, manatees, and a myriad of bird species inhabit this wetland paradise. I remember my airboat ride through the mangroves, where I snapped photos of alligators lounging in the sun. The park has budget-friendly camping options, allowing you to immerse yourself in this extraordinary landscape.

South America

Amazon Rainforest, Brazil

The Amazon Rainforest is a must-visit for anyone passionate about wildlife photography. It’s home to countless species, many of which are not found anywhere else on Earth. I was in awe of the vibrant colors and sounds of the jungle. There are affordable eco-lodges and guided tours available, making it easier to explore without spending a fortune. Photographing the unique flora and fauna of the Amazon was a transformative experience that deepened my appreciation for biodiversity.

Galapagos Islands, Ecuador

The Galapagos Islands are famous for their unique wildlife and are a dream for photographers. I still remember watching the blue-footed boobies perform their quirky mating dance. While some tours can be pricey, there are budget-friendly hostels and local experiences that allow you to capture the islands’ beauty without overspending. The chance to photograph so many unique species in such a pristine environment is worth every penny.

Asia

Ranthambore National Park, India

Ranthambore National Park is one of India’s most renowned wildlife reserves, famous for its tiger population. I was lucky enough to catch a glimpse of one in the wild, and it was a moment I’ll never forget. The park offers various affordable safari options, and the chance to photograph these majestic creatures in their natural habitat is unparalleled. Staying in nearby villages can provide a more budget-friendly experience while still allowing access to the park.

Borneo Rainforest, Malaysia

Borneo is famous for its incredible biodiversity and is an essential stop for wildlife photographers. From orangutans to pygmy elephants, the opportunities for stunning shots are endless. I loved exploring the rainforest and taking photos of the unique flora and fauna. There are affordable lodges and guided tours that cater to budget travelers, making it possible to experience the wonders of Borneo without breaking the bank.

Australia and Oceania

Great Barrier Reef, Australia

While often known for its underwater beauty, the Great Barrier Reef also offers unique wildlife photography opportunities above water. I was amazed at the diversity of life, from sea turtles to colorful birds. There are several budget-friendly tours and campsites along the coast, allowing you to experience this incredible ecosystem without overspending. The vibrant underwater world is a photographer’s dream, and I highly recommend bringing a waterproof camera or housing for stunning underwater shots. Read Interesting article: Affordable Underwater Wildlife Photography Tips for Backpackers

Fiordland National Park, New Zealand

Fiordland National Park is a breathtaking destination known for its dramatic landscapes and diverse wildlife. I was captivated by the stunning fjords, waterfalls, and unique bird species. The park has several affordable accommodations, including campsites and budget lodges. Exploring the area and capturing the beauty of the fjords and their inhabitants was an unparalleled experience for me. The natural beauty of this location makes it a must-visit for any wildlife photographer.

Best Times to Visit for Wildlife Photography

Seasonal Migration Patterns

One of the most exciting aspects of wildlife photography is timing your visit to coincide with seasonal migration patterns. I’ve found that witnessing migrations can result in breathtaking photographs. For instance, in Africa, the Great Migration of wildebeest and zebras occurs from June to September in the Serengeti. I remember being there during this time; it felt like being part of a natural spectacle that has played out for centuries. The sheer number of animals moving across the plains is something I’ll never forget. Similarly, in North America, the migration of birds in spring and fall provides incredible opportunities for capturing these avian travelers as they make their way to warmer climates. Knowing these patterns can help us plan our trips for maximum photographic impact.

Weather Considerations

Weather plays a significant role in wildlife photography, and I’ve learned that it can greatly affect both the animals’ behavior and the quality of the images you capture. For example, early morning fog can create a mystical atmosphere, as I experienced during a sunrise shoot in the Everglades. On the flip side, rainy weather can be challenging but also rewarding; the colors pop, and animals often behave differently. I remember getting caught in a downpour while photographing elephants in Namibia, but the resulting photos with raindrops on their skin were some of my favorites. So, when planning your wildlife adventure, keep an eye on the forecast and consider how different weather conditions might enhance or hinder your photography experience.

Peak Wildlife Viewing Times

Every location has its peak wildlife viewing times, and I’ve learned that knowing these can significantly boost your chances of capturing stunning shots. For example, in Yellowstone, dawn and dusk are prime times for spotting animals, as many are more active during these cooler hours. During my visit, I woke up at 5 AM to catch the golden light of morning, and it was worth every minute of lost sleep. In the Amazon, early mornings offer the best chance to see and photograph various birds and monkeys as they start their day. Researching when and where to find specific animals will help you plan your itinerary effectively and maximize your photographic opportunities.

Budgeting for Wildlife Photography Trips

Cost Breakdown: Travel, Accommodation, and Equipment

Planning a budget for a wildlife photography trip can feel overwhelming, but I’ve found that breaking down the costs makes it more manageable. First, consider travel expenses. This could include flights, car rentals, or even local transport options like buses or trains. I often find that booking flights in advance helps me save money. Next, accommodation can vary widely depending on location. I’ve stayed in everything from luxury lodges to budget-friendly hostels, and while I appreciate the comfort of nicer places, I’ve had some of my best experiences staying in local guesthouses where I could immerse myself in the culture. Lastly, don’t forget about equipment costs. While it’s easy to get carried away with the latest gear, I believe it’s essential to invest wisely in key pieces that will enhance your photography. For me, a good lens and a sturdy tripod have proven invaluable.

Affordable Accommodation Options

Finding budget-friendly accommodations can greatly enhance our wildlife photography adventures. I’ve discovered that many national parks and wildlife reserves have campgrounds and affordable lodges nearby. During my travels, I’ve often opted for camping, which not only cuts costs but also places us right in the heart of nature. I fondly recall camping under the stars in Banff, where I could hear the distant calls of wildlife. Additionally, many areas have hostels or guesthouses that offer comfortable stays at lower prices. Websites like Airbnb or local booking platforms can also provide great deals. I always recommend checking for deals or discounts, especially during the shoulder seasons, as prices tend to drop while still offering fantastic wildlife viewing opportunities.

Tips for Saving Money on Travel

Over the years, I’ve picked up a few tricks to save money while traveling for wildlife photography. First, be flexible with your travel dates. Sometimes flying mid-week or at off-peak times can result in significant savings. I also like to use fare comparison websites to find the best deals. When it comes to local transport, I’ve found that public transportation can be a budget-friendly option, and it often provides a unique perspective on local life. I’ve also made a habit of packing my own snacks and meals; not only does this save money, but it allows me to enjoy picnics in nature, which often become cherished moments of my trips. Lastly, I recommend connecting with fellow photographers online; they can share tips about discounts or hidden gems that are off the beaten path.

Essential Gear for Wildlife Adventure Photography

Camera Equipment Recommendations

As I’ve delved deeper into wildlife photography, I’ve realized the importance of having the right camera equipment. A good DSLR or mirrorless camera is essential; I personally use a DSLR with a versatile zoom lens. This setup allows me to capture both distant animals and close-up details without switching lenses all the time. A fast lens with a wide aperture can also make a big difference in low light conditions, which is especially important during early morning or late afternoon shoots. I suggest investing in a sturdy tripod or monopod for stability, particularly when shooting in low-light situations or when using heavy telephoto lenses. Lastly, don’t forget extra batteries and memory cards; I’ve learned the hard way that you never want to run out of power or storage while in the field!

Clothing and Gear for Different Environments

When it comes to wildlife photography, dressing appropriately for the environment is crucial. I’ve experienced varying climates, from the heat of the Namib Desert to the chilly mornings in Yellowstone. I always recommend layering your clothing to adapt to changing temperatures throughout the day. Sturdy boots are a must for rough terrains, and I’ve also found that neutral-colored clothing helps me blend in with nature, reducing the chances of startling wildlife. Additionally, a good hat and sunglasses protect against the sun, and don’t forget a rain jacket if you’re heading to a place with unpredictable weather. When photographing in wet or humid environments, I often carry a waterproof bag to keep my gear safe.

Drone Photography Considerations

Drone photography has opened up a new world of possibilities for wildlife photography. I’ve used my drone to capture breathtaking aerial shots that provide a unique perspective on landscapes and wildlife. However, it’s essential to check regulations before flying, as many national parks have restrictions. I also recommend being respectful of wildlife; keeping a safe distance is vital to avoid disturbing animals. In my experience, the best time to capture stunning drone shots is during golden hour, as the light creates magical landscapes. Drones can be a valuable tool, but they should be used responsibly to ensure the safety and well-being of the wildlife we love to photograph.

Photography Techniques for Wildlife Adventure Photography

Understanding Animal Behavior

To truly capture the essence of wildlife, I’ve learned that understanding animal behavior is key. Observing animals in their natural habitat can give us insight into their routines, and allows us to anticipate moments worth capturing. I often spend time watching before taking any shots; whether it’s noticing when a bird is about to take flight or understanding the social dynamics within a herd of animals, patience truly pays off. Each animal has its own set of behaviors, and I find that learning about them enhances my photography experience significantly. It’s like a dance; the more you understand the rhythm, the more beautiful the shots you can capture.

Best Practices for Capturing Wildlife

When it comes to taking photographs of wildlife, I’ve found that a few best practices can make all the difference. First, using a fast shutter speed is essential to freeze motion, especially with fast-moving animals. When I’m photographing birds in flight, I often set my camera to continuous shooting mode to increase my chances of getting that perfect shot. Additionally, focusing on the eyes of the subject is crucial; clear, sharp eyes can make or break a photo. I also recommend using natural light whenever possible, as it enhances colors and textures. Lastly, don’t hesitate to experiment with angles; getting low to the ground or shooting from a different perspective can create more compelling images.

Editing Tips for Wildlife Photos

Editing is an integral part of wildlife photography, and I’ve found that it can elevate my images to new heights. I often start with basic adjustments in exposure and contrast to enhance the overall look. Cropping can also help focus attention on the subject, which I find especially useful in busy compositions. I love playing with saturation and vibrancy to make colors pop, but I always aim for a natural look. I’ve learned that subtlety is key when it comes to editing; the goal is to enhance the image without making it look overly processed. Lastly, I recommend keeping a consistent style in your edits to create a cohesive portfolio. Each photograph tells a story, and the editing process helps to convey that story more effectively.

Frequently Asked Questions

What is wildlife adventure photography?

Wildlife adventure photography is about capturing the essence of nature and its diverse species in their natural habitats. It combines artistry with nature, allowing photographers to connect with wildlife and tell stories through their images.

Why is it important to find affordable options for wildlife photography?

Finding affordable options allows aspiring wildlife photographers to explore new destinations without overspending. Budget-friendly travel opens up opportunities to discover stunning wildlife hotspots that might otherwise be inaccessible due to cost.

What are some top destinations for wildlife photography in Africa?

Some top destinations for wildlife photography in Africa include Serengeti National Park in Tanzania, Kruger National Park in South Africa, and the Namib Desert in Namibia, each offering unique wildlife experiences and affordable accommodations.

What wildlife can be found in Yellowstone National Park?

Yellowstone National Park is home to a variety of wildlife, including bison and grizzly bears. It offers numerous opportunities for photographers to capture incredible images of these animals in their natural surroundings.

What should photographers consider when planning their trips for wildlife photography?

Photographers should consider seasonal migration patterns, weather conditions, and peak wildlife viewing times. Timing visits to coincide with migrations and being aware of weather can significantly enhance photographic opportunities.

How can photographers save money on travel for wildlife photography?

Photographers can save money by being flexible with travel dates, using fare comparison websites, opting for public transportation, packing their own meals, and connecting with fellow photographers for tips on discounts and hidden gems.

What essential camera equipment is recommended for wildlife photography?

A good DSLR or mirrorless camera with a versatile zoom lens is essential for wildlife photography. Additionally, a sturdy tripod, extra batteries, and memory cards are important to have on hand for capturing images in the field.

What are best practices for capturing wildlife photographs?

Best practices include using a fast shutter speed to freeze motion, focusing on the eyes of the subject for clarity, utilizing natural light, and experimenting with different angles for more compelling images.

How can editing enhance wildlife photographs?

Editing can enhance wildlife photographs by improving exposure and contrast, cropping to focus on the subject, and adjusting saturation and vibrancy for a natural look. A consistent editing style can also help create a cohesive portfolio.

What is the significance of understanding animal behavior in wildlife photography?

Understanding animal behavior is crucial for capturing the essence of wildlife. It allows photographers to anticipate moments worth capturing and enhances the overall photography experience by providing insight into the routines of the animals.

Capture the Wild: Budget Tips for Wildlife Adventure Photography

Embarking on a wildlife photography adventure can be thrilling, but it doesn’t have to break the bank. With the right tips and tricks, you can capture breathtaking images of nature without overspending. Read Interesting article: Affordable Wildlife Photography Adventures You Can’t Miss

Capture the Wild: Budget Tips for Wildlife Adventure Photography

Understanding Wildlife Adventure Photography

What is Wildlife Adventure Photography?

Wildlife adventure photography is all about capturing the beauty and behavior of animals in their natural habitats. I remember my first encounter with a herd of elephants at dusk, their silhouettes framed against a colorful sunset. The thrill of freezing that moment in time was exhilarating! This type of photography often requires patience, skill, and a bit of luck. You’ll find yourself waiting quietly in the bushes or on a hilltop, hoping to catch a glimpse of a rare species or a unique behavior. The goal is not just to take pictures but to tell a story about the wildlife and its environment.

Importance of Budgeting in Wildlife Photography

Budgeting is crucial in wildlife photography, especially if you want to pursue it as a hobby or even a career. I’ve seen many aspiring photographers get discouraged by the costs involved—camera gear, travel expenses, and accommodation can add up quickly. However, having a budget doesn’t mean you have to sacrifice quality. It allows us to plan better and make informed decisions about where to invest our money. Personally, I’ve learned to prioritize experiences over equipment. Sometimes, the most memorable shots come from a spontaneous trip to a local park rather than an expensive expedition.

Essential Gear for Wildlife Photography on a Budget

Camera Equipment: Choosing the Right Gear

When starting out in wildlife photography, selecting the right camera is essential. I believe a good camera doesn’t necessarily mean the most expensive one. For many, a DSLR or a mirrorless camera with a decent sensor will do the trick. I started with a mid-range DSLR, and it served me well for years. Look for features like a fast autofocus system and a burst mode to capture fast-moving animals. I also suggest checking for weather-resistant models, as wildlife photography often takes us into unpredictable environments. Read Interesting article: Essential Gear for Wildlife Safari Photography Adventures

Budget-Friendly Lenses for Wildlife Photography

The lens you choose can make a significant difference in the quality of your wildlife photos. Telephoto lenses are typically ideal for this genre, allowing you to get close-up shots without disturbing the animals. While high-end lenses can cost a fortune, I found some great budget-friendly options that still deliver impressive results. Brands like Sigma and Tamron often offer quality alternatives at a fraction of the price of more established brands. I remember finding a used telephoto lens that changed my photography game without draining my wallet.

Accessories: Tripods, Filters, and Bags

Having the right accessories can enhance your photography experience. A sturdy tripod is something I never leave behind—it stabilizes your shots, especially in low light. I recommend getting a lightweight model that’s easy to carry around. Filters can also be beneficial; a polarizing filter can help reduce glare and enhance colors, which I’ve found crucial when photographing water scenes. And don’t forget a good camera bag! I’ve invested in a weather-resistant bag that protects my gear from the elements while also being comfortable to carry during long hikes.

Second-Hand Gear: Pros and Cons

Buying second-hand gear can be a fantastic way to save money, but it comes with its own set of challenges. I often browse online marketplaces for pre-loved cameras and lenses, and I’ve had some great finds. However, it’s essential to do your research before purchasing. Look for reputable sellers, check reviews, and if possible, test the gear in person. On the flip side, be cautious about items that come with no warranty or return policy. I once bought a used lens that had a minor defect, and while it was a good deal, it was a lesson learned in being thorough.

Choosing Locations for Wildlife Photography

National Parks: Affordable Options

National parks are some of my favorite places to capture wildlife, and they can also be budget-friendly. I’ve been fortunate enough to visit several parks, and each offers unique opportunities for stunning photos. Parks like Yellowstone and Yosemite have diverse ecosystems, allowing you to photograph everything from majestic bison to elusive coyotes. Entrance fees are often reasonable, and many parks have options for camping or affordable lodges nearby. I remember spending a week in a tent at Yellowstone, waking up to the sound of elk calling in the early morning. Those experiences were priceless and gave me plenty of photo ops without breaking the bank.

Wildlife Reserves and Sanctuaries

Wildlife reserves and sanctuaries are another fantastic option. They often focus on conservation and provide a safe haven for animals. I’ve visited several reserves that charge a small entrance fee, which goes toward the care of the animals. I recall a trip to a nearby sanctuary where I was able to photograph rescued birds in a natural setting. These reserves usually have knowledgeable guides who can share insights about the animals, which can enhance your experience and help you capture better shots. Plus, since the animals are often used to human presence, they can be a bit more approachable, giving you better chances for close-up shots.

Local Wildlife Hotspots: Exploring Nearby Areas

Sometimes, you don’t need to travel far to find amazing wildlife. I’ve discovered some hidden gems right in my own backyard. Local parks, nature reserves, and even urban areas can be teeming with wildlife. I often take short trips to nearby wetlands or forests, where I’ve spotted everything from deer to a variety of bird species. I recommend checking online resources or local photography groups to find popular spots that others have had success with. You might be surprised at how much life exists just outside your door!

When to Visit: Seasonal Considerations

The timing of your visit can greatly affect your wildlife photography adventure. I’ve learned that different seasons bring out different animals and behaviors. For instance, spring is a fantastic time for birdwatching as many species return to nest, and the flora is vibrant and lush. In contrast, fall can be ideal for capturing animals preparing for winter. I remember visiting a park during the fall and witnessing a herd of deer as they gathered for their seasonal migration. It was magical! Always consider checking animal migration patterns or breeding seasons to align your visit with peak wildlife activity. This can make a significant difference in the types of shots you can capture.

Tips for Planning Your Wildlife Photography Adventure

Setting a Realistic Budget

When planning your wildlife photography adventure, setting a realistic budget is crucial. I suggest breaking down your expenses into categories like travel, lodging, food, and gear. It helps to track what you can afford without stretching yourself too thin. For example, I’ve learned to prioritize my spending on experiences rather than fancy hotels. I often choose to stay in simple accommodations or camp to save money. This way, I can allocate more of my budget toward gas for travel or entry fees to parks. Having a clear budget not only eases financial stress but also allows for spontaneous decisions along the way!

Finding Affordable Accommodations

Accommodations can eat up a large chunk of your budget, but there are plenty of affordable options out there. I’ve had great experiences with camping, which connects me with nature and often saves money. Many national parks have campgrounds, and you can even find campgrounds in state parks or forests nearby. If camping isn’t your thing, try looking for budget hotels or hostels. I’ve often used websites that offer last-minute deals, which have led me to some incredible finds. Plus, staying in less touristy areas can save money and provide a more authentic experience.

Transportation Options: Saving on Travel Costs

Transportation can be another significant expense, but there are ways to keep costs down. If it’s a local adventure, consider carpooling with friends who share your passion for photography. I’ve had some of my best experiences driving to wildlife hotspots with fellow photographers, sharing the costs of gas and creating memories along the way. If you’re traveling further, look into budget airlines or train services. I once found an amazing deal on a flight that allowed me to visit a national park I had always dreamed of exploring. Just be flexible with your travel dates if you can; sometimes, shifting your plans by a day or two can save you a lot!

Food and Dining on a Budget

Food doesn’t have to be a budget buster during your wildlife photography trips. I often pack my own snacks and meals, especially when heading into remote areas where dining options are limited. Bringing sandwiches, fruits, and plenty of water not only saves money but also keeps me fueled for long days of shooting. When I do eat out, I usually seek out local diners or food trucks, which often provide delicious meals at a fraction of the price of fancy restaurants. Once, I stumbled upon a cozy little diner near a wildlife sanctuary, and their homemade pie was the highlight of my trip!

Techniques for Capturing Stunning Wildlife Shots

Understanding Animal Behavior for Better Shots

One of the most rewarding aspects of wildlife photography is learning about the animals you’re photographing. I’ve found that taking the time to understand animal behavior can dramatically improve my shots. For instance, observing a bird’s nesting habits or a deer’s feeding patterns can help me anticipate the right moment to click the shutter. I remember watching a family of otters play in a river; I noticed they had a routine of popping up for air every few seconds, which allowed me to capture some adorable action shots. Patience is key in these situations, so I often find myself spending hours just watching and waiting. It’s not just about getting the shot; it’s about connecting with nature and the wildlife around us.

Using Natural Light to Your Advantage

Lighting can make or break a photograph, and I’ve come to appreciate the importance of natural light in wildlife photography. Early mornings and late afternoons, often referred to as the “golden hours,” provide soft, warm light that enhances colors and textures. I’ve had some of my most stunning images come from a sunrise excursion, where the mist hung low over a lake, and the light illuminated a family of swans gliding by. Avoiding harsh midday light is usually best, as it can create unflattering shadows. If I find myself out during the day, I often look for shaded areas or use backlighting to create striking silhouettes. The key is to experiment and see how different lighting conditions affect your images.

Composition Tips for Wildlife Photography

Composition is another element that can elevate your wildlife photography. I’ve learned to use the rule of thirds as a guideline, placing the animal off-center to create a more dynamic image. Recently, while photographing a fox, I positioned it to one side of the frame with the landscape stretching out behind it. It created a sense of space and context that I found really engaging. Additionally, leading lines can draw the viewer’s eye toward the subject, so I often look for paths, rivers, or tree lines that guide the gaze. I also try to vary my angles—getting down low or shooting from above can provide unique perspectives that make my photos stand out.

Post-Processing: Enhancing Images on a Budget

Post-processing is an essential part of my workflow, and I believe it doesn’t have to be expensive. While there are many high-end software options out there, I’ve found that free or affordable tools like GIMP or Lightroom Mobile can do wonders. I often spend time adjusting exposure, contrast, and color balance to bring my images to life. A little sharpening can also enhance details, especially for fur or feathers. I remember taking a shot of a lion lounging in the grass; with some tweaks in post-processing, I was able to bring out the rich golds of its mane and the deep greens of the surrounding foliage. It’s amazing how a few adjustments can transform a good photo into a stunning one!

Common Mistakes to Avoid in Wildlife Photography

Overlooking Safety Considerations

Safety should always be a priority when engaging in wildlife photography. I’ve had my share of close calls, and I can’t stress enough how crucial it is to respect wildlife and keep a safe distance. I remember one time, while photographing bears from afar, some tourists got too close, and it was a stark reminder of how unpredictable animals can be. I always carry bear spray when hiking in bear territory and keep my distance when observing larger animals. Understanding your environment and knowing how to react in case of an encounter can keep both you and the wildlife safe.

Being Unprepared for Weather Changes

Weather can be unpredictable, especially when you’re out in nature. I’ve learned this the hard way! On one trip, I didn’t check the forecast and ended up in a sudden downpour, which soaked my gear and dampened my spirits. Now, I always prepare by checking weather reports and bringing along waterproof covers for my camera. Layering my clothing is also crucial, as temperatures can vary significantly throughout the day. Being prepared means I can focus more on capturing great shots rather than worrying about my comfort or equipment.

Getting Too Close: Ethical Wildlife Photography

Ethical considerations are critical in wildlife photography. I believe it’s essential to respect the animals and their habitats. Approaching too closely can stress wildlife and disrupt their natural behaviors. I’ve often relied on my telephoto lens to capture intimate moments without intruding. For example, while photographing a nesting bird, I stayed at a safe distance with my long lens, allowing me to document the scene without causing any disturbance. It’s all about finding that balance—getting the shot while ensuring the well-being of the wildlife. This practice not only preserves the beauty of nature but also sets a positive example for others.

Resources for Wildlife Photography Enthusiasts

Online Communities and Forums

Joining online communities has been a game-changer for me as a wildlife photography enthusiast. Platforms like Flickr, Facebook groups, and specialized forums allow us to share our work, get feedback, and connect with like-minded individuals. I’ve learned so much from fellow photographers who graciously share their tips and experiences. I remember posting a photo of an eagle in flight, and the constructive criticism I received helped me improve my technique. Being part of these communities fosters a supportive environment where we can all grow and inspire one another.

Photography Workshops and Courses

Sometimes, hands-on experience is the best way to learn. I’ve attended a few workshops focused on wildlife photography, and each one has been invaluable. These courses often take place in stunning locations and provide the chance to shoot alongside professionals who share their expertise. I remember one workshop where we had a chance to photograph a herd of elephants at sunset; not only did I come away with some of my best shots, but the tips I learned on composition and settings were also priceless.

Books and Guides on Wildlife Photography

Books and guides can serve as fantastic learning resources. I often turn to both photography books and field guides to enhance my knowledge. While many offer technical advice, I particularly enjoy those that focus on the philosophy of wildlife photography and the ethics involved. One of my favorites is a guide that emphasizes patience and respect for the animals, encouraging photographers to immerse themselves in the environment. Reading about others’ experiences and insights is always enlightening and adds depth to my own adventures. Read Interesting article: Explore the World: Budget-Friendly Landscape Photography Spots

Frequently Asked Questions

What is Wildlife Adventure Photography?

Wildlife adventure photography involves capturing the beauty and behavior of animals in their natural habitats, often requiring patience, skill, and a bit of luck. The goal is to tell a story about the wildlife and its environment.

Why is budgeting important in wildlife photography?

Budgeting is crucial in wildlife photography as it helps manage expenses related to camera gear, travel, and accommodation. A budget allows photographers to prioritize experiences over equipment and make informed decisions about their spending.

What type of camera is recommended for beginners in wildlife photography?

Beginners are advised to choose a DSLR or mirrorless camera with a decent sensor, fast autofocus, and burst mode. A mid-range DSLR can serve well without being overly expensive.

Are there affordable lens options for wildlife photography?

Yes, telephoto lenses are ideal for wildlife photography, and brands like Sigma and Tamron offer budget-friendly alternatives that deliver impressive results without the high price tag of more established brands.

What accessories are essential for wildlife photography on a budget?

Essential accessories include a sturdy and lightweight tripod for stabilization, filters like polarizing filters to enhance colors, and a weather-resistant camera bag to protect gear during outdoor adventures.

What are some recommended locations for budget-friendly wildlife photography?

National parks, wildlife reserves, and local wildlife hotspots are great options. National parks like Yellowstone and Yosemite offer diverse ecosystems, while reserves often charge small entrance fees that support animal conservation.

How can one find affordable accommodations during wildlife photography trips?

Camping is a budget-friendly option that connects you with nature, while budget hotels or hostels can also save money. Websites offering last-minute deals can lead to affordable lodging options.

What should photographers consider regarding transportation costs?

To save on transportation, carpooling with fellow photographers can help share gas costs. For longer trips, look for budget airlines or train services and be flexible with travel dates to find better deals.

What are some techniques for capturing better wildlife shots?

Understanding animal behavior, utilizing natural light during the golden hours, and applying composition techniques like the rule of thirds can significantly enhance wildlife photography.

What common mistakes should wildlife photographers avoid?

Photographers should prioritize safety by maintaining a safe distance from wildlife, be prepared for weather changes, and practice ethical photography by avoiding close approaches that stress animals.