Web Analytics

Recent Posts

Top Tips for Backpacking to Seasonal Landscape Wonders

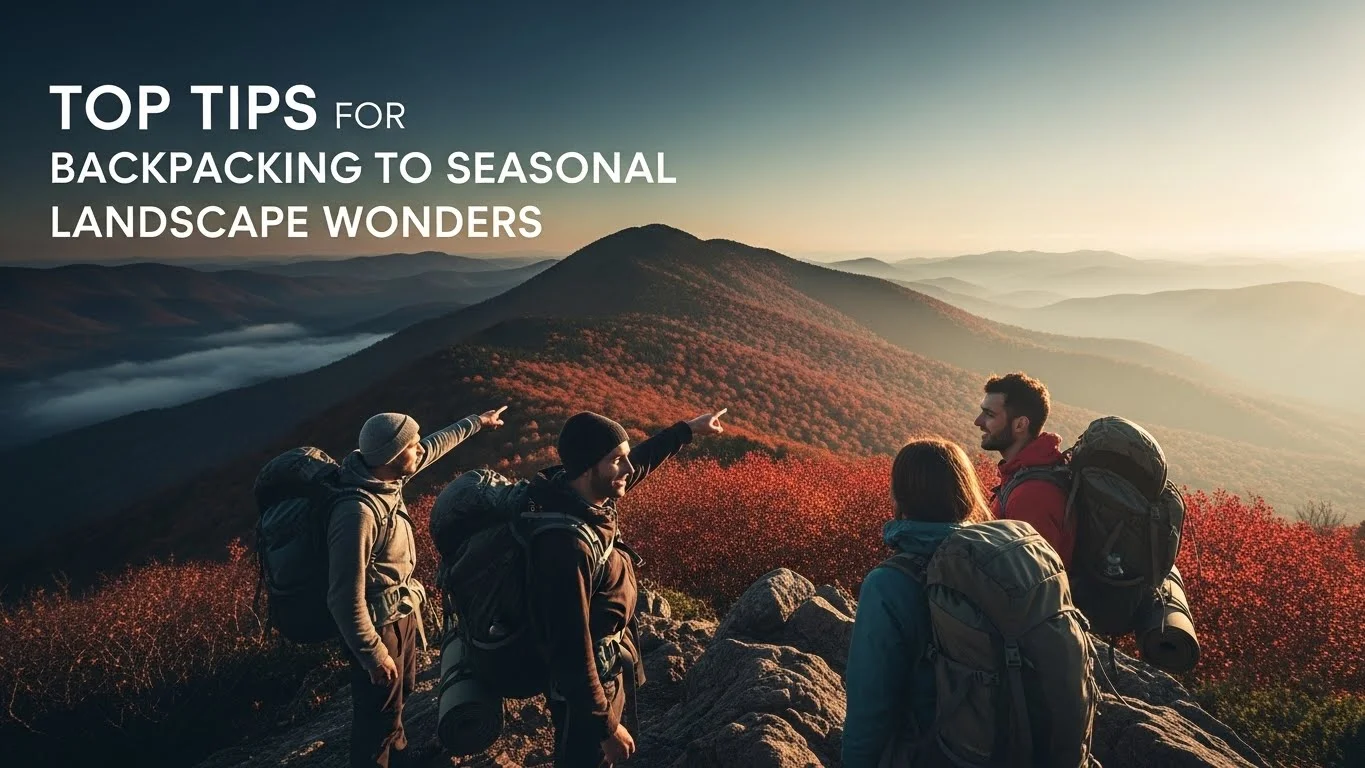
Backpacking through seasonal landscapes is an adventure that can take your breath away. The changing colors, textures, and scents of nature create unforgettable experiences that connect us to the world around us. For those interested in budget-friendly travel, there are also great budget backpacking tips to consider.

Top Tips for Backpacking to Seasonal Landscape Wonders

Understanding Seasonal Landscape Wonders

Definition of Seasonal Landscapes

Seasonal landscapes are the breathtaking scenes we encounter as nature transitions from one season to another. Each season brings its unique palette, from the vibrant blooms of spring to the golden hues of autumn. I’ve often found that these landscapes change not just visually but also in the feelings they evoke. For me, spring is all about renewal and hope, while autumn whispers of change and reflection.

Importance of Seasonal Changes in Nature

The importance of seasonal changes extends beyond aesthetics. These transitions play a vital role in ecosystems. They dictate animal behaviors, plant cycles, and even human activities. I remember hiking in a forest during late spring, surrounded by blossoming flowers and buzzing bees, and realizing how interconnected life is. Each season supports various forms of life, and witnessing this interconnectedness makes me appreciate nature more deeply.

Best Locations for Seasonal Backpacking

Spring: Cherry Blossoms in Washington, D.C.

When spring rolls around, one of my favorite places to visit is Washington, D.C. The cherry blossoms bloom in a spectacular display, transforming the city into a pastel wonderland. The National Cherry Blossom Festival usually takes place in late March to early April, marking a peak time to experience these beautiful trees. I remember cycling around the Tidal Basin, the air filled with sweet floral scents and laughter from families enjoying picnics under the blooms. It’s an experience that truly captures the essence of spring! If you’re looking for backpacking tips for visiting historic battlefields cheaply, this area offers rich history alongside the natural beauty.

Summer: National Parks in the Rockies

As summer approaches, the Rockies beckon. I’ve always found that exploring the national parks here, like Glacier and Rocky Mountain, is a glorious way to embrace the season. The lush green meadows, vibrant wildflowers, and wildlife are at their peak during these months. I recall one summer hike where I stumbled upon a family of deer grazing peacefully. Being surrounded by such breathtaking beauty while feeling the warm sun on my skin is a memory I’ll cherish forever. The trails are often busy, but the fresh air and stunning views are worth it!

Fall: Autumn Foliage in New England

Fall is magical in New England, where the leaves transform into a fiery tapestry of red, orange, and gold. I remember driving through Vermont, stopping at scenic overlooks to take it all in. It felt like stepping into a painting. The best time to see this spectacle is usually mid to late October. I recommend taking the back roads to truly soak in the beautiful vistas and maybe even find a cozy spot to enjoy some apple cider. The crisp air and crunching leaves underfoot make every moment special.

Winter: Snow-Capped Mountains in the Sierras

When winter arrives, I love heading to the Sierra Nevada mountains. The snow-covered peaks and serene landscapes create a stunning backdrop for winter activities. I’ve often spent weekends snowshoeing through the quiet woods, surrounded by towering trees draped in white. The beauty of a snowfall is unlike anything else; it wraps the world in a peaceful blanket. Visiting during January and February is ideal for fresh powder. I’ve found that winter backpacking can be challenging, but the rewards of pristine beauty and solitude are worth every effort.

When to Plan Your Backpacking Trip

Understanding Peak Seasons for Different Landscapes

Knowing the peak seasons for different landscapes is crucial for planning a successful backpacking trip. I’ve learned that timing can make or break the experience. For instance, spring blooms are fleeting. If you wait too long, you might miss the cherry blossoms entirely. Similarly, the fall foliage peaks only for a short time, so planning your trip around these times is key.

Weather Considerations for Seasonal Backpacking

Weather plays a significant role in our experiences in the wild. I’ve faced unexpected rain during a summer hike and had to adjust my plans on the fly. It’s essential to check forecasts and be prepared for changing conditions. In the Rockies, for instance, afternoon storms can roll in quickly, so packing rain gear can make a huge difference. I always try to keep an eye on the weather and pack accordingly, which helps ensure a safer and more enjoyable adventure.

Importance of Off-Peak Travel

Traveling during off-peak seasons can offer a different experience altogether. I discovered this when I visited New England in early November instead of peak foliage season. While the leaves were past their prime, the quiet trails and still-beautiful landscapes allowed for solitude and reflection. Plus, I found that accommodations were much more affordable and easier to book. It’s a great way to enjoy nature without the crowds.

Essential Gear for Seasonal Backpacking

Clothing: Layering for Temperature Variability

When it comes to clothing for seasonal backpacking, I’ve learned that layering is the key. The weather can change dramatically throughout the day, so being prepared is essential. I remember one summer hike in the Rockies where the sun was blazing in the morning, but by afternoon, dark clouds rolled in, and it got chilly. I had my trusty base layer, insulating mid-layer, and a waterproof jacket handy. This allowed me to adapt quickly to the temperature changes. I recommend investing in moisture-wicking fabrics for your base layer, breathable materials for your mid-layer, and a lightweight, packable jacket for those unexpected rain showers. Not only does layering keep you comfortable, but it also helps regulate your body temperature, especially during those strenuous climbs.

Backpacks: Choosing the Right Size and Style

Choosing the right backpack has been a game-changer for me. I’ve experimented with various sizes and styles over the years, and I’ve found that a good fit can make or break your adventure. For shorter hikes, I prefer a daypack of around 20-30 liters. It’s lightweight and perfect for carrying essentials without weighing me down. For longer trips, a larger pack of 50-70 liters is ideal. I remember my first multi-day trek where I overpacked and struggled with a pack that was too heavy. Now, I focus on packing light and using the space efficiently. Look for features like adjustable straps, ventilation, and hip belts for comfort and support. It’s worth trying on different packs to find the one that feels just right.

Camping Equipment: Tents, Sleeping Bags, and Cooking Gear

Camping gear can significantly affect your experience in the wild. I’ve camped with both ultra-light tents and heavier models, and I’ve concluded that finding the right balance between weight and durability is crucial. My go-to tent is a two-person model that packs down small but provides ample space for two people and our gear. I also recommend a good sleeping bag rated for the season you’re in; for winter trips, I opt for a bag that offers extra insulation to keep cozy at night. Cooking gear is also essential. I’ve tried various stoves, but I always come back to my compact camp stove for its reliability and ease of use. Whether you’re boiling water for coffee or whipping up a warm meal, having the right gear makes all the difference.

Navigation Tools: Maps, Compasses, and GPS Devices

Having reliable navigation tools is something I never take for granted anymore. I’ve had my fair share of getting lost, which taught me the importance of being prepared. While GPS devices are handy, I also carry a physical map and a compass. I remember a time when my phone lost signal, and I was grateful I had a map to guide me. I always make sure to learn how to read a map and use a compass before heading out. This combination of tools helps me stay oriented, even in remote areas. Plus, there’s something reassuring about holding a map and plotting your route the old-fashioned way. I suggest practicing navigation skills before your trip, so you feel confident out there.

Top Tips for Planning Your Backpacking Route

Researching Trails and Terrain

Researching trails and understanding the terrain is a vital part of trip planning. I often start by looking up hiking websites and forums to gather information about the trails I’m interested in. I remember planning a trip to a popular national park, and after reading reviews, I discovered a lesser-known trail that offered stunning views with fewer crowds. Knowing the terrain helps me prepare for the type of challenges I might face, whether it’s rocky paths, steep inclines, or river crossings. I also take note of the distance and estimated hiking times, which helps me gauge how much to pack and plan my daily itinerary.

Using Apps for Trail Locating and Conditions

Technology has made navigating trails easier than ever. I often use hiking apps that provide real-time information about trail conditions, maps, and user reviews. I’ve found these apps invaluable, especially when planning routes in unfamiliar areas. One of my favorite apps even shows elevation profiles, which helps me strategize my hiking pace. However, I always remember to download maps offline, just in case I lose cell service while out in nature. These tools enhance my experience and keep me informed about any potential hazards.

Creating a Flexible Itinerary

Flexibility is something I’ve learned to embrace while backpacking. I like to have a rough itinerary outlining my daily hiking distances and stops, but I also leave room for spontaneity. I once planned a specific route through a national forest, but when I stumbled upon a hidden waterfall, I couldn’t resist taking a detour. Adjusting my plans allowed me to explore something beautiful and unexpected. I recommend building some buffer time into your schedule to enjoy those moments that make the journey memorable.

Safety Considerations: Wildlife and Natural Hazards

When planning my routes, I always consider safety. Understanding the wildlife in the area is crucial. I remember a trip where I learned about bear protocols after nearly stumbling upon a bear’s den. Knowing what to do in wildlife encounters and how to store food properly can make a huge difference. Additionally, I always check for natural hazards like steep cliffs, flash flood areas, or unstable rock formations. Staying informed helps me prepare and respect the environment I’m exploring, ensuring that I have a safe and enjoyable experience.

Staying Safe While Backpacking

First Aid Essentials for Backpackers

Safety is something I never take lightly while backpacking. Over the years, I’ve learned that having a well-stocked first aid kit can mean the difference between a minor setback and a major issue. I always pack the basics: adhesive bandages for blisters, antiseptic wipes, gauze, and medical tape. I also include a few specialized items like a snake bite kit and allergy medication, just in case. On one trip, I was hiking with a friend who twisted her ankle. Thankfully, I had a wrap and some pain relievers in my kit, which helped her manage until we made it back to camp. I recommend checking your kit regularly and replenishing any expired items, so you’re always prepared for whatever nature throws your way.

Emergency Protocols and Communication

Communication is key in any outdoor adventure. I always make sure that someone knows my planned route and expected return time. In remote areas, cell service can be spotty, so I’ve found it helpful to carry a personal locator beacon (PLB) or a satellite messenger. These devices can be lifesavers in emergencies, allowing me to call for help even without cell reception. I remember a solo trip where I got caught in a sudden storm, and while I was able to hunker down and ride it out, knowing I had a way to communicate gave me peace of mind. It’s also a good idea to familiarize myself with the area’s emergency procedures, such as the nearest ranger station or hospital.

Understanding Local Wildlife and Plants

Being aware of the wildlife and plants in the areas I’m exploring is crucial for my safety. I’ve learned to identify plants that can cause allergic reactions or be harmful, like poison ivy or stinging nettle. On one memorable hike, I accidentally brushed against some poison ivy and ended up with an itchy rash that lasted for weeks! Now, I make it a point to educate myself about local flora and fauna before any trip. Additionally, understanding the wildlife behavior, especially with animals like bears or mountain lions, can help me avoid dangerous encounters. I always carry bear spray when in bear country and know how to store food properly to minimize attractants.

Eco-Friendly Backpacking Practices

Leave No Trace Principles

Practicing Leave No Trace principles has become a fundamental part of my outdoor adventures. I think about my impact on the environment and strive to leave the places I visit as I found them. This means packing out all my trash, sticking to established trails, and camping in designated areas. I remember hiking in a beautiful national park and being disheartened by litter left behind by other visitors. It really reinforced for me how important it is to be responsible and respectful of nature. I make it a habit to carry out not just my trash but also any litter I find along the way, hoping to inspire others to do the same.

Respecting Wildlife and Their Habitats

Respecting wildlife is another critical aspect of eco-friendly backpacking. I’ve been fortunate to see diverse animals in their natural habitats, but I always keep my distance. Observing from afar allows me to appreciate their beauty without disrupting their routines. I once had the incredible experience of watching a herd of elk from a distance, and I was reminded that they are wild creatures deserving of space. Additionally, I avoid feeding animals, as it can lead to unhealthy dependencies on humans. I’ve learned that when we respect wildlife, we not only protect them but also preserve the integrity of the ecosystems we cherish.

Choosing Sustainable Gear and Supplies

Choosing sustainable gear has become increasingly important in my backpacking journey. I’ve started looking for brands that prioritize eco-friendly materials and ethical manufacturing practices. For instance, I’ve swapped out my old plastic water bottles for a reusable one made from stainless steel, which keeps my drinks cold and reduces waste. I also pay attention to the gear I buy—opting for items that are durable and repairable, so they last longer. On one trip, I used a solar-powered charger to keep my devices powered, which felt great knowing I was harnessing renewable energy. Investing in sustainable gear not only benefits the environment but also enhances my experience, as I feel better knowing I’m making mindful choices.

Capturing the Experience: Photography Tips

Best Times for Landscape Photography

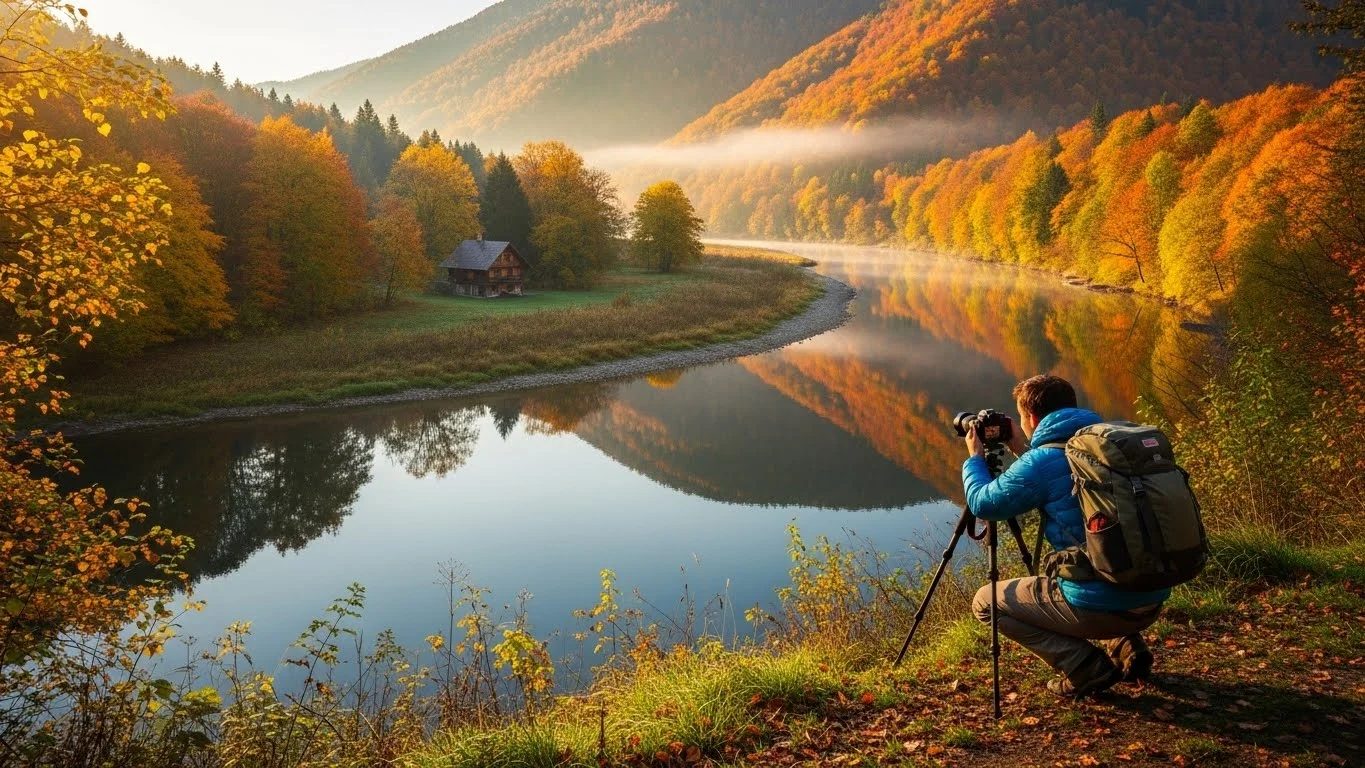
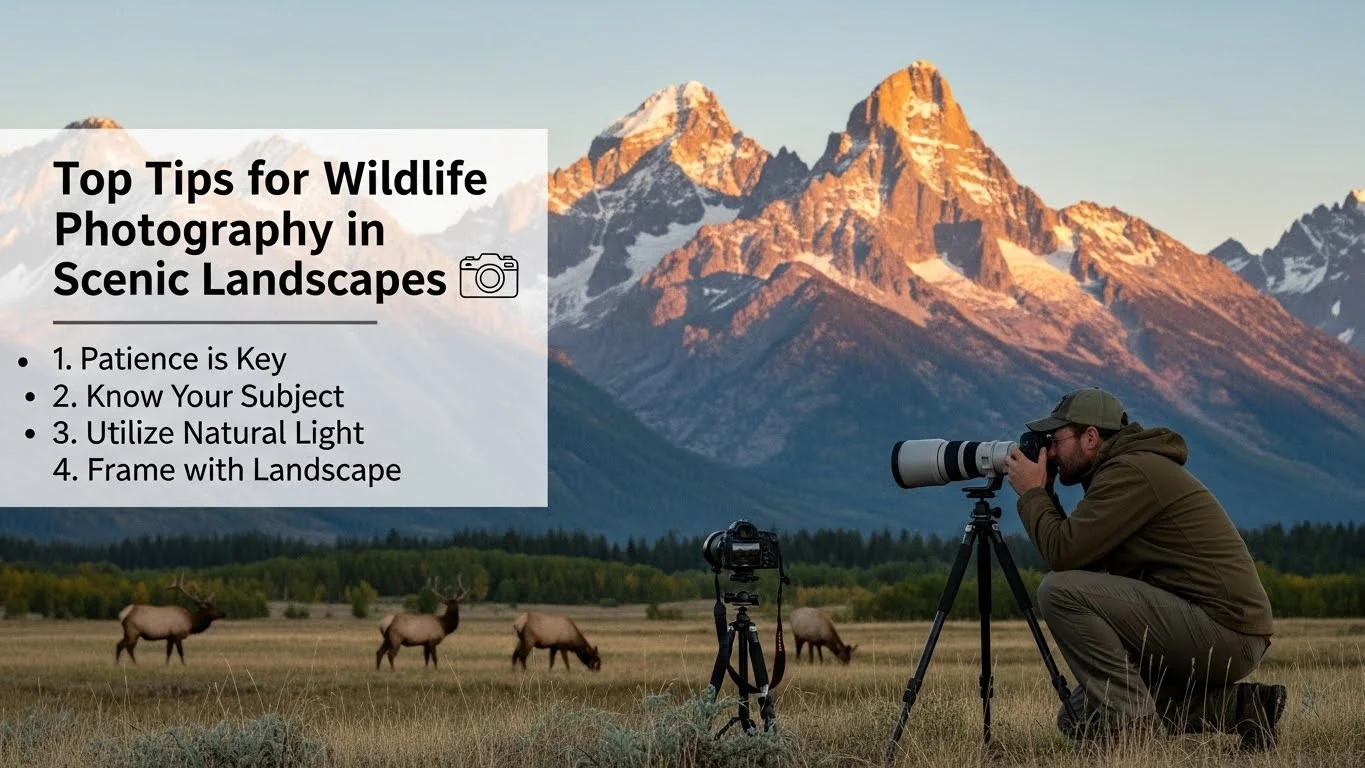
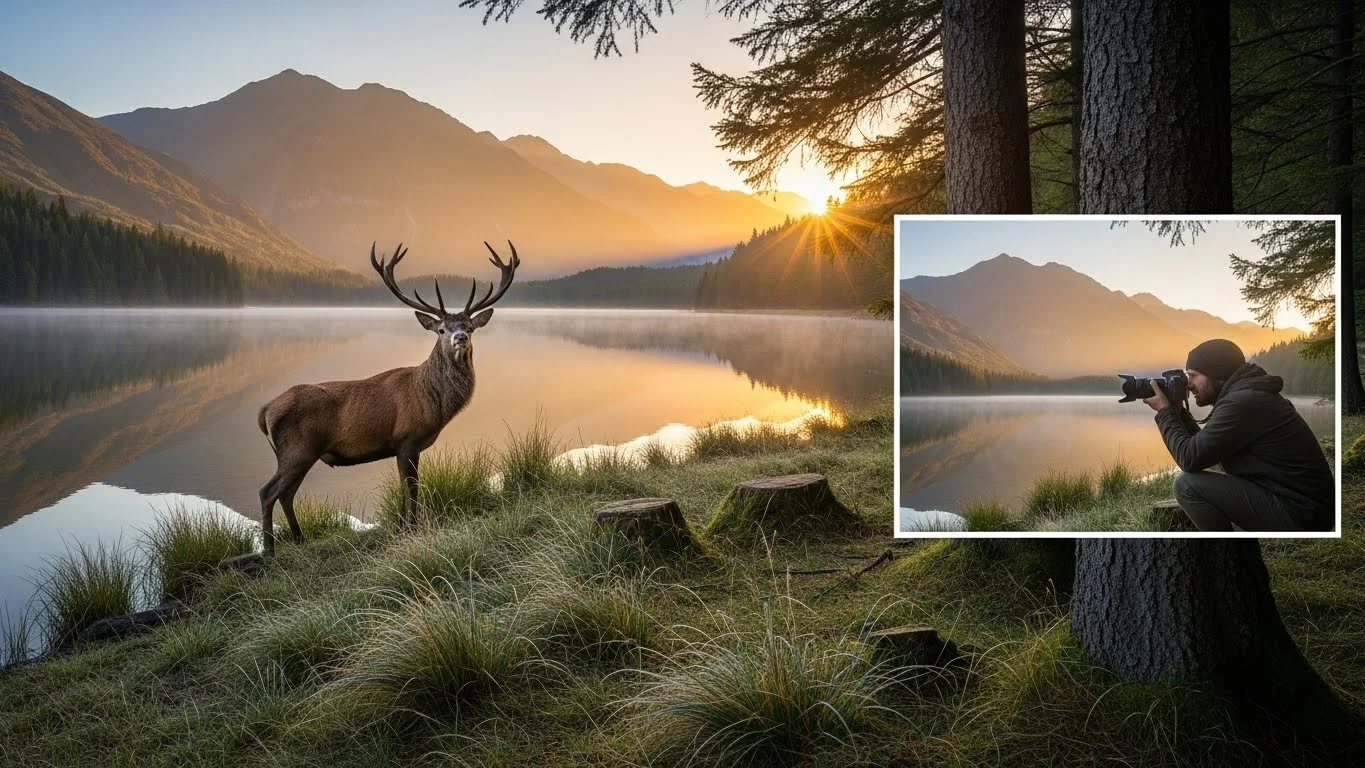
Capturing the breathtaking beauty of seasonal landscapes is something I’m passionate about. I’ve found that the best times for landscape photography are during the golden hours—early in the morning and late in the afternoon. The soft, warm light creates stunning contrasts and highlights the colors of nature. I remember waking up before dawn to catch the sunrise over a misty valley, and the resulting photos were some of my favorites. Planning my photography sessions around weather conditions can also make a significant difference. A cloudy day can add drama to the sky and enhance the colors of fall foliage, while a clear day may provide vibrant blues and greens.

Essential Photography Gear for Backpackers

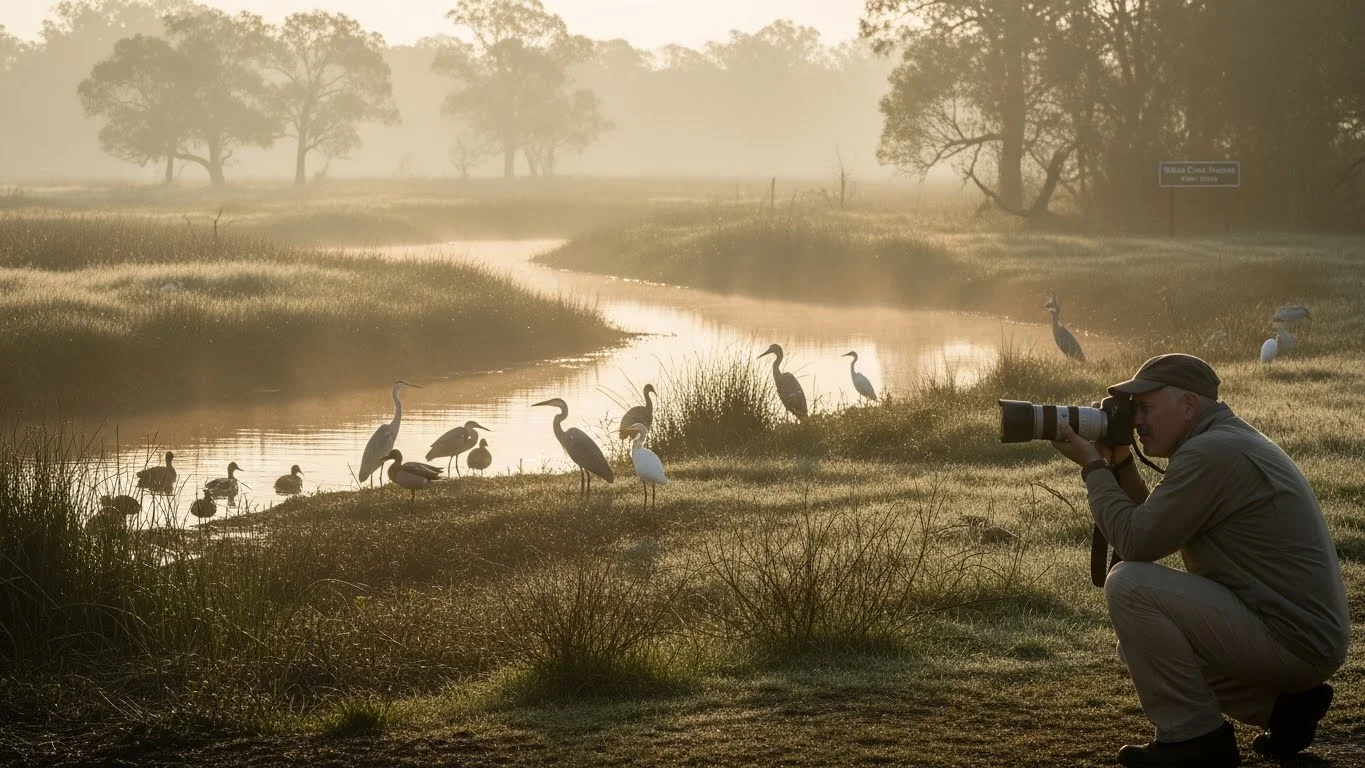
When it comes to photography gear, I’ve learned to keep it simple yet effective. I carry a lightweight DSLR camera with a couple of versatile lenses. A zoom lens is particularly handy for capturing distant wildlife, while a wide-angle lens is great for landscapes. I also bring a sturdy tripod for long-exposure shots, especially in low light. On one trip, I set up my tripod by a serene lake at sunset, and the reflections were absolutely magical. Investing in a quality camera bag that’s easy to carry makes a huge difference, too, allowing me to keep my gear safe while I navigate challenging trails.

Techniques for Capturing Seasonal Changes

To truly capture the essence of seasonal landscapes, I’ve developed a few techniques. I love experimenting with different angles and perspectives, like shooting from a low vantage point to emphasize foreground elements. I also take advantage of the changing seasons by revisiting favorite locations at different times of the year, allowing me to document transformations. I remember taking a photo of the same tree in summer and then again in the fall; the contrast was incredible! I’ve found that patience is key—waiting for the right moment, whether it’s the perfect light or a passing cloud, can result in stunning photographs. I encourage everyone to take their time and enjoy the process of capturing nature’s beauty.

Frequently Asked Questions

What are seasonal landscapes?

Seasonal landscapes are the breathtaking scenes we encounter as nature transitions from one season to another, each bringing its unique palette and evoking different feelings.

Why are seasonal changes important in nature?

Seasonal changes play a vital role in ecosystems, influencing animal behaviors, plant cycles, and human activities, fostering a deeper appreciation for nature.

What are some recommended locations for spring backpacking?

One of the best locations for spring backpacking is Washington, D.C., where the cherry blossoms bloom, particularly during the National Cherry Blossom Festival in late March to early April.

What should I consider when planning a backpacking trip in the summer?

When planning a summer backpacking trip, consider visiting national parks in the Rockies, such as Glacier and Rocky Mountain, where the landscape is lush with vibrant wildflowers and wildlife.

When is the best time to see fall foliage in New England?

The best time to see fall foliage in New England is usually mid to late October, when the leaves transform into vibrant shades of red, orange, and gold.

What are the essential clothing tips for seasonal backpacking?

Layering is key for seasonal backpacking, as it allows you to adapt to dramatic weather changes throughout the day, ensuring comfort and temperature regulation.

What navigation tools are recommended for backpackers?

Reliable navigation tools include maps, compasses, and GPS devices. It’s essential to be familiar with using these tools for safe navigation in remote areas.

What first aid essentials should a backpacker carry?

A well-stocked first aid kit should include adhesive bandages, antiseptic wipes, gauze, medical tape, and specialized items like a snake bite kit and allergy medication.

What are Leave No Trace principles?

Leave No Trace principles involve minimizing your impact on the environment by packing out all trash, sticking to established trails, and camping in designated areas.

What photography tips can enhance capturing seasonal landscapes?

To capture seasonal landscapes effectively, shoot during golden hours for the best light, use versatile lenses, and experiment with different angles and perspectives to highlight nature’s beauty.

Capture Stunning Seasonal Landscapes on a Budget

Capturing stunning seasonal landscapes doesn’t have to break the bank. With the right tips and a little creativity, you can create breathtaking images that showcase nature’s beauty throughout the year. Read Interesting article: Explore Budget-Friendly Locations for Wildlife Photography

Capture Stunning Seasonal Landscapes on a Budget

Understanding Seasonal Landscapes

What Are Seasonal Landscapes?

Seasonal landscapes are those breathtaking scenes that change with the seasons. They include the vibrant blossoms of spring, the lush greens of summer, the warm hues of autumn, and the serene whites of winter. Each season brings its own unique colors, textures, and moods, transforming the same location into something entirely different every few months. I remember visiting a local park in spring, where the bare trees were suddenly bursting with color as flowers bloomed everywhere. It was like witnessing a beautiful painting coming to life right before my eyes.

The Beauty of Nature’s Changes

One of the most rewarding aspects of photography is capturing the beauty of nature as it evolves. With each season, landscapes offer a distinct atmosphere. In spring, the world seems to awaken, with flowers blooming and wildlife reemerging. Summer brings the vibrancy of life, with lush greenery and bright colors. Autumn paints the world in warm oranges and reds, creating a cozy, nostalgic feeling. Then, winter wraps everything in a blanket of snow and frost, creating a serene and tranquil scene. I’ve found that being outside during these seasonal changes not only fills my camera with stunning photos but also brings a sense of peace and connection to nature.

Why Capture Seasonal Landscapes?

Capturing seasonal landscapes is more than just a hobby; it’s a way to document the passage of time and appreciate the beauty that surrounds us. Each photograph tells a story of a moment in time, inviting us to remember the feelings associated with those experiences. For me, looking back at photos from different seasons brings back memories of family outings, quiet moments alone in nature, or adventures with friends. Plus, sharing these images with others can inspire them to explore the world around them, creating a shared appreciation for nature’s ever-changing beauty. Read Interesting article: Capture Stunning Wildlife in Landscapes on a Budget

Essential Gear for Budget Photography

Choosing the Right Camera

If you’re just starting out in landscape photography, you don’t need the latest high-end camera to capture stunning images. I’ve seen amazing photos taken with simple point-and-shoot cameras and even smartphones. The key is to choose a camera that you’re comfortable with and that meets your needs. If you can, look for a camera with manual settings, as this allows you greater control over the exposure, shutter speed, and aperture. I started with a basic DSLR, which was affordable and helped me learn the fundamentals of photography without overwhelming me.

Budget-Friendly Lenses and Accessories

When it comes to lenses, you don’t necessarily need an expensive collection to take great landscape photos. A versatile zoom lens can cover a range of situations, while a prime lens can provide excellent sharpness and depth of field. I often use my 50mm lens for its beautiful bokeh, which helps foreground subjects pop against a blurred background, especially in nature shots. Additionally, consider investing in a polarizing filter. These filters can enhance colors and reduce glare, making your images more vibrant without costing a fortune.

Smartphone Photography Tips

Let’s not forget about smartphones—they’ve come a long way in terms of camera technology! I often find myself reaching for my phone for spontaneous shots, especially when I’m not carrying my camera. To make the most of smartphone photography, I recommend using grid lines to help with composition, experimenting with different angles, and utilizing natural light as much as possible. Many smartphones also have editing tools integrated into their gallery apps, allowing for quick adjustments right after taking a photo.

Tripods and Stabilizers on a Budget

A sturdy tripod is essential for capturing sharp images, especially in low light or when using long exposures. I remember the first time I used a tripod on a chilly autumn morning; it allowed me to take breathtaking long-exposure shots of falling leaves without any camera shake. There are many affordable options available that won’t break the bank. If you’re really on a tight budget, consider making your own stabilizer using simple materials or even utilizing everyday objects to stabilize your camera.

Best Times to Capture Seasonal Landscapes

Spring: Blossoms and New Beginnings

Spring is truly one of my favorite times to get out and take photos. The world feels alive again after the long winter. I remember one spring morning, wandering through a local garden, where cherry blossoms were in full bloom. The pink and white petals danced in the breeze, and the fragrance was intoxicating. This season is all about transformation, and you can see it everywhere. Early mornings or late afternoons are the best times for capturing vibrant colors, as the soft light enhances the beauty of flowers and fresh green leaves. I often find myself experimenting with macro shots of individual blossoms, and the results can be absolutely stunning.

Summer: Vibrant Colors and Full Bloom

Summer brings its own kind of magic. I love the bright colors and the lush landscapes that seem to burst with life. Whether it’s the deep greens of a forest or the bright yellows of sunflowers, summer offers an array of colors that are hard to resist. One of my favorite spots is a sunflower field near my home. The golden flowers sway under the sun, creating a sea of color. I’ve learned that the golden hour just before sunset is perfect for summer photography, as the light casts a warm glow over everything. It adds a layer of warmth to the images that really brings them to life. Plus, summer storms can create dramatic skies that make for breathtaking landscapes, so I always keep my camera handy!

Autumn: Rich Hues and Falling Leaves

Autumn is often regarded as the most picturesque season, and I couldn’t agree more. The trees transform into a palette of warm oranges, reds, and yellows that create a stunning backdrop for photography. I remember hiking in a nearby forest during peak foliage season, and the sight was like stepping into a painting. The crunch of leaves underfoot, the crisp air, and the vibrant colors all come together to create an unforgettable experience. It’s a time when I love to play with the contrast of the colorful leaves against the clear blue sky or a serene lake. I’ve found that shooting during overcast days can also enhance the colors, giving them a soft, rich quality that’s hard to replicate.

Winter: Snowy Serenity and Frosted Beauty

Winter photography has a charm all its own. I remember the first snowfall of the year; everything was blanketed in white, and the world seemed to transform into a peaceful wonderland. Capturing the beauty of snow-covered landscapes can be magical, especially when the sun peeks through the clouds and illuminates the snowflakes. I often find myself exploring local parks during winter, where the bare trees create striking silhouettes against the white backdrop. One tip I’ve learned is to increase the exposure in winter shots to avoid the snow appearing gray. Finding interesting patterns in the snow, like footprints or fallen branches, can also add a unique element to your winter photos. And let’s not forget the beauty of frost on branches—a close-up shot can reveal delicate details that are simply breathtaking.

Locations for Stunning Seasonal Photography

National Parks and Nature Reserves

One of the best ways to capture seasonal landscapes is by visiting national parks and nature reserves. I’ve been fortunate enough to explore a few, and each one has its own unique beauty throughout the year. For instance, I visited Yellowstone during the summer, and the colors of the hot springs were out of this world. In the fall, I’ve seen the aspens turn golden, creating a stunning contrast against the deep blue sky. These parks not only offer breathtaking views but also provide a chance to connect with nature. I’ve found that taking a little time to research the best spots in these parks can lead to discovering hidden gems, like secret trails or lesser-known overlooks. Read Interesting article: Urban Landscape Photography: Travel on a Budget

Local Parks and Gardens

Don’t overlook your local parks and gardens! They can be fantastic spots for seasonal photography. I often stroll through my neighborhood park, especially in spring when the tulips and daffodils bloom. It’s amazing how much beauty can be found just a few minutes from home. I’ve learned to visit these places regularly, as they can change with each season. Some parks have special events, like flower festivals in spring or harvest festivals in autumn, which can provide unique photography opportunities. Plus, I love the sense of community that comes with being out and about in these spaces.

Scenic Byways and Overlooks

Driving along scenic byways can lead to some of the most picturesque landscapes. I recall a road trip I took last fall, where the foliage was at its peak, and every turn revealed breathtaking views. These routes often have designated overlooks where you can stop, take a breath, and capture the beauty around you. I always keep my camera ready, as sometimes the best moments happen unexpectedly. Whether it’s a sweeping vista or a hidden valley, these drives can become a source of inspiration, and I find that they often lead to my favorite images.

Hidden Gems in Your Area

Sometimes the most incredible locations are the ones we least expect. I’ve discovered some of my favorite photography spots just by wandering off the beaten path. Whether it’s a secluded lake, a quiet forest path, or an abandoned building draped in ivy, these hidden gems can add a unique touch to my seasonal photography. I suggest exploring new areas or even asking locals for recommendations. You never know what treasures you might find! I remember stumbling upon a small, overgrown garden while hiking, and it turned out to be one of the best spots for capturing wildflowers in spring. The thrill of discovering something new always keeps my photography journey exciting!

Techniques for Capturing Stunning Images

Understanding Natural Light and Timing

One of the most important lessons I’ve learned in photography is the significance of natural light. The way light interacts with the landscape can dramatically affect the mood and quality of your photos. I remember one early morning when I ventured out just before sunrise. The soft, golden light created a warm glow that made the dew on the grass sparkle like tiny diamonds. This magical hour, known as the golden hour, is ideal for capturing landscapes. It occurs shortly after sunrise and before sunset, when the sun is low in the sky and casts a beautiful, diffused light. I always aim to plan my shoots around these times, knowing that the results are often stunning.

On the flip side, I’ve also discovered that mid-day light can be harsh, leading to strong shadows and washed-out colors. If I find myself shooting during this time, I look for shaded areas or consider using cloud cover to soften the light. I’ve noticed that overcast days can be great for capturing rich colors, especially in autumn when the leaves are vibrant. The diffused light brings out the details without the glare that direct sunlight can create.

Framing and Composition Tips

Composition is another critical aspect of photography that can elevate your images from ordinary to extraordinary. I often think about the rule of thirds when framing my shots. By dividing the image into a 3×3 grid and placing points of interest along these lines or at their intersections, my photos tend to feel more balanced and engaging. For instance, when photographing a lake surrounded by mountains, I’ll position the horizon along the top or bottom third of the frame, letting the mountains or water take center stage.

I also love experimenting with leading lines. These can be paths, rivers, or fences that draw the viewer’s eye into the photo. I recall a hike where I found a winding trail leading into a stunning forest. Capturing this path not only added depth but also created a sense of adventure. Additionally, I try to include foreground elements in my compositions. Whether it’s a rock, a flower, or even a person, these elements can help establish depth and provide a point of reference, making the landscape feel more immersive.

Using Filters on a Budget

Filters are a fantastic way to enhance my landscape photography without breaking the bank. I often use a polarizing filter to reduce glare from water and enhance the colors of the sky, especially on bright sunny days. This filter can make the clouds pop and saturate the colors of the landscape. I remember photographing a lake at midday with a polarizing filter, and the difference was astonishing—the colors were richer, and the reflections were much clearer.

If you’re looking to add some drama to your skies, a graduated neutral density filter can help balance the exposure between the bright sky and the darker foreground. While these filters can come at a cost, there are affordable options available, and some can even be found second-hand. Alternatively, I’ve learned to experiment with digital filters in post-processing if I’m on a tight budget.

Post-Processing Techniques for Enhancing Photos

Post-processing is where I can really bring my images to life. After capturing a seasonal landscape, I often take the time to edit my photos to enhance their vibrancy and clarity. I find that even simple adjustments can make a significant difference. For example, increasing the contrast can help the colors stand out, while adjusting the brightness can bring out details that might have been lost in shadows.

I remember the first time I edited a photo of a sunset—it was breathtaking! By slightly increasing the saturation and sharpening the image, I was able to highlight the beautiful hues of orange and pink that filled the sky. There are many user-friendly editing software options available, both free and paid, that can help you achieve stunning results without a steep learning curve. I recommend starting with something like Lightroom or even free programs like GIMP or Canva, which provide plenty of tools to enhance your images.

In my experience, the key to successful post-processing is to maintain a balance. I try to avoid over-editing, as it can lead to unnatural-looking images. Instead, I aim for a natural enhancement, allowing the beauty of the landscape to shine through. With practice, I’ve found that my editing skills have improved, allowing me to develop a unique style that reflects my vision.

Budget-Friendly Editing Tools

Free Photo Editing Software Options

Finding good editing software doesn’t have to cost a fortune. I’ve discovered several free options that are incredibly user-friendly and can help elevate my photos without spending a dime. One of my favorites is GIMP, which offers a range of features similar to those in Photoshop. It’s perfect for beginners because there are endless tutorials available online to help you get started. Another great option is Paint.NET; it’s simple and intuitive, making basic edits a breeze. I remember initially struggling with editing, but these tools made it easier to refine my images and bring out the beauty of the landscapes I captured.

Mobile Apps for Quick Edits

With my busy lifestyle, I often rely on mobile apps for quick edits on the go. I love using Snapseed, which has a variety of filters and editing tools that can transform a photo in just a few taps. The healing tool is particularly useful for removing distractions from a shot. Another app I frequently use is VSCO, which not only allows for editing but also offers a community of photographers to connect with. I’ve found that using these apps helps me maintain an active presence on social media, as I can share my images immediately after capturing them.

Online Resources for Tutorials and Tips

The internet is a treasure trove of resources for photographers, especially beginners like us looking to expand our skills. I often find myself browsing YouTube for tutorials on specific editing techniques or photography tips. Channels like Peter McKinnon and Jessica Kobeissi offer fantastic insights that have helped me improve both my editing and shooting skills. Additionally, websites like Fstoppers and PetaPixel publish articles that cover everything from gear reviews to editing tutorials. These resources have been invaluable on my photography journey, helping me grow and learn continuously.

Sharing and Showcasing Your Work

Social Media Strategies for Photographers

Once you’ve captured and edited your seasonal landscapes, sharing them is a great way to connect with others and showcase your work. I’ve found that Instagram is particularly effective for photographers. By using relevant hashtags like #LandscapePhotography or #NatureLovers, I can reach a wider audience. I also try to engage with other photographers by commenting on their posts and sharing tips. This sense of community has not only helped me gain followers but also inspired me to keep improving my craft.

Creating an Online Portfolio on a Budget

Having an online portfolio is essential for any photographer looking to showcase their work. I decided to create a simple website using platforms like Wix or WordPress, which offer free templates that are easy to customize. I love that I can organize my photos by season or location, making it easy for visitors to find what they’re interested in. Sharing my portfolio with friends and family has been a great way to get feedback and encouragement, and it feels rewarding to see my work displayed professionally.

Participating in Photography Challenges and Communities

Joining photography challenges is another fun way to push my creativity and connect with fellow photographers. I often participate in monthly challenges on social media, where I can share my seasonal landscapes based on specific themes. This not only motivates me to get out and shoot more but also allows me to see how others interpret the same theme. Engaging with photography communities, whether online or in local meetups, has opened up new opportunities for collaboration and learning, which I truly cherish.

Additional Tips for Budget Photography

Finding Free or Low-Cost Photography Workshops

If you’re eager to improve your skills, consider looking for free or low-cost photography workshops in your area. I stumbled upon a local community center that offered workshops on various photography topics. It was a great way to meet other enthusiasts and learn in a supportive environment. I learned techniques that I would have never thought to try on my own, and the experience really boosted my confidence.

Networking with Local Photographers

Networking has proven to be beneficial in my photography journey. I’ve connected with local photographers through social media groups and photography clubs. These connections often lead to opportunities for collaboration, or even just someone to share tips with. I remember attending a local photo walk where I met several talented photographers who shared their insights on gear and techniques. It was so inspiring to exchange ideas and learn from one another!

Leveraging Online Resources and Courses

Lastly, I encourage you to take advantage of online courses that are affordable or even free. Websites like Coursera and Skillshare offer classes on various photography techniques, which can be great for building foundational skills. I’ve taken a few classes that focused on composition and editing, and they were incredibly helpful in refining my style. The beauty of these resources is that I can learn at my own pace, fitting them into my schedule as needed.

Final Thoughts

As I reflect on my journey with seasonal landscape photography, I’m continuously amazed at how capturing nature’s beauty can be both fulfilling and accessible. With the right mindset, creativity, and a willingness to learn, anyone can create stunning images without breaking the bank. Whether you’re exploring local parks or diving into editing techniques, remember that every photo tells a story. I hope you feel inspired to grab your camera and venture out into the world, capturing the stunning seasonal landscapes that surround you. We all have a unique perspective to share, and I can’t wait to see what you create!

Frequently Asked Questions

What are seasonal landscapes?

Seasonal landscapes are scenes that change with the seasons, showcasing different colors, textures, and moods throughout the year. They include the blossoms of spring, lush greens of summer, warm hues of autumn, and serene whites of winter.

Why is it important to capture seasonal landscapes?

Capturing seasonal landscapes allows us to document the passage of time and appreciate the beauty around us. Each photograph tells a story and brings back memories associated with those moments, inspiring others to explore and appreciate nature’s beauty.

Do I need an expensive camera to take great landscape photos?

No, you don’t need a high-end camera. Many stunning photos have been taken with simple point-and-shoot cameras or smartphones. It’s more important to choose a camera you’re comfortable with and that meets your needs.

What kind of lenses should I use for landscape photography on a budget?

A versatile zoom lens can cover a range of situations, while a prime lens can provide excellent sharpness. A 50mm lens is often recommended for its beautiful bokeh, and a polarizing filter can enhance colors and reduce glare without costing much.

What are the best times to capture landscapes in spring?

Early mornings or late afternoons are ideal for capturing vibrant colors in spring, as the soft light enhances the beauty of blooming flowers and fresh green leaves.

How can I effectively use natural light for photography?

Natural light significantly affects the mood and quality of photos. The golden hour, shortly after sunrise and before sunset, is ideal for capturing landscapes. Overcast days can also enhance colors, especially in autumn.

What composition techniques can enhance landscape photos?

Using the rule of thirds helps create balanced images. Incorporating leading lines, such as paths or rivers, can draw the viewer’s eye into the photo. Including foreground elements can also add depth and make the landscape feel more immersive.

What are some budget-friendly photo editing tools?

Free photo editing software options include GIMP and Paint.NET, which are user-friendly. For mobile edits, apps like Snapseed and VSCO offer quick editing tools and community engagement for photographers.

How can I share my photography work online?

Using social media platforms like Instagram allows photographers to connect with others by using relevant hashtags. Creating an online portfolio through free website builders like Wix or WordPress can also showcase your work professionally.

What are some ways to improve photography skills on a budget?

Look for free or low-cost photography workshops in your area, network with local photographers, and leverage online resources and courses that are affordable or free to build your skills.

Explore Budget-Friendly Locations for Wildlife Photography

Wildlife photography is a thrilling adventure, but it doesn’t have to drain your wallet. Discovering budget-friendly locations can enhance both your skills and your portfolio without breaking the bank.

Explore Budget-Friendly Locations for Wildlife Photography

Understanding Wildlife Photography

Wildlife photography is more than just pointing a camera at animals; it’s about capturing the essence of nature and the beauty of the creatures that inhabit it. I remember my first wildlife photography experience; I was overwhelmed by the excitement of spotting a deer in the early morning mist. The thrill of being in nature, waiting for the perfect moment, can be exhilarating. However, many budding photographers often feel that the cost of gear and travel can be prohibitive. This is where understanding budget-friendly locations comes into play.

The Importance of Budget-Friendly Photography Locations

Choosing budget-friendly photography locations can make a significant difference. Not only does it lower travel costs, but it also opens up opportunities to discover hidden gems that might be overlooked in more popular, pricier spots. I found that some of my best photographs were taken in local parks or less-known reserves, where the wildlife is abundant, and the crowds are minimal. This allows me to focus on my photography without distractions. Plus, being able to go back frequently to a nearby location helped me build my skills and refine my techniques over time.

Essential Gear for Wildlife Photography on a Budget

When it comes to wildlife photography, having the right gear can help you capture stunning images. However, you don’t have to spend a fortune. I learned early on that a good camera with a decent zoom lens can suffice. Here’s what I recommend for budget-friendly wildlife photography gear:

  • Camera: Look for entry-level DSLRs or mirrorless cameras. Brands like Canon and Nikon often have affordable options.
  • Lens: A lens with a focal length of 300mm or more is ideal for wildlife. You can often find used lenses in good condition.
  • Tripod: A sturdy tripod can help with stability, especially in low-light conditions. There are budget-friendly options that work well.
  • Editing Software: Invest in basic photo editing software. I started with free options like GIMP before moving to Adobe Lightroom, which was worth the investment for me.

Additionally, I’ve found that bringing along a rain cover for my gear can be a lifesaver. It allows me to shoot in various weather conditions without worrying about damaging my equipment. Keeping my gear lightweight and portable helped me venture to different locations without feeling burdened.

Top Budget-Friendly Locations for Wildlife Photography

Now that we’ve established how to prepare for wildlife photography on a budget, let’s explore some fantastic locations where you can get amazing shots without spending too much. One option is to consider budget-friendly wildlife photography tours that can lead you to some of the best spots.

National Parks

National parks are often the first places that come to mind for wildlife photography. While some parks can be expensive, many offer affordable options and incredible wildlife viewing opportunities. I’ve had unforgettable experiences in a couple of them.

Yellowstone National Park

Yellowstone is a paradise for wildlife photographers. From bison to bears, the diversity of animals is astounding. The park’s entry fee is reasonable, especially considering the vast landscapes and wildlife you’ll encounter. I remember spotting a herd of elk at dawn; the early morning light combined with the mist created magical conditions for photography. Visiting in the shoulder seasons can also mean fewer crowds and more opportunities to capture wildlife in action.

Everglades National Park

The Everglades is another incredible spot for wildlife photography. It’s home to unique species like alligators, manatees, and a variety of birds. The park offers affordable entry options, and I’ve found that kayaking through the mangroves can provide up-close encounters with wildlife. Just be sure to plan your trip according to the wet and dry seasons for the best experience.

State Parks

State parks often get overlooked, but they can be just as rich in wildlife and opportunities for photography. They tend to have lower entry fees and fewer visitors, which can be a big plus.

Point Reyes National Seashore

Located in California, Point Reyes is a hidden gem for wildlife photographers. With its coastal scenery and diverse habitats, I’ve captured stunning images of elephant seals and migratory birds. The park is very accessible, and entry fees are minimal. I recommend visiting during the migration seasons for the best wildlife sightings.

Chincoteague Island

Chincoteague Island in Virginia is famous for its wild ponies, but it’s also home to a rich variety of bird species, especially during migration. The park’s reasonable entry fees and scenic landscapes make it a delightful spot for photography. I had the chance to photograph a family of ponies against a stunning sunset backdrop, which remains one of my favorite shots.

As I explored these locations, I learned that being patient and observing wildlife behavior led to the most rewarding photographs. Budget-friendly doesn’t mean compromising on experience; in fact, it often enhances it. With the right approach, we can capture breathtaking wildlife moments without spending a fortune. Stay tuned for more exciting locations and tips on maximizing your budget for wildlife photography!

Top Budget-Friendly Locations for Wildlife Photography

Wildlife Reserves

Wildlife reserves can be one of the best-kept secrets for budget-conscious photographers. I’ve discovered that these places often provide incredible wildlife sightings without the hustle and bustle you find in national parks. The entry fees are typically lower, and the serenity of the surroundings can make for a perfect photography experience.

San Juan Islands

The San Juan Islands in Washington State are a treasure trove for wildlife photographers. I remember my trip there, captivated by the sight of orcas and sea lions. The best part? There are plenty of affordable options for boat tours that take you out to see these majestic animals up close. The islands also boast a variety of habitats, from lush forests to rocky shorelines, which means you can capture diverse wildlife in a single trip. I often found myself sitting quietly on the shoreline, waiting for the perfect moment to snap a shot of a playful otter. It’s an experience that stays with you long after the camera clicks.

Alligator River National Wildlife Refuge

This haven in North Carolina is a fantastic destination for those looking to photograph a range of wildlife, including black bears and migratory birds. The refuge is well-maintained and has minimal entry fees, making it a budget-friendly option. I was fortunate enough to capture a stunning image of a bear foraging for food during one of my visits. The trails are designed for easy access, allowing you to explore different areas without feeling overwhelmed. It’s important to remember, though, that with the thrill of wildlife comes the responsibility of being respectful. I always make sure to maintain a safe distance and keep noise to a minimum to avoid disturbing the creatures.

Factors to Consider When Choosing Locations

Wildlife Diversity

One aspect I consider when picking a photography location is wildlife diversity. Different areas are home to specific species, and I’ve learned that some locations boast a broader range of wildlife than others. For instance, visiting a wetlands area can expose you to a wealth of bird species, while a forest may offer opportunities to photograph deer, foxes, and various smaller creatures. I like to do some research beforehand, looking at what wildlife is typically present during my visit. This way, I can maximize my chances of getting those jaw-dropping shots.

Accessibility and Travel Costs

Accessibility is key in choosing a location. I’ve found that places that are easy to reach not only save time but also help keep costs down. For example, I try to look for reserves or parks that are within driving distance. This not only saves on airfare but also allows for spontaneous trips. I always check the route using apps to find the most cost-effective way to get there. A road trip can be a fun adventure, and I’ve enjoyed stopping at various spots along the way to capture unexpected wildlife moments!

Seasonality and Best Times to Visit

Understanding the seasonality of wildlife can be a game changer. I remember planning a trip to photograph migratory birds and being blown away by the sheer number of species I witnessed. Each season brings different opportunities; for instance, spring can be fantastic for newborn animals, while autumn often sees animals preparing for winter. I’ve learned that planning my visits during peak wildlife activity can enhance my photography experience significantly. I recommend keeping a wildlife calendar handy to track migrations and breeding seasons!

How to Maximize Your Budget

Finding Affordable Accommodations

When it comes to accommodations, I’ve found that there are plenty of budget-friendly options. Camping can be a wonderful way to immerse yourself in nature, and I often choose to camp when I visit national parks or reserves. Not only does it save money, but it also allows for those early morning and late evening shoots when the wildlife is most active. If camping isn’t your style, look for local motels or hostels that offer reasonable rates. I always check online platforms for discounts or last-minute deals to ensure I’m getting the best price.

Cost-Effective Transportation Options

Transportation can eat into a wildlife photography budget quickly. I’ve had great experiences using public transportation when visiting urban wildlife spots or even carpooling with fellow photographers. Sharing costs not only saves money but also allows for great conversations and shared tips! For me, renting a bike in some areas has also been a fantastic way to explore and photograph wildlife while keeping costs down.

Free vs. Paid Entry Fees

Finally, I’ve learned to balance my visits between free and paid locations. Many state parks and wildlife reserves have minimal or no entry fees, and I’ve discovered some hidden gems that are often less crowded. However, don’t shy away from paying for entry to places that offer unique wildlife experiences. Sometimes, the fee can provide access to areas that are prime photography spots. I often weigh what I can gain from a location against the entry cost before deciding where to go.

Photography Tips for Budget-Friendly Locations

Best Times of Day for Wildlife Photography

Timing can make all the difference in wildlife photography, and I’ve learned that the best times to shoot are often during the golden hours—early morning and late afternoon. During these times, the light is soft and warm, which helps to create that magical quality in photos. I recall a morning at a local wildlife reserve where I arrived just before dawn. As the sun rose, the mist lifted, revealing a family of deer grazing peacefully. The light was perfect, and I managed to capture some stunning shots that I still cherish today.

In my experience, many animals are also more active during these periods. For example, I’ve seen birds taking flight at dawn and mammals like foxes and rabbits coming out to forage. Whenever I plan a trip, I always make sure to be at my chosen location around these times to maximize my chances of seeing wildlife in action.

Techniques for Capturing Wildlife on a Budget

While having good gear is helpful, I’ve found that the techniques I use can often make a more significant impact on my photos. One technique that I rely on is being patient and remaining still. I remember sitting quietly for what felt like hours while waiting to photograph a rare bird. It was all worth it when the bird finally landed right in front of me! I’ve learned that animals are often more comfortable when they don’t sense human presence, so wearing neutral colors and blending into the surroundings can help.

Another technique I recommend is to focus on the eyes of the animal. I’ve discovered that sharp, clear eyes can make or break a wildlife photo. Whenever I shoot, I always aim to get the eyes in focus, as they convey emotion and connection to the viewer. If you can capture that special glint or expression, it often elevates the image from just a picture to something truly compelling.

Utilizing Natural Light to Enhance Photos

Natural light is my best friend in wildlife photography. I’ve experimented with different lighting conditions, and I’ve found that utilizing the natural light available can create stunning results without needing expensive lighting equipment. One of my favorite tricks is to position myself so that the light is coming from behind me, illuminating the subject beautifully. I remember one afternoon at a wildlife refuge when I managed to photograph a heron against the warm sunset glow. The colors were vibrant, and it transformed a simple shot into a breathtaking image.

Overcast days can also work to your advantage. The diffused light on cloudy days can help minimize harsh shadows and bring out the details in the fur or feathers of animals. I’ve often come home from cloudy days with some of my favorite shots, simply because the light was so flattering. Always keep an eye on the weather forecast and try to adapt your plans accordingly; sometimes, the best photos come from the most unexpected conditions!

Safety and Ethical Considerations

Staying Safe While Photographing Wildlife

While I love being close to nature and capturing wildlife, safety should always be a top priority. I’ve learned that it’s essential to be aware of my surroundings and to understand the wildlife behavior in the area I’m visiting. For example, I remember a time when I was photographing bears in a national park. I made sure to follow all park regulations, kept a safe distance, and always had an escape route planned. It’s crucial to respect wildlife and their space to ensure both my safety and theirs.

When venturing into the wild, I always carry a first-aid kit and make sure my phone is charged in case of emergencies. Additionally, I try to go with a buddy whenever possible. It’s not only safer, but it also allows for shared experiences and insights that can enhance our photography adventures.

Ethical Photography Practices

Ethics in wildlife photography is something I take very seriously. I believe it’s crucial to respect the animals and their habitats. I always maintain a safe distance and avoid using bait to attract wildlife for a shot. I’ve seen too many instances where photographers disturb animals, which can lead to stress or even abandonment of nests and young. To me, capturing the beauty of an animal in its natural behavior is far more rewarding than forcing a moment.

Additionally, I’m mindful of the environment. I always follow the principles of Leave No Trace, ensuring that I don’t disrupt habitats or leave trash behind. I think it’s our responsibility as photographers to protect the very nature we love to photograph. By practicing ethical photography, we can contribute to the conservation of wildlife and ensure that future generations can enjoy the same experiences we do.

Frequently Asked Questions

What is wildlife photography?

Wildlife photography is about capturing the essence of nature and the beauty of the creatures that inhabit it, rather than just pointing a camera at animals.

Why are budget-friendly photography locations important?

Choosing budget-friendly photography locations reduces travel costs and allows photographers to discover hidden gems that may be overlooked in more popular, pricier spots.

What essential gear is recommended for budget-friendly wildlife photography?

Recommended gear includes an entry-level DSLR or mirrorless camera, a lens with a focal length of 300mm or more, a sturdy tripod, and basic photo editing software.

What are some top budget-friendly locations for wildlife photography?

Some top locations include Yellowstone National Park, Everglades National Park, Point Reyes National Seashore, Chincoteague Island, the San Juan Islands, and Alligator River National Wildlife Refuge. For more options, consider checking budget wildlife photography tours.

What factors should be considered when choosing wildlife photography locations?

Considerations include wildlife diversity, accessibility and travel costs, and seasonality to determine the best times to visit for wildlife activity.

How can photographers maximize their budget for wildlife photography?

Photographers can find affordable accommodations, use cost-effective transportation options, and balance visits between free and paid entry locations.

What are the best times of day for wildlife photography?

The best times to shoot are during the golden hours—early morning and late afternoon—when the light is soft and warm, and many animals are more active.

What techniques can help capture wildlife photos on a budget?

Techniques include being patient and remaining still, focusing on the eyes of the animal, and utilizing natural light to enhance photos.

How can photographers ensure safety while photographing wildlife?

Photographers should be aware of their surroundings, understand wildlife behavior, maintain a safe distance, carry a first-aid kit, and ideally go with a buddy for added safety.

What are ethical considerations in wildlife photography?

Ethical considerations include respecting animals and their habitats, maintaining a safe distance, avoiding baiting wildlife for photos, and following the principles of Leave No Trace.

Top Tips for Wildlife Photography in Scenic Landscapes

Wildlife photography in scenic landscapes can be a thrilling adventure, blending the beauty of nature with the art of capturing fleeting moments. Let’s dive into the essential tips that can elevate your photography skills and help you connect with the wild. Read Interesting article: Budget-Friendly Wildlife Photography Tips for Backpackers

Top Tips for Wildlife Photography in Scenic Landscapes

Understanding Wildlife Photography

What is Wildlife Photography?

Wildlife photography, at its heart, is about capturing the beauty and behavior of animals in their natural habitats. I remember the first time I picked up my camera with the intent to photograph wildlife—I felt a mixture of excitement and nervousness. It’s not just about taking pictures; it’s about telling a story, showcasing the raw emotion of these creatures, and portraying their struggles and triumphs within their environments. Each shot needs to reflect the unique essence of the species and the world they inhabit.

The Importance of Scenic Landscapes

When I think about wildlife photography, scenic landscapes play an enormous role. The backdrop can enhance the subject, creating a more impactful image. For example, I once photographed a majestic elk against a backdrop of snow-capped mountains, and the composition brought a dramatic depth that I couldn’t have achieved with a plain background. Scenic landscapes not only frame the wildlife but also tell a more complete story about their lives and habitats. The environment adds context, showing the challenges they face and their interactions with the ecosystem.

Finding the right landscape is crucial. It’s one thing to capture a bird perched on a branch, but when that branch is surrounded by blooming wildflowers or set against a stunning sunset, the image becomes much more captivating. I’ve learned that the best wildlife photographs often happen when the setting is just as important as the subject itself.

In my experience, planning is key. I often spend time researching locations that are known for their diverse wildlife and breathtaking scenery. National parks, wilderness areas, and nature reserves offer fantastic opportunities for great shots, but they also require patience and sometimes a bit of luck. I’ve gone out multiple times without getting the perfect shot, but I’ve also had unforgettable experiences just being in nature, waiting for the right moment. Read Interesting article: Essential Wildlife Photography Tips for Budget Safari Travelers

Essential Equipment for Wildlife Photography

Cameras: DSLRs vs. Mirrorless

Choosing the right camera is fundamental to capturing stunning wildlife images. Personally, I’ve transitioned from a DSLR to a mirrorless camera, and I can’t tell you how much I appreciate the benefits. Mirrorless cameras are typically lighter and more compact, which is a huge plus when you’re trekking through different terrains. They also have faster autofocus capabilities, which is crucial when trying to capture a bird in flight or a deer leaping through the forest.

However, DSLRs still hold their ground with their robust build and longer battery life. I think it mostly comes down to personal preference and the specific type of photography you’re aiming to pursue. If you’re just starting out, any camera that allows you to manual focus and change lenses will serve you well.

Lenses: Telephoto vs. Wide-Angle

When it comes to lenses, I’ve found that investing in a good telephoto lens is essential for wildlife photography. A lens with a focal length of at least 300mm helps me get close-ups of animals without disturbing them. I remember getting my first 400mm lens; it opened up a whole new world of detail that I hadn’t captured before. On the other hand, wide-angle lenses are fantastic for capturing landscapes, especially if you want to include the animal in context with its surroundings. Sometimes I’ve used both lenses in a single outing to maximize my opportunities.

Tripods and Stabilizers

Stability is key, especially when you’re shooting at longer focal lengths. I always carry a tripod with me, as it allows for sharper images and helps reduce camera shake. If I’m shooting in a dynamic environment, like a riverbank with jumping fish, I also use a stabilizer. It’s made a noticeable difference in the clarity of my action shots.

Accessories: Filters, Batteries, and Memory Cards

Don’t underestimate the value of accessories. I’ve learned the hard way to carry extra batteries and memory cards, especially on long trips where I might be away from power sources. Additionally, polarizing filters are great for reducing glare and enhancing colors in your images. Just the other day, I used a polarizer while shooting a tranquil lake scene, and the colors popped like never before.

In wildlife photography, preparation is everything. Having the right equipment on hand can make the difference between a missed opportunity and a stunning photograph. I often remind myself that while we can’t control the wildlife, we can control our readiness to capture the moment when it arrives.

Choosing the Right Location

National Parks and Wildlife Reserves

When it comes to wildlife photography, choosing the right location can make all the difference. I’ve always been drawn to national parks and wildlife reserves. These areas are often protected, providing a safe haven for animals and a stunning backdrop for photography. I remember my trip to Yellowstone National Park; the sheer variety of wildlife I encountered was astounding. From bison roaming freely to elk grazing in the meadows, every moment was a gift.

One thing I’ve learned is to research the best times to visit these parks. Each season brings different wildlife activity. For instance, visiting during the spring can mean witnessing newborn animals, while autumn often showcases vibrant foliage and animals preparing for winter. I always carry a map of the park and mark out the spots I want to explore; it helps me stay organized and focused during my adventures.

Scenic Landscapes: Mountains, Forests, and Oceans

Beyond national parks, I’ve found that picturesque landscapes play a huge role in wildlife photography. Mountains, forests, and oceans have their unique charms and can create stunning backdrops for animal photography. I particularly love capturing wildlife in coastal areas. The way the light reflects off the water adds a magical quality to the images.

For example, I spent a week on the Oregon coast, where I had the chance to photograph seals lounging on the rocks with the Pacific Ocean crashing behind them. The combination of the rugged coastline and the playful seals made for some of my favorite shots. I recommend exploring different types of terrains; you might be surprised at what you find. Each landscape has its own story to tell, and the wildlife that inhabits it can often be seen in unique ways. Read Interesting article: Capture the Wild: Top Wildlife Photography Tips for Safaris

Timing: Best Seasons and Times of Day

Timing is crucial in wildlife photography, and I’ve learned that both seasons and times of day can dramatically affect my shots. I love the early mornings for a couple of reasons: the light is soft, and the world is often quieter, which means animals are more active and less disturbed. I remember waking up before dawn on a trip to a national park, the air crisp and cool, and watching as the sun rose over the horizon. The golden light illuminated everything beautifully, and I was fortunate enough to capture a herd of deer as they grazed peacefully in a meadow.

Similarly, I’ve found that certain seasons bring out specific wildlife behaviors. For instance, autumn is fantastic for bird migrations, while summer can be a great time for seeing young animals. I make it a point to check wildlife calendars for the regions I’m visiting. Knowing which animals are active during which seasons can help ensure that I’m in the right place at the right time.

Understanding Animal Behavior

Researching Species and Habitats

I can’t stress enough how important it is to understand the wildlife I’m aiming to photograph. Each species has its own habits, preferences, and quirks. Before I head out, I spend time researching the animals I might encounter. There’s something magical about understanding what motivates them—whether it’s feeding, mating, or escaping predators. This knowledge helps me anticipate their movements and get those perfect shots.

One memorable experience was when I researched the nesting habits of ospreys before a trip to a lake. Knowing their nesting season allowed me to position myself at the right spot to capture them bringing food back to their young. This type of preparation not only improves my chances of getting great photos but also enriches my overall experience in the field.

Recognizing Patterns and Habitats

Over time, I’ve learned to recognize patterns in animal behavior based on their habitats. For instance, I often find that certain animals are more active during specific times of the day or year, depending on their environment. I remember a time when I was trailing through a dense forest and noticed that deer were more likely to appear near water sources during the late afternoon. By paying attention to these patterns, I can position myself more effectively and increase my chances of capturing stunning images.

Ethics of Wildlife Photography

As I’ve grown in my wildlife photography journey, I’ve become increasingly aware of the ethics involved. It’s essential to respect the animals and their habitats. I always strive to maintain a safe distance, using my zoom lens to avoid disturbing them. I remember a situation where I saw someone getting too close to a nesting bird; it made me realize the importance of educating others about ethical practices. We’re guests in their world, and it’s our responsibility to minimize our impact while still enjoying and documenting their beauty.

Composition Techniques for Stunning Shots

Rule of Thirds and Framing

Composition is one of those areas where I’ve really learned to hone my skills over the years. One technique I find incredibly useful is the rule of thirds. I remember my photography mentor explaining this concept to me during an outing, and it completely changed how I approach my shots. The idea is simple: divide your frame into a three-by-three grid, and position your subject along those lines or at their intersections. This technique can create a more balanced and engaging composition, drawing the viewer’s eye directly to your subject.

For example, I once captured a stunning image of a fox peeking through tall grass. By placing the fox off-center, I was able to incorporate the surrounding environment, which added context and depth. Framing is another valuable technique. I often use natural elements like tree branches or rock formations to frame my subject, creating a sense of depth and directing the viewer’s gaze right where I want it. I find that paying close attention to these compositional techniques can really elevate the impact of my photographs.

Utilizing Leading Lines and Depth

Leading lines are another powerful tool in wildlife photography. They guide the viewer’s eye through the image, adding a sense of movement and direction. I’ll never forget the time I was hiking along a riverbank and spotted a heron standing still in the water. I positioned myself to capture the flowing river as a leading line that directed attention to the heron. The result was a dynamic and engaging image that felt alive and vibrant.

Creating depth in your images is equally important. I’ve learned that including foreground elements, like flowers or rocks, can make a photo feel three-dimensional. When I captured a shot of a bear fishing in a river, I made sure to include some rocks in the foreground, which added layers to the scene and made it more immersive. These techniques take practice, but once you start noticing leading lines and how to create depth, your photos will become increasingly captivating.

Capturing Action Shots vs. Portraits

In my experience, knowing when to switch between action shots and portraits can make all the difference in wildlife photography. Action shots, like a bird in flight or a deer leaping through the underbrush, are exhilarating to capture. I’ve found that using a faster shutter speed is key to freezing those moments. I remember being mesmerized while photographing an eagle as it swooped down to catch a fish. That adrenaline rush when I pressed the shutter—knowing I had captured such a fleeting moment—was unforgettable.

On the other hand, wildlife portraits can tell a different story. They allow you to convey the animal’s personality and character. I love taking my time to get close and capture the nuances of an animal’s expression. One of my favorite portraits is of a wise-looking owl staring directly into my lens. The soft background really highlighted its features, and I felt like I was able to connect with the bird in a profound way. Knowing when to shift your focus between action and portrait shots can really enrich your portfolio and showcase the diversity of wildlife.

Lighting Considerations in Scenic Landscapes

Golden Hour: What It Is and Why It Matters

Lighting is such a crucial aspect of photography, and I’ve come to cherish the golden hour. This magical time occurs just after sunrise and just before sunset, when the sunlight is soft, warm, and diffused. I remember one early morning when I was set up to photograph a herd of wild horses. The warm glow of the sun rising behind them bathed the entire scene in a golden hue, creating a breathtaking backdrop that enhanced the image tenfold. The golden hour not only highlights textures and colors but also adds an emotional quality to the photograph.

Dealing with Harsh Midday Sun

Midday sun can be challenging, and I’ve had my fair share of frustrating experiences with it. However, I’ve learned some tricks to make the most of those harsh lighting conditions. When the sun is high in the sky, I try to find shaded areas or use trees to filter the light. I once found myself photographing a family of deer during midday, and rather than giving up, I moved into the shade of a large tree. The filtered light created a softer, more even exposure that really brought out the details in their fur.

Using Natural Light to Enhance Your Photos

Natural light is a photographer’s best friend, and I’ve found that paying attention to how it interacts with my subjects can lead to stunning results. Reflective surfaces, like water or wet rocks, can bounce light in beautiful ways. I remember standing by a lake at dusk, watching as the sun set and the colors reflected in the water’s surface. I captured a group of ducks gliding across the lake, and the interplay of light and color added a dreamlike quality to the shot. Being mindful of how natural light can enhance your images can lead to some truly breathtaking photographs.

Post-Processing Tips

Choosing Software: Lightroom vs. Photoshop

Once I’ve captured my wildlife images, the next step is post-processing, which is where I really get to enhance my photos. I’ve experimented with various software options, but I’ve found that Adobe Lightroom is my go-to for its user-friendly interface and powerful editing capabilities. Lightroom is great for organizing my images and making adjustments to exposure, contrast, and color without significantly altering the photo’s quality. I remember feeling overwhelmed at first, but as I spent more time learning the tools, I realized how much potential my photos had once I applied some thoughtful edits.

Photoshop, on the other hand, is ideal for more advanced editing. I’ve used it for tasks like removing distractions from the background or combining multiple images for a composite shot. For me, the two programs complement each other well. I often do my basic edits in Lightroom and then jump over to Photoshop for the final touches. It’s a workflow that feels seamless and efficient.

Basic Editing Techniques: Cropping, Color Correction

One of the first things I do when editing a photo is to crop it for better composition. I’ve learned that a little cropping can dramatically change the focus of an image. For example, I took a photo of a bear from quite a distance, and after cropping, the bear became the prominent subject of the image, telling a much stronger story. I also pay attention to color correction—especially for wildlife, where accurate colors can make or break a shot. I remember editing a photo of a peacock, and adjusting the colors helped bring out the vibrancy of its feathers, making it come alive on the screen.

Advanced Techniques: HDR and Focus Stacking

As I’ve grown more comfortable with editing, I’ve started to explore advanced techniques like HDR (High Dynamic Range) and focus stacking. HDR has allowed me to capture images in challenging lighting conditions, where the contrast between bright and dark areas can be extreme. By merging three or more exposures, I can create a balanced image that retains details in both shadows and highlights. A memorable moment for me was photographing a sunset, where the sky was ablaze with color, and HDR helped me preserve the richness of the scene.

Focus stacking is another technique I’ve dabbled in, especially when photographing small subjects like insects or flowers. By combining multiple images taken at different focus points, I can achieve a sharp depth of field that wouldn’t be possible with a single shot. It’s a bit of a learning curve, but the results are often stunning and worth the effort.

Sharing and Showcasing Your Work

Building an Online Portfolio

After putting so much heart and effort into my wildlife photography, I realized the importance of sharing my work with others. I decided to create an online portfolio to showcase my favorite images. Building a website was a fulfilling process, allowing me to not only display my photos but also tell the stories behind them. I recommend using platforms like WordPress or Squarespace for their ease of use. My portfolio has become a vital tool for connecting with other photographers and potential clients.

Social Media Strategies for Wildlife Photographers

Social media has become an essential way to share my work and engage with other photographers and nature enthusiasts. I’ve found Instagram to be particularly effective for showcasing my wildlife shots through captivating visuals and storytelling. I like to use relevant hashtags to reach a wider audience, but I also make sure to engage with my followers by responding to comments and sharing insights about my photography adventures. It’s been a great way to build a community, and I’ve connected with many talented photographers through this platform.

Submitting to Contests and Publications

Another exciting way to share my work is by submitting to photography contests and publications. I often look for contests that focus on wildlife photography, as they can offer great visibility and opportunities to have my work featured. I remember entering a local contest and was thrilled when one of my images was selected for a gallery exhibition. It felt rewarding to see my work displayed alongside other talented photographers. I also keep an eye out for wildlife magazines and online publications where I can submit my photos and potentially reach an even broader audience.

Common Mistakes to Avoid

Overlooking Wildlife Safety and Ethics

As passionate as I am about wildlife photography, I’ve learned that safety and ethics should always come first. There have been times when I’ve seen photographers getting too close to animals in an effort to get a better shot. It’s a mistake I’ve made in the past, and now I always remind myself to respect their space. Protecting wildlife and their habitats is our responsibility, and it’s essential to educate others on ethical practices.

Neglecting to Plan Ahead

Planning is an integral part of successful wildlife photography. I remember heading out to a location without fully knowing what I might encounter, which led to missed opportunities. Now, I always research the area, check local wildlife reports, and even connect with other photographers who frequent the location. This preparation allows me to be better equipped and increases the chances of capturing that perfect moment.

Ignoring Weather Conditions

Weather can have a significant impact on wildlife behavior and photography. I’ve learned the hard way that it’s crucial to check the forecast before heading out. For instance, some animals are less active during rain or extreme heat. On one trip, I ignored the weather warnings and ended up getting soaked without any worthwhile photos. Now, I embrace the elements, but I always make sure to be prepared for whatever Mother Nature throws my way.

Resources for Wildlife Photographers

Books and Online Courses

For anyone who wants to improve their wildlife photography skills, I can’t recommend enough the value of educational resources. I’ve read numerous books on wildlife photography that cover everything from technical skills to ethical practices. Online courses have also been instrumental in my growth. Websites like MasterClass and Skillshare offer fantastic classes taught by experienced photographers who share their insights and techniques.

Photography Communities and Forums

Joining photography communities and forums has been an enriching experience for me. I regularly participate in discussions on platforms like Reddit and photography-specific forums. These spaces allow me to connect with other wildlife photographers, seek feedback on my work, and share tips and tricks. It’s inspiring to see how others approach similar challenges, and I’ve made some valuable friendships along the way.

Equipment Rental Services

Lastly, I’ve discovered the benefits of using equipment rental services. Sometimes I want to try out a new lens or camera body before making a purchase. Renting equipment allows me to experiment without committing to a buy right away. I’ve used services like BorrowLenses and LensRentals, which have been fantastic in expanding my toolkit without breaking the bank.

Final Thoughts

Wildlife photography has been a journey filled with learning, adventure, and a deepening appreciation for nature. Each outing brings its own challenges and rewards, and I’ve found that the more I immerse myself in this passion, the more I grow as both a photographer and a nature enthusiast. My hope is that through this article, I’ve shared insights that inspire you to explore the world of wildlife photography, capture stunning images, and tell the stories of the incredible creatures that share our planet. Remember, it’s not just about the photographs; it’s about the experiences and connections we make along the way.

Frequently Asked Questions

What is wildlife photography?

Wildlife photography is about capturing the beauty and behavior of animals in their natural habitats. It involves telling a story, showcasing the raw emotion of these creatures, and portraying their struggles and triumphs within their environments.

Why are scenic landscapes important in wildlife photography?

Scenic landscapes enhance the subject by creating a more impactful image. They frame the wildlife and provide context about their lives and habitats, showing the challenges they face and their interactions with the ecosystem.

What type of camera is recommended for wildlife photography?

Both DSLRs and mirrorless cameras are suitable for wildlife photography. Mirrorless cameras are typically lighter and have faster autofocus capabilities, while DSLRs offer robust build and longer battery life. Ultimately, the choice depends on personal preference and photography goals.

What lens is best for wildlife photography?

A good telephoto lens, with a focal length of at least 300mm, is essential for capturing close-ups of animals without disturbing them. Wide-angle lenses can also be useful for including the animal in its surrounding landscape.

What are the best times of day for wildlife photography?

Early mornings are ideal for wildlife photography as the light is soft and animals are often more active. The golden hour, which occurs just after sunrise and just before sunset, provides the best lighting conditions for capturing stunning images.

How important is it to understand animal behavior in wildlife photography?

Understanding animal behavior is crucial for anticipating movements and capturing perfect shots. Researching the species and their habits allows photographers to position themselves effectively and improve their chances of getting great photos.

What are some composition techniques for wildlife photography?

Techniques such as the rule of thirds, framing, and using leading lines can enhance the composition of wildlife photographs. Creating depth by including foreground elements can also make images more immersive and engaging.

What is the role of post-processing in wildlife photography?

Post-processing is important for enhancing wildlife images. Software like Adobe Lightroom is ideal for basic edits, while Photoshop can be used for more advanced techniques such as removing distractions or combining images for composite shots.

How can photographers share and showcase their wildlife work?

Photographers can build an online portfolio, utilize social media platforms like Instagram, and submit their work to contests and publications to showcase their wildlife photography and connect with other enthusiasts.

What common mistakes should wildlife photographers avoid?

Common mistakes include overlooking wildlife safety and ethics, neglecting to plan ahead, and ignoring weather conditions. Being prepared and respectful towards wildlife can greatly enhance the photography experience.

Capture Stunning Wildlife in Landscapes on a Budget

If you’ve ever felt the thrill of capturing a fleeting moment of wildlife in its natural habitat, you know how exhilarating it can be. You don’t need a fortune to create stunning wildlife photographs in beautiful landscapes; you just need passion and a few smart strategies. Read Interesting article: Budget-Friendly Wildlife Photography Tours You Can’t Miss

Capture Stunning Wildlife in Landscapes on a Budget

Understanding Wildlife Photography

The Importance of Wildlife in Landscapes

Wildlife photography has always held a special place in my heart. There’s something magical about observing animals in their natural settings, whether it’s a majestic eagle soaring over a mountain range or a deer grazing in a sunlit meadow. These moments remind us of the beauty and diversity of our planet. I believe wildlife is an integral part of the landscape, adding life and context to the scenery. When I look at a photograph that captures both the landscape and its inhabitants, I feel a connection to nature that transports me back to that moment. It’s a powerful reminder of the ecosystems we share and the importance of preserving them.

Benefits of Capturing Wildlife on a Budget

When I first got into wildlife photography, I was surprised to find that you don’t need to spend a ton of money to get great shots. In fact, shooting on a budget often pushes us to be more creative and resourceful. We learn to work with what we have, which can lead to unique and unexpected results. For example, I discovered that using natural elements like trees or rocks can create interesting framing for my subject. I believe that being budget-conscious can enhance our skills as photographers. It encourages us to think outside the box and appreciate the beauty around us without relying on expensive gear. Plus, it’s a great way to explore local parks, wildlife reserves, and even our backyards, all while saving money. Wildlife photography becomes more accessible, allowing us to share our passion with others and inspire them to take part in this beautiful hobby. Read Interesting article: Explore Wildlife Photography Tours: Budget-Friendly Guide

Essential Gear for Budget Wildlife Photography

Camera Options for Beginners

As I started my journey into wildlife photography, I quickly learned that having the right camera can make a significant difference, but it doesn’t mean you need to buy the latest model. I often recommend beginners look into second-hand options or entry-level DSLRs and mirrorless cameras. These can produce high-quality images without breaking the bank. I still use my trusty beginner camera, which has served me well in capturing stunning images. Look for cameras with good autofocus systems and decent low-light performance. It makes a world of difference when you’re trying to capture animals at dawn or dusk, which are often the best times for wildlife activity.

Budget-Friendly Lenses

When it comes to lenses, I can’t stress enough how important versatility is, especially for wildlife photography. Zoom lenses can be your best friend. I started with a budget-friendly 70-300mm lens, which allowed me to get close to my subjects without disturbing them. This flexibility means I can shoot both landscapes and wildlife without constantly switching out lenses. I’ve found that investing in a good quality lens can elevate your images significantly. There are plenty of affordable options from reputable brands to help you capture those breathtaking moments.

Tripods and Stabilization Tools

Stability is key when photographing wildlife, especially if you’re using a longer lens. I learned this the hard way when a few of my shots turned out blurry due to camera shake. A sturdy tripod is an essential piece of gear, but I understand budget constraints. Luckily, there are great options available at various price points. A lightweight tripod is particularly helpful if you’re hiking, as it won’t weigh you down. Additionally, consider using a monopod for added support while remaining mobile. I’ve found that a simple stabilizer can significantly enhance image quality.

Accessories: Filters, Memory Cards, and More

Accessories may seem minor, but they can enhance your photography experience. For instance, investing in a polarizing filter can help reduce glare and enhance colors in your landscape shots. I’ve used filters extensively to bring out the vibrant greens of foliage and the rich blues of the sky. Memory cards are another crucial investment; I always carry a few extras on trips to ensure I never miss a moment due to lack of storage. And don’t forget about a good camera bag to keep everything organized and protected during your adventures. I remember the peace of mind I felt knowing my gear was safe while I explored new areas.

Best Locations for Wildlife Photography

National Parks and Wildlife Reserves

One of my favorite places to capture wildlife is in national parks and wildlife reserves. These areas are often teeming with various species, thanks to their protected status. I remember my first visit to Yellowstone National Park; I was in awe of the bison roaming freely and the elk grazing near the streams. The landscapes were just as stunning, with geysers and mountains creating a breathtaking backdrop for my photos. Each trip feels like a new adventure where I can witness different animals in their natural habitat. I recommend checking out local regulations and guidelines for each park, as they can help you identify the best times and areas to spot wildlife.

Urban Wildlife Hotspots

It might surprise you, but urban areas can offer excellent opportunities for wildlife photography too! I’ve spotted hawks perched on city buildings and raccoons rummaging through parks. Urban wildlife often adapts to human presence, making it easier to observe them. I suggest exploring local parks, botanical gardens, or waterfronts in your city. Sometimes, just a short walk can lead to incredible encounters. I once spent an afternoon at a city park and ended up capturing stunning images of a family of ducks paddling through a pond. The vibrant colors and lively scenes reminded me that nature is all around us, even in bustling cities.

Local Nature Trails and Parks

Don’t overlook the value of local nature trails and parks. These hidden gems can provide a wealth of wildlife photography opportunities. I often visit trails near my home, where I’ve come across everything from squirrels to deer. The beauty of these locations is that they’re usually less crowded, allowing for a more peaceful shooting experience. I recommend taking the time to walk different trails during various seasons. You’ll be amazed at how the changing environment affects the wildlife you encounter. The more familiar you become with these locations, the better your chances of capturing those perfect moments.

Hidden Gems for Wildlife Viewing

Sometimes the best spots are the ones that aren’t well-known. I’ve discovered several hidden gems through local photographer communities and word of mouth. These lesser-known locations can provide an intimate experience with wildlife, often with fewer photographers around. For example, I found a small wetland area tucked away from the main roads, where I observed herons and frogs in their natural habitat. I encourage you to seek recommendations from fellow photographers or do some online research to uncover these hidden treasures. Exploring new areas can lead to unforgettable experiences and stunning shots you might not get at more popular locations.

Timing Your Photography Sessions

Best Seasons for Wildlife Photography

Timing is everything in wildlife photography. From my experience, different seasons offer unique opportunities for capturing various animals. For instance, spring is a fantastic time for birdwatching as many species return to nest and raise their young. I’ve had incredible luck photographing baby animals during this time, like fawns and ducklings. Fall is another magical season, as animals prepare for winter, and the foliage creates stunning backdrops. I’ve always felt that understanding seasonal patterns can significantly enhance the quality of your wildlife photographs.

Optimal Times of Day for Shooting

The best times for wildlife photography are often early morning and late afternoon, known as the “golden hours.” I’ve found that during these times, the light is softer, and animals are generally more active. I vividly remember waking up before sunrise to catch the first light hitting a misty lake, where I spotted a family of swans gliding majestically across the water. Those moments are not only beautiful but also incredibly rewarding. If you can plan your photography sessions around these times, you’re likely to achieve stunning results.

Weather Considerations and Their Impact

Weather can dramatically impact wildlife behavior and your photography. Overcast days are often ideal, as the diffused light minimizes harsh shadows and brings out vibrant colors. I’ve noticed that animals tend to be more active just before a rainstorm, making it an excellent time for shooting. However, I also love the challenge of capturing wildlife in different weather conditions. I once spent a day photographing in a light drizzle and ended up with some of my favorite shots of deer in the fog. Don’t shy away from unpredictable weather; it can lead to some truly unique and captivating images.

Techniques for Capturing Stunning Shots

Understanding Animal Behavior

One of the most rewarding aspects of wildlife photography is learning to read animal behavior. I remember the thrill of observing a family of foxes in my local park. By taking the time to watch their movements, I noticed they had a routine—they would often emerge from their den around the same time each evening. This knowledge allowed me to plan my visits and position myself for the best shots. Understanding patterns like feeding habits, mating seasons, and migration can help us anticipate when and where to find animals. I recommend spending time simply observing before raising your camera. It can lead to truly magical moments that feel authentic and raw.

Composition Tips for Landscape and Wildlife

Composition can make or break a photograph, and I’ve learned that a few simple techniques can elevate my wildlife images. The rule of thirds is a classic guideline that I always keep in mind. By placing my subject off-center, I create a more dynamic image. I also enjoy experimenting with leading lines—natural features like paths or rivers that draw the viewer’s eye toward the subject. Another technique I’ve embraced is the use of negative space. Sometimes, less is more, and allowing some empty space around the subject can emphasize its importance in the frame. I often find that practicing these techniques in my local parks greatly enhances my photography skills.

Utilizing Natural Light Effectively

Lighting is a crucial element in photography, and I’ve learned to harness natural light to my advantage. Early morning and late afternoon offer that golden, soft light that makes everything look magical. I often find myself chasing the light, especially during those hours. On overcast days, I’ve noticed that the diffused light can create a dreamy atmosphere, perfect for capturing the intricate details of animal fur or feathers. I also like to pay attention to how the light interacts with my subject—backlighting can produce stunning silhouettes. Understanding how to work with natural light has transformed my approach to wildlife photography and created some of my favorite images.

Zooming In: Close-Up Techniques

Capturing close-up shots can reveal stunning details that we often overlook. I love using my zoom lens to get intimate portraits of wildlife. It’s amazing how much personality you can capture in an animal’s eyes or the texture of its fur. One technique I’ve found effective is to get low to the ground. By lowering my perspective, I can create a more engaging composition that draws the viewer into the scene. Additionally, I try to focus on the animal’s eyes, as they often convey emotion and connection in the photograph. This technique has allowed me to capture some truly breathtaking close-ups that tell a story.

Editing Your Wildlife Photos on a Budget

Free and Low-Cost Editing Software Options

Editing can really enhance the beauty of wildlife photographs, and I’ve been thrilled to find several free or low-cost software options that deliver great results. Programs like GIMP and Darktable are fantastic resources for beginners. I started with GIMP and found its features surprisingly robust for a free program. For those who prefer a more user-friendly interface, I recommend trying out Adobe Lightroom’s mobile app. The editing tools are intuitive, and I’ve enjoyed using it to enhance my images while on the go. Finding the right editing software that fits your needs can take your wildlife photography to the next level without straining your budget.

Basic Editing Tips for Beginners

When I first started editing my photos, I found it helpful to keep things simple. Adjusting exposure and contrast made a noticeable difference in my images. I often play around with the saturation and vibrance to make colors pop, especially when capturing lush landscapes. Cropping is another essential tool for improving composition. I gradually learned to be cautious with filters, as they can sometimes take away from the natural beauty of the shot. My advice is to focus on enhancing what you’ve already captured rather than completely transforming the image. It’s all about showcasing the beauty of wildlife in its natural environment.

How to Enhance Color and Detail

To bring out the colors and details in my wildlife photographs, I often use sharpening and noise reduction tools during editing. I remember a time when I captured a stunning image of a bird just after it had rained. The colors were vibrant, but the image had a bit of noise due to the low light. By applying noise reduction, I was able to enhance the clarity without losing detail. Additionally, I love using tools like the brush or gradient filters to selectively enhance areas of the photograph. For instance, lightening the background can help the subject stand out. Understanding how to manipulate color and detail has been key in transforming good images into great ones.

Sharing and Showcasing Your Work

Building an Online Portfolio

Once I started building a collection of wildlife photographs, I realized how important it was to showcase my work. I created a simple online portfolio using platforms like Wix and Squarespace. These websites offer user-friendly templates that allow anyone, regardless of technical skills, to create a beautiful portfolio. I recommend selecting your best images to highlight your unique style and interests. It’s also helpful to categorize your work—like landscapes, close-ups, and different wildlife species—so viewers can easily navigate through your collection. Having an online presence has not only helped me share my passion but also connect with fellow photographers.

Social Media Strategies for Wildlife Photographers

Social media can be a powerful tool for sharing wildlife photography, and I’ve enjoyed connecting with other enthusiasts through platforms like Instagram and Facebook. I found that engaging with the photography community has been incredibly rewarding. I often use relevant hashtags, like #WildlifePhotography or #NatureLovers, to reach a broader audience. Posting regularly and sharing stories about my experiences while capturing images adds a personal touch that followers seem to appreciate. Additionally, I’ve participated in photography challenges and collaborations, which have helped me grow my skills and expand my network.

Entering Photography Contests and Exhibitions

Participating in photography contests and exhibitions has been another exciting avenue for showcasing my work. I remember entering my first contest, feeling nervous but excited to share my favorite wildlife shot. The feedback I received was invaluable and boosted my confidence. Many local and national competitions are open to photographers at all skill levels. I encourage you to research opportunities within your community or online. Exhibitions also provide a chance to display your work physically, allowing others to appreciate your passion for wildlife photography. These experiences have not only helped me grow as a photographer but have also connected me with amazing people who share the same passion. Read Interesting article: Capture Nature’s Wonders: Budget Wildlife Photography Tours

Additional Tips for Budget Wildlife Photography

Joining Photography Groups and Communities

Being part of photography groups has enriched my wildlife photography journey in countless ways. I remember when I joined a local photography club; it opened up a world of shared knowledge and support. I discovered new locations, learned different techniques, and even received constructive criticism that helped me improve. Whether online or in-person, these communities are filled with individuals who are eager to share their experiences and tips. Engaging in discussions and sharing our work creates an environment of learning and inspiration.

Leveraging Online Resources and Tutorials

There’s an abundance of online resources available for wildlife photographers, and I’ve found them incredibly helpful. Websites like YouTube have countless tutorials on techniques and editing tips. I often spend an evening watching videos to learn new skills or refine my existing ones. Blogs and forums also provide valuable insights from experienced photographers. I recommend taking advantage of these resources; they can significantly enhance your understanding of wildlife photography without requiring a financial investment.

Saving on Travel and Accommodation Expenses

Traveling to capture wildlife can sometimes be a financial challenge, but I’ve learned to be strategic about it. I often look for local workshops or photography tours that offer group rates or discounts. Carpooling with fellow photographers can also help cut down costs. For accommodation, I’ve found that camping or staying in budget-friendly lodges can save a lot of money while providing a unique experience close to nature. Planning trips during off-peak seasons can also lead to more affordable travel options. Embracing these strategies has allowed me to explore new areas without straining my wallet.

Frequently Asked Questions

What is the importance of wildlife in landscapes?

Wildlife photography captures the beauty and diversity of our planet, reminding us of the ecosystems we share. Observing animals in their natural settings adds life and context to landscapes, creating a powerful connection to nature.

Can you take stunning wildlife photographs on a budget?

Yes, wildlife photography can be done on a budget. Being cost-conscious encourages creativity and resourcefulness, leading to unique results without the need for expensive gear. Exploring local parks and reserves allows for accessible wildlife photography experiences.

What camera options are recommended for beginners in wildlife photography?

Beginners are advised to consider second-hand options or entry-level DSLRs and mirrorless cameras, which can produce high-quality images without a high cost. Look for cameras with good autofocus systems and low-light performance for better results during dawn or dusk.

Which types of lenses are best for budget wildlife photography?

Versatile zoom lenses are highly recommended, such as a budget-friendly 70-300mm lens. This type of lens allows photographers to get close to subjects while also being able to shoot landscapes, providing flexibility without needing to change lenses frequently.

What are the best locations for wildlife photography?

National parks, wildlife reserves, urban wildlife hotspots, local nature trails, and hidden gems are all excellent locations for wildlife photography. These areas often provide opportunities to observe various species in their natural habitats.

When is the best time to photograph wildlife?

The best seasons for wildlife photography include spring for birdwatching and fall for capturing animals preparing for winter. Additionally, early morning and late afternoon, known as the “golden hours,” offer the best lighting and increased animal activity.

How can understanding animal behavior improve wildlife photography?

Learning to read animal behavior helps photographers anticipate when and where to find animals. By observing their routines, such as feeding and migration patterns, photographers can plan their visits for optimal shooting opportunities.

What are some basic editing tips for wildlife photographs?

Basic editing tips include adjusting exposure, contrast, saturation, and cropping to improve composition. It’s important to focus on enhancing the natural beauty of the shot rather than transforming the image with excessive filters.

How can photographers showcase their work online?

Building an online portfolio using platforms like Wix or Squarespace is a great way to showcase wildlife photography. Selecting the best images and categorizing them can help viewers navigate the collection effectively.

What are some strategies for saving on travel and accommodation for wildlife photography?

To save on travel costs, consider local workshops or photography tours with group rates. Carpooling, camping, or finding budget-friendly lodges can also reduce expenses, along with planning trips during off-peak seasons for more affordable options.

Urban Landscape Photography: Travel on a Budget

Urban landscape photography offers a unique way to capture the essence of a city while traveling on a budget. I’ve found that with a little creativity and resourcefulness, stunning urban shots are within reach for everyone. For those looking to enhance their skills, check out Top Tips for Budget Urban Landscape Photography.

Urban Landscape Photography: Travel on a Budget

Understanding Urban Landscape Photography

Definition and Scope

Urban landscape photography is all about capturing the beauty of cities and their surroundings. It often includes man-made structures like buildings, bridges, and streets, mixed in with natural elements like parks and rivers. I remember my first experience with urban photography; it felt like stepping into a vibrant canvas where every corner told a different story. The scope of this genre is vast, and it allows photographers to showcase the relationship between humans and their environments.

The Importance of Urban Landscapes

Urban landscapes are significant because they reflect the culture, history, and everyday life of a city. When I look back at my own photos, I see not just structures but also the life that surrounds them—people bustling about, street performers, and the little moments that breathe life into the city. Capturing these elements helps to communicate the spirit of a place. For me, it’s more than just taking pictures; it’s about telling a story that resonates with those who view them.

Key Elements of Urban Landscape Photography

There are several key elements to consider when diving into urban landscape photography. First, composition is crucial. I often think about the rule of thirds, where placing the main subject off-center creates a more engaging photo. Secondly, light plays a significant role. The golden hour, just after sunrise or before sunset, offers soft, diffused light that can transform an ordinary scene into something magical. I’ve found that experimenting with various angles and perspectives can also lead to stunning results; sometimes, the best shot is from an unexpected viewpoint.

Another element to consider is the inclusion of people. While urban landscapes can be striking when devoid of human presence, I think that including people adds a layer of context and emotion. It can showcase the hustle and bustle of city life or even a quiet moment of reflection. Finally, don’t forget about the details. I often zoom in on unique architectural features or street art that tell a broader story about the city. Every small detail counts, and these elements can enhance the overall impact of the photograph. For more on gear, see Best Budget Gear for Urban Landscape Photography.

Equipment for Budget-Friendly Urban Photography

Essential Camera Gear

When it comes to urban landscape photography on a budget, you don’t need the latest and greatest gear to get started. I’ve found that even a basic camera can produce stunning results if you know how to use it. A DSLR or mirrorless camera is ideal, but many compact cameras and even older models can work well. The key is understanding your camera’s settings and learning how to adjust them for different lighting conditions. I spent hours fiddling with my settings to get the hang of it, and it paid off in the end.

Affordable Lens Options

Lenses can be a big part of your photography budget, but there are affordable options that can still give you great results. A versatile zoom lens, like a 24-70mm, can cover a wide range of scenarios, from wide cityscapes to closer architectural details. I also recommend considering prime lenses, like a 50mm lens, which are often more affordable and provide excellent image quality. If you’re on a super tight budget, check out second-hand gear. I once found a fantastic lens for half the price at a local camera shop.

Smartphone Photography Tips

Let’s not overlook the power of smartphone photography. Many smartphones today come equipped with impressive cameras that can produce high-quality images. I remember walking through the streets of New York City, snapping photos with my phone, and being amazed at how well they turned out. To make the most of smartphone photography, pay attention to lighting, utilize editing apps, and experiment with angles. Sometimes, holding your phone low to the ground or shooting from a higher vantage point can create striking images.

Accessories to Enhance Your Shots

While focusing on budget-friendly options, there are a few accessories that can enhance your urban photography without breaking the bank. A sturdy tripod is a must-have for low-light situations, especially at night when the city lights create stunning reflections. I also recommend a polarizing filter; it can reduce glare and enhance colors, making your images pop. Lastly, a camera bag that protects your gear while being easy to carry is essential when you’re exploring a city on foot. I’ve learned the hard way how important it is to keep my gear safe while on the move!

Choosing Your Urban Destination

Top Budget-Friendly Cities for Urban Photography

When planning my urban photography adventures, I’ve discovered that some cities are particularly kind to budget travelers. One of my favorite places is Lisbon, Portugal. The colorful buildings and vibrant street art provide endless inspiration, and the streetcar system makes it easy to explore. Plus, the food is delicious and affordable! Another great option is Mexico City. With its rich history and stunning architecture, I found it incredibly photogenic, and many museums offer free entry on certain days. I remember wandering through Coyoacán, capturing the charming streets that felt like stepping back in time.

If you’re looking for a blend of modern and historical, Chicago is another fantastic choice. The architecture there is iconic, and the lakeside parks create beautiful backdrops for urban landscapes. I spent a day at Millennium Park, where I not only photographed the famous Cloud Gate but also enjoyed the lively atmosphere. Lastly, consider Budapest, Hungary. The city’s mix of old-world charm and contemporary flair made for some striking contrasts in my photos. The thermal baths, bridges, and Parliament building all offered excellent opportunities for capturing stunning images. Don’t forget to check out Exploring Cities: Budget-Friendly Urban Landscape Shots for more inspiration.

Hidden Gems in Major Cities

While the popular tourist spots are always a great start, I’ve learned that some of the best urban photography moments come from discovering hidden gems. In New York City, for example, I stumbled upon the High Line, an elevated park built on a historic freight rail line. It offers unique views of the city and a peaceful escape from the bustling streets below. I remember capturing the juxtaposition of greenery against the urban backdrop; it was a perfect blend of nature and architecture.

Another hidden treasure is the neighborhood of Montmartre in Paris. While many flock to the Eiffel Tower, I found the narrow streets of Montmartre filled with quaint cafes and artists at work to be equally captivating. I’ve captured some of my favorite street portraits there, showcasing the local character. In Tokyo, areas like Yanaka offer a glimpse into traditional Japan, away from the neon lights. Wandering through the quiet streets, I discovered small temples and charming shops, which made for intimate urban shots.

Best Times to Visit Urban Locations

Timing can make or break your urban photography experience. I’ve noticed that visiting a city during off-peak seasons not only saves money but also provides better opportunities for photography. For instance, I found that going to Barcelona in late fall meant fewer crowds at popular sites like the Sagrada Familia, allowing me to capture the stunning architecture without people blocking my shots.

Moreover, early mornings or late afternoons are often the best times to shoot in urban environments. The soft light during these hours can create a magical atmosphere, and I’ve loved capturing the gentle glow of sunlit streets and the long shadows cast by buildings. I remember one particular morning in San Francisco when the fog rolled in, creating an ethereal mood that transformed the cityscape into something truly unique.

Seasonal events can also provide fantastic opportunities for urban photography. I’ve attended festivals and parades in various cities, where I captured vibrant colors and lively crowds. For example, taking photos during New Orleans’ Mardi Gras allowed me to document not just the floats but also the infectious energy of the city. I recommend keeping an eye on local calendars to find events that align with your travel plans.

Techniques for Capturing Stunning Urban Landscapes

Understanding Light and Composition

Once I’m out in the field, understanding light is crucial to my urban photography. I’ve learned that different times of day can completely change the mood of my images. During my trips, I often experiment with backlighting and side lighting, which can create dramatic effects. I remember a moment when I shot a building against the setting sun; the warm light illuminated the windows beautifully and added depth to the image.

Composition is another key aspect I always think about. Using leading lines, such as roads or pathways, can draw the viewer’s eye into the scene. I often try to frame my shots with interesting foreground elements, like trees or street furniture, which adds layers to the composition. I once framed a city skyline behind a row of cherry blossom trees, creating a beautiful blend of nature and urban life.

Framing and Perspective Tricks

When it comes to framing my shots, I love to get creative. Sometimes, I’ll use doorways, windows, or archways to frame my subject. This technique adds context and draws the viewer’s attention to the focal point. I remember standing in an alley in Rome, where I positioned myself at the end, framing the iconic Colosseum through an arched entrance. The result was a striking shot that showed the blend of old and new.

Perspective can also dramatically alter the way I capture a scene. I’ve had great success shooting from high vantage points, like rooftops or hills. The sweeping views of the city can be breathtaking. I found myself on a rooftop in Lisbon at sunset, capturing the sprawling city below bathed in golden light. Conversely, shooting from low angles can give a sense of grandeur to my subjects, making buildings appear even more imposing.

Utilizing Shadows and Reflections

Shadows and reflections are two of my favorite elements to play with in urban landscapes. When the sun is high, shadows can create interesting patterns and textures on the ground, adding depth to my photos. I remember a day in Chicago when the shadows cast by the skyscrapers created dramatic shapes that enhanced my images.

Reflections can also add an extra layer of intrigue to my shots. I often look for puddles or glass buildings that can mirror the cityscape. One of my best captures came from a rainy day in Seattle, where I found a perfect puddle reflecting the vibrant colors of the Space Needle. It created a fantastic symmetry that I still cherish.

Budget Travel Tips for Urban Photography

Finding Affordable Accommodation

When I plan my urban photography trips, finding affordable accommodation is always at the top of my list. I’ve discovered that staying in hostels or guesthouses can save a lot of money while providing a chance to meet fellow travelers. I remember my stay in a cozy hostel in the heart of Berlin, where the friendly atmosphere and communal spaces encouraged me to connect with other photographers. I often use platforms like Airbnb to find unique stays that fit my budget. Sometimes, I even choose locations just a bit outside the main tourist areas; it not only saves money but also allows me to explore neighborhoods that are less frequented by tourists.

Using Public Transport for Exploration

Public transportation is a game-changer when exploring a new city on a budget. I’ve found that cities often have excellent public transport systems that can take you to all the prime photography spots without the hassle of navigating traffic or incurring parking fees. In Paris, for instance, I hopped on the metro to reach various neighborhoods quickly, capturing the essence of the city as I went. Riding the subway also provides unique photo opportunities; I’ve snapped candid moments of locals and travelers alike. Just be sure to check the transport schedules and routes to maximize your exploration time!

Free or Low-Cost Attractions

There’s something thrilling about uncovering free or low-cost attractions during my travels. Many cities offer free walking tours that not only provide a wealth of information but also take you to hidden gems perfect for photography. I remember joining a walking tour in Lisbon, where we wandered through stunning alleys and picturesque viewpoints. I also look for parks and public squares, which often serve as beautiful backdrops for urban shots. Museums frequently have free admission days, allowing you to explore art and history without spending a dime. I’ve made some of my best memories capturing the art and architecture in these spaces.

Local Food on a Budget

Food is one of my favorite parts of traveling, but it can add up quickly. I always seek out local street food or markets, where I can enjoy delicious meals without breaking the bank. I remember my time in Bangkok, where the street food was not only affordable but also an authentic way to experience the city’s cuisine. Markets often provide a great backdrop for photography, too! Gathering images of vibrant fruits, locals preparing food, and the bustling atmosphere adds an extra layer to my urban story. I find that asking locals for their recommendations often leads to finding the best spots that aren’t in guidebooks.

Post-Processing Techniques for Urban Photography

Free Editing Software Options

Once I’ve captured my urban landscapes, I love diving into post-processing to enhance my images. There are several free editing software options available that I’ve found incredibly user-friendly. Programs like GIMP and Darktable have become staples in my editing routine. I remember feeling overwhelmed by editing at first, but these tools helped me gradually learn the ropes without spending any money. They allow you to adjust exposure, contrast, and colors—elements that can dramatically change the feel of a photo.

Basic Editing Techniques for Beginners

For those new to editing, I recommend starting with the basics. Simple adjustments, such as cropping to improve composition or adjusting brightness and contrast, can make a significant difference. I often play with saturation to make colors pop, especially in urban scenes where vibrant street art or architecture can shine. I’ve learned that a little tweaking can transform an average photo into something spectacular. One of my favorite techniques is sharpening the image just enough to enhance the details without making it look unnatural.

Enhancing Urban Landscapes: Filters and Effects

Filters can be a great way to add a unique touch to my urban photos. I’ve found that using subtle filters can help convey the mood of a scene or highlight certain colors. For example, I often apply a warm filter to sunset shots to enhance the golden hour glow. However, I always remind myself to use filters sparingly; I’ve seen images that look overly edited, and I prefer to keep my photos looking authentic. Additionally, adding a vignette effect can draw attention to the center of an image, which works well in busy urban environments. It’s all about finding a balance that enhances rather than overwhelms.

Frequently Asked Questions

What is urban landscape photography?

Urban landscape photography is the art of capturing the beauty of cities and their surroundings, often incorporating man-made structures like buildings and bridges alongside natural elements like parks and rivers. It showcases the relationship between humans and their environments.

Why are urban landscapes important?

Urban landscapes reflect the culture, history, and everyday life of a city. They communicate the spirit of a place by capturing not just structures but also the life surrounding them, including people and activities that bring the city to life.

What are some key elements to consider in urban landscape photography?

Key elements include composition, light, inclusion of people, and attention to detail. Using techniques like the rule of thirds, shooting during the golden hour, and capturing unique architectural features can enhance the overall impact of your photographs.

What camera gear is recommended for budget-friendly urban photography?

You don’t need the latest gear to start urban photography. A basic DSLR or mirrorless camera can work well, and affordable lenses like a 24-70mm zoom or a 50mm prime lens can provide great results. Second-hand gear is also a good option for saving money.

How can smartphone photography be utilized in urban landscapes?

Smartphones can produce high-quality images and are great for urban photography. To maximize their potential, focus on lighting, use editing apps, and experiment with different angles to create striking images.

What are some top budget-friendly cities for urban photography?

Some excellent budget-friendly cities for urban photography include Lisbon, Mexico City, Chicago, and Budapest. Each city offers unique architecture, vibrant street life, and affordable food options, making them ideal for capturing stunning urban landscapes.

What hidden gems can be explored for urban photography?

Hidden gems include places like the High Line in New York City, Montmartre in Paris, and Yanaka in Tokyo. These locations offer unique perspectives and intimate settings that can yield excellent photography opportunities away from typical tourist spots.

What are the best times to visit urban locations for photography?

Visiting cities during off-peak seasons and capturing images during early mornings or late afternoons can provide better opportunities for photography. Seasonal events, like festivals, also offer vibrant scenes to capture.

What post-processing techniques are recommended for urban photography?

Basic editing techniques such as cropping, adjusting brightness and contrast, and playing with saturation can enhance urban images. Free editing software like GIMP and Darktable can be useful for beginners to improve their photos without incurring costs.

How can affordable accommodation and transport benefit urban photography trips?

Staying in budget accommodations like hostels and using public transportation can save money and offer opportunities to meet fellow travelers and explore the city efficiently. This allows photographers to focus on capturing the essence of the city without spending excessively.